Joomla 3.9.18 + Virtuemart 3.8.2 + SP Builder 3.7.2 Documentation
Getting started
If you don't don't understand how to install template, please watch the video Flatastic installation. It's the same process https://youtu.be/kN3ZO8vwPRg
MY PERSONAL NOTICE! I don't advice to install the new VM versions. Usually we are testing it on our test server and after provide official update on Templateforest site
This method lets you install Joomla CMS engine, Joomla template, sample data and all the necessary extensions.
Creating a database
Once you've completed uploading the files to a hosting-server, you should prepare an empty database for your Joomla website. It should be created with the help of the database management tool in Hosting CPanel [MySQL Databases typically].
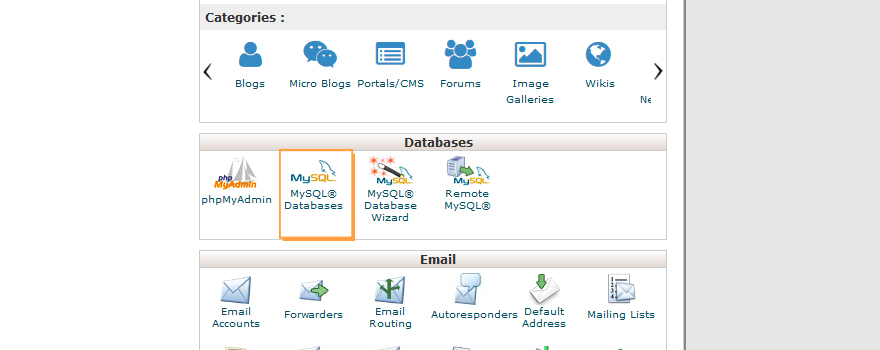
Follow the simple instructions to create a new database through the cPanel [check the slides below]:
- In order to access the list of databases, press the "MySQL Databases" button in the navigation menu.
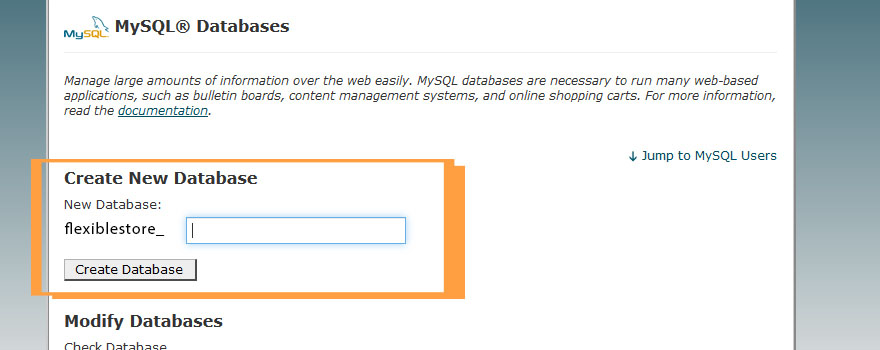
- Input the database name in the "New database" field.
- Press the “Create Database” button.
You will see the new database in the listing. Click on the database name link in order to get access to the one.
Check the instruction accompanied by the illustrations [click on switches to move on]:
1. Open the “MySQL Databases” tab in order to access the database listing:
2. Enter the database name and Press the “Create Database” button:
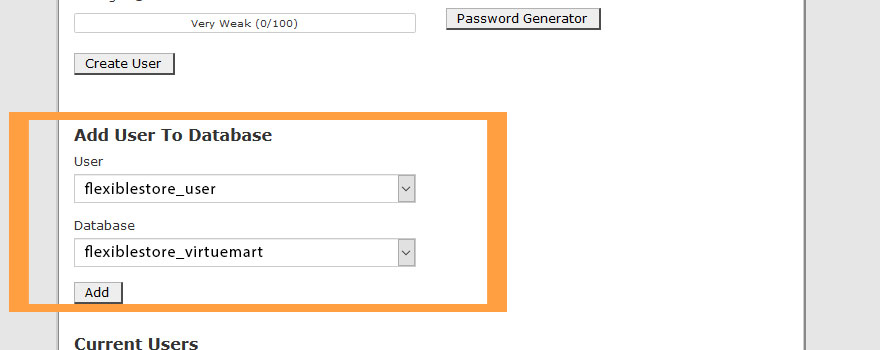
3. Apply your user to Database:
4. Give all Privileges:
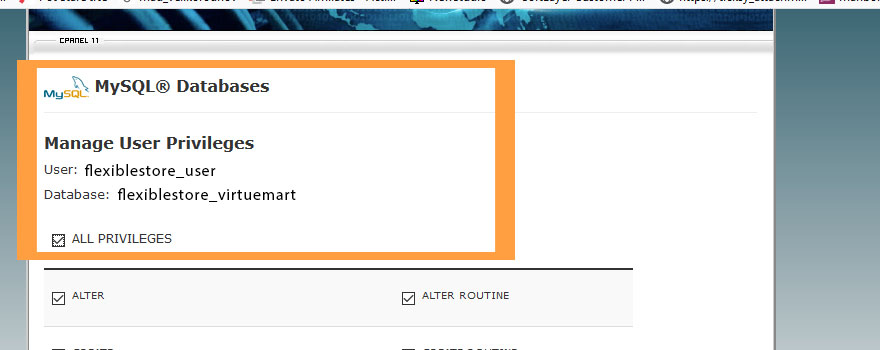
Should there be any issues when database creating, please contact your hosting provider to assist.
Uploading and Unzipping
To start working with Joomla, you need to upload files to your hosting server first. This can be accomplished either by your Hosting CPanel File Manager or FTP-client.
Follow the simple instruction:
- Open the template and access to 'joomla' folder.
- Select the 'unzip.php' and 'fullpackage.zip' files and upload them to your server. I advice to use cPanel for upload and Extract files].
-
Enter the pass to 'unzip.php' file on the server [http://your_domain_name/unzip.php] in the address bar.
-
You will see the following window:
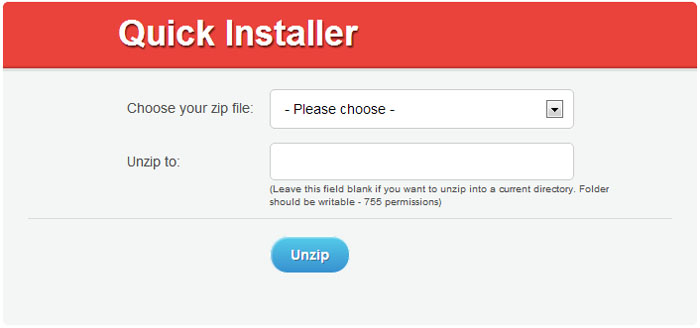
- In the field 'Choose your zip file’ select the uploaded fullpackage.zip file .
- In the field 'Unzip to’ choose the folder to unzip files.
- Press the 'Unzip’ button to unzip files.
- Another method:
- Upload file via cPanel and Click Extract button.
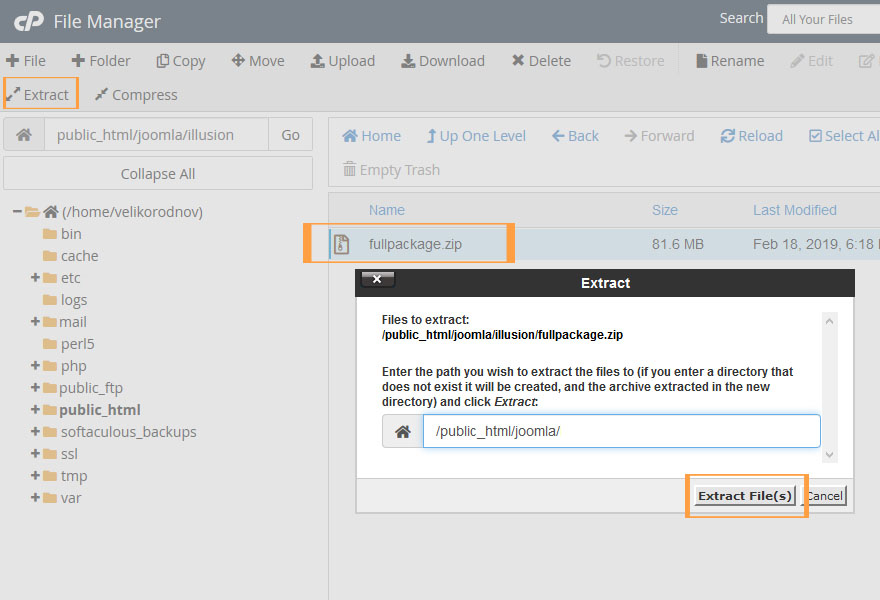
Make sure you've set the correct permissions type for the unzipping files folder. The permissions should be CHMOD 755 or 777, depending on the sever configuration.
Joomla CMS Installation
Please, complete all the preparation steps and install all the necessary software.
Open your browser and enter the path to Joomla folder in the browser address bar [for example, http://your_domain_name/joomla]. You will see the Joomla CMS Installation window.
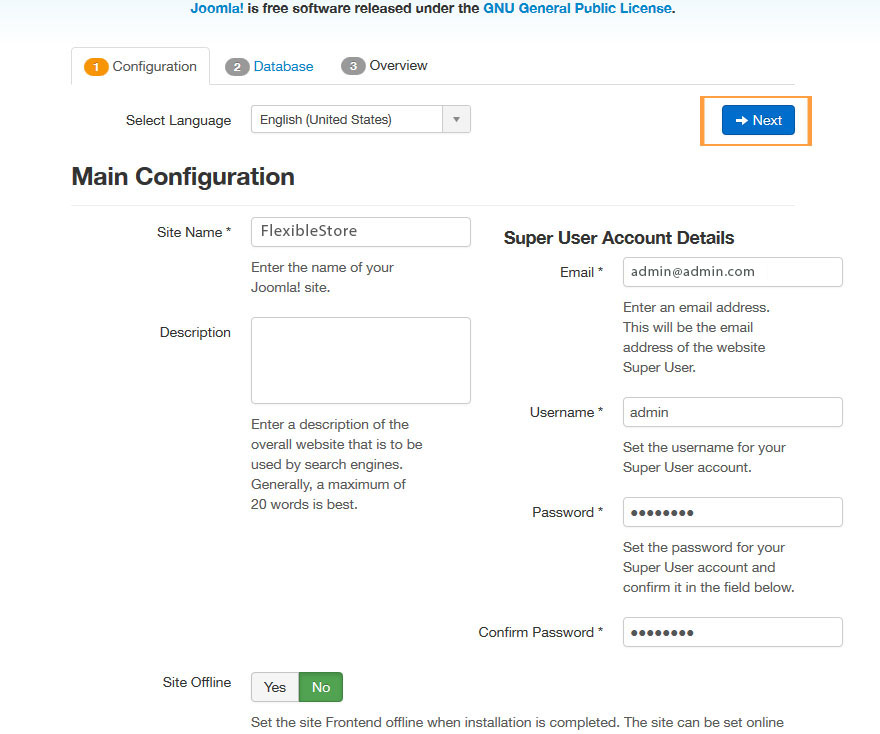
Website configuration
In the “Select Language” dropdown menu , select the language of your Joomla installation-master.
Attention: in the “Select Language” dropdown menu you have an option choose the language of the Joomla installation process only. You not select your website language.
Fill in all the form fields of the “Main Configuration” section. Be sure to complete all fields that are marked with an asterisk [ mandatory field].
Please fill in the fields: "Admin Email", "Admin Username" and "Admin Password" in the right column in order to create a new Joomla website user with admin rights.
"Admin Email", "Admin Username" and "Admin Password" each, is necessary for accessing Joomla website admin panel. Please keep the data confidential.
Once you've entered all the data, press the Next button in the upper right corner:
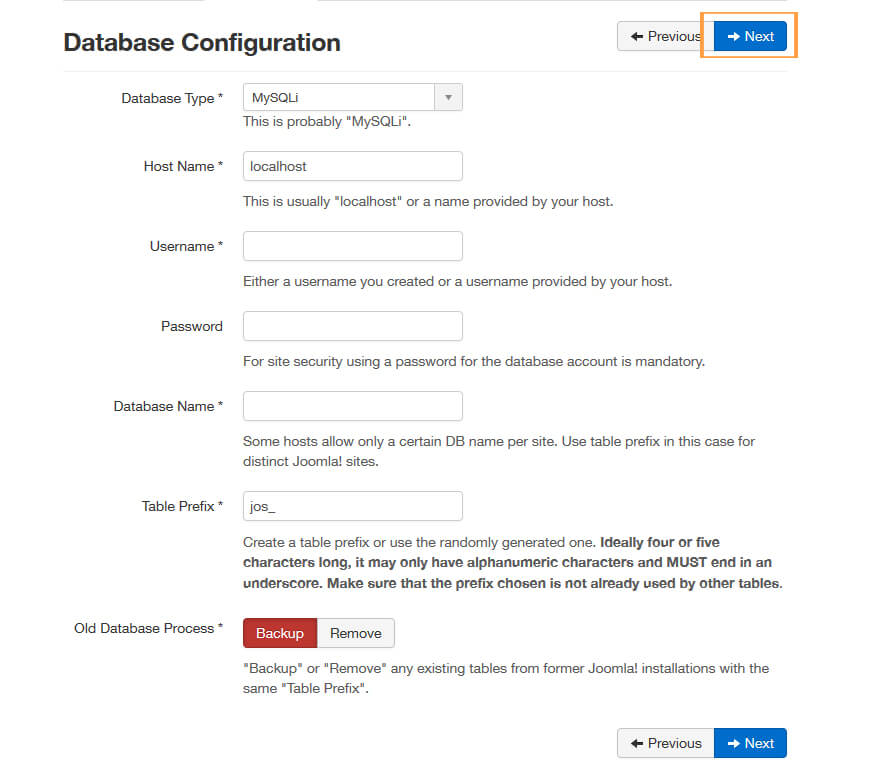
Database configuration
Then you need to input your database details. Please, contact your hosting provider to get the correct details.
Installing Joomla from scratch, you should just enter "Host Name", "Username", "Database Name" and "Password". You can normally leave other options set to Default. However, there can be some differences depending on your hosting provider.
Once you've entered all the details, press the Install button:
Overview
Joomla CMS installation is almost complete now. At the “Overview” stage you need to select, whether you want to install Joomla Sample data or not.
Attention: Sample Data are necessary to make your website similar to the template Live Demo: with all the sample images, texts and saved module settings. To import sample data, please choose Sample Data with the title "sample_flexibles.sql".
Please select sample data in case you want to install them or press "None", if you no sample data to be on your Joomla website:

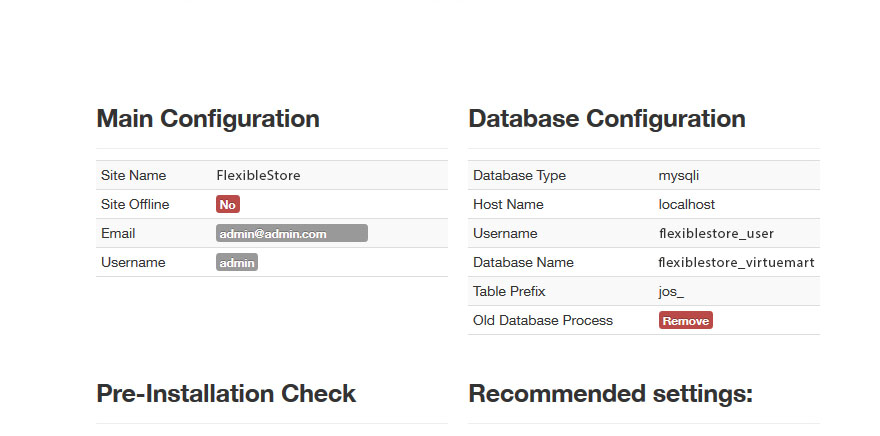
You can check, whether the database configuration and admin panel access details are valid, and e-mail it:
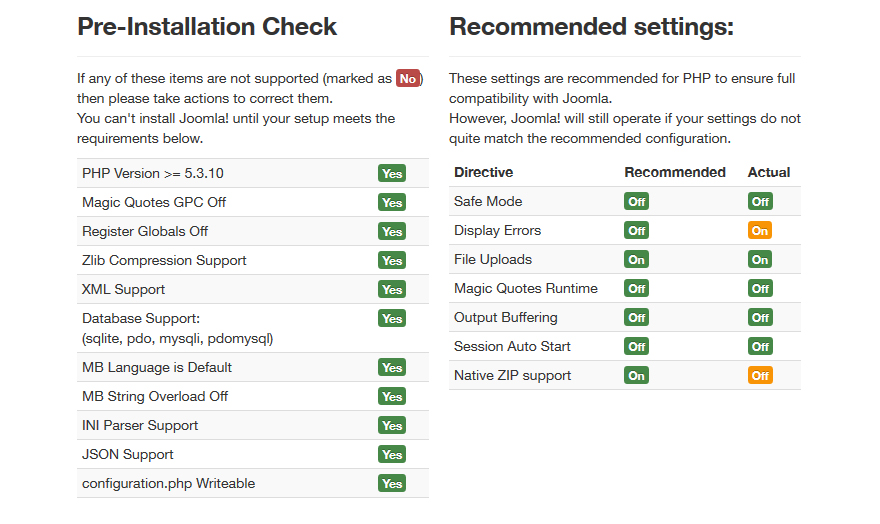
You can verify your hosting server conformity with the Joomla requirement and check your installation settings once again. Should warning notification boxes are displayed on the "Recommended settings" section, please contact your hosting provider for further assistance:
Click the Install button to proceed.
Installation Complete
Congratulations! You have successfully installed Joomla CMS.
As you see, it is not that complicated.
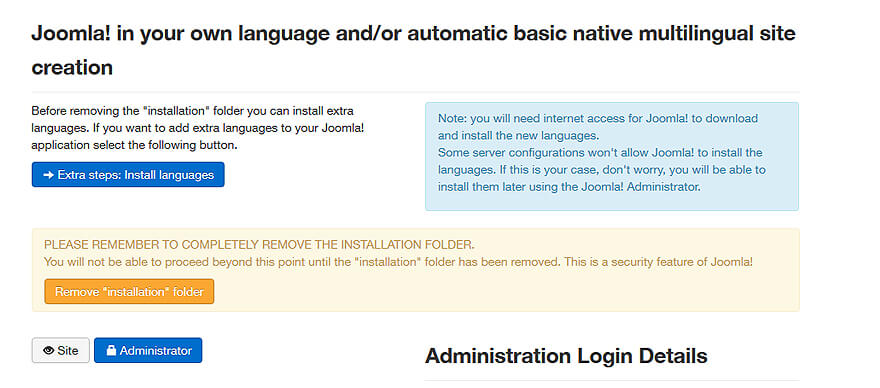
To enhance security level, please delete the "Installation" folder from your Joomla root directory.
Now you are ready to proceed to your Joomla CMS based website configuring. Click the “Site” button, in order to open your website or press “Administrator" to access your Joomla admin panel.
Some manipulations after installation
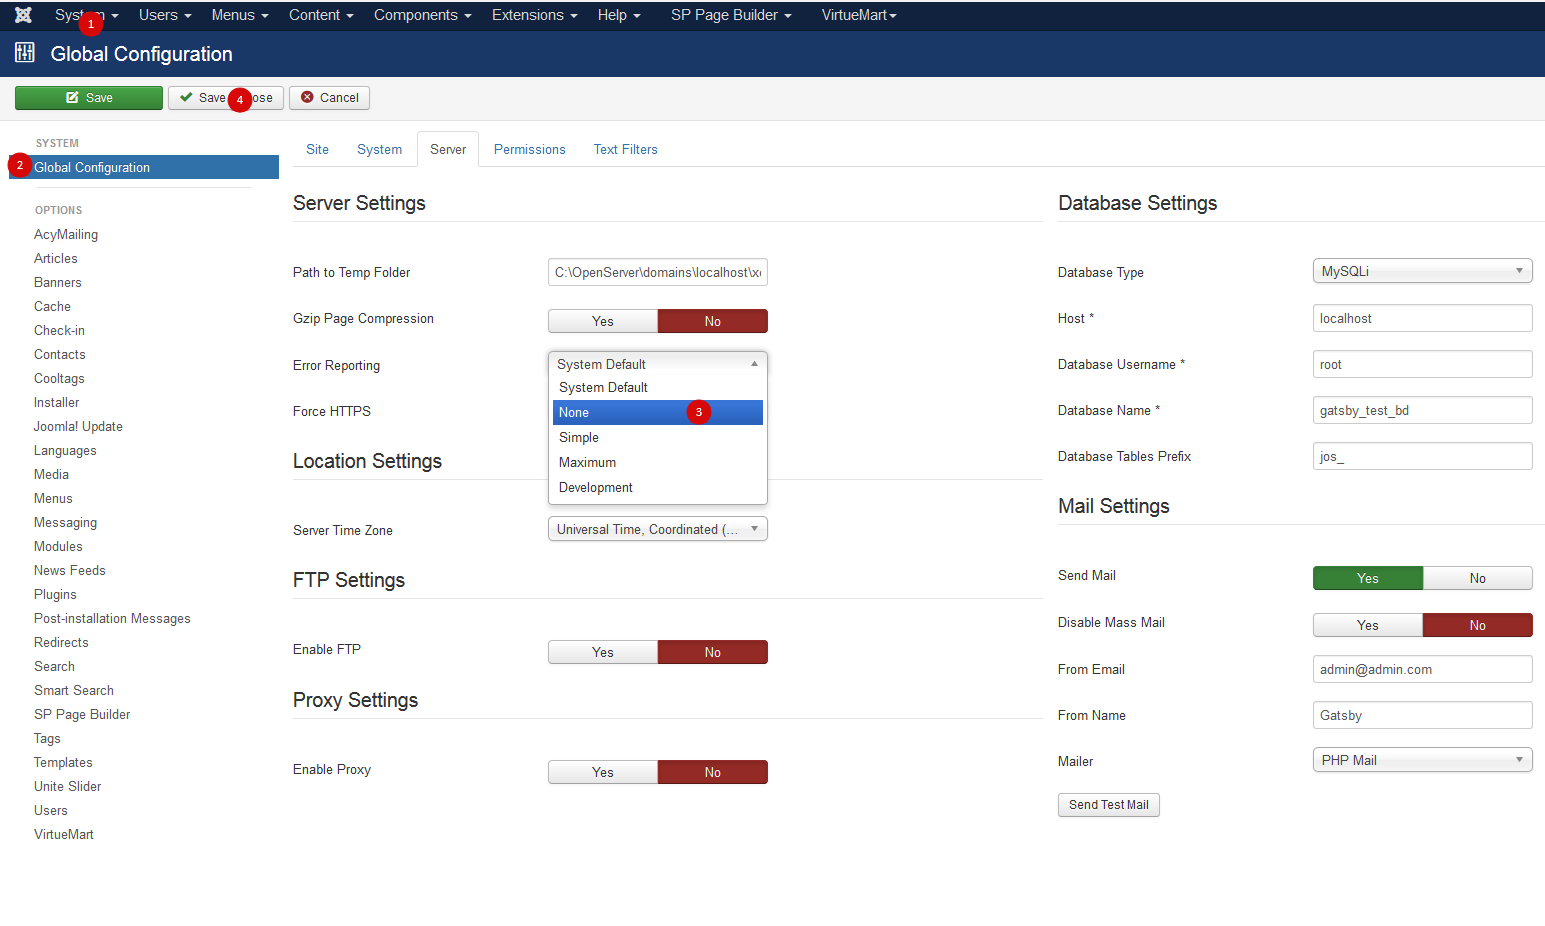
- Open configuration tab and switch off Error Reporting
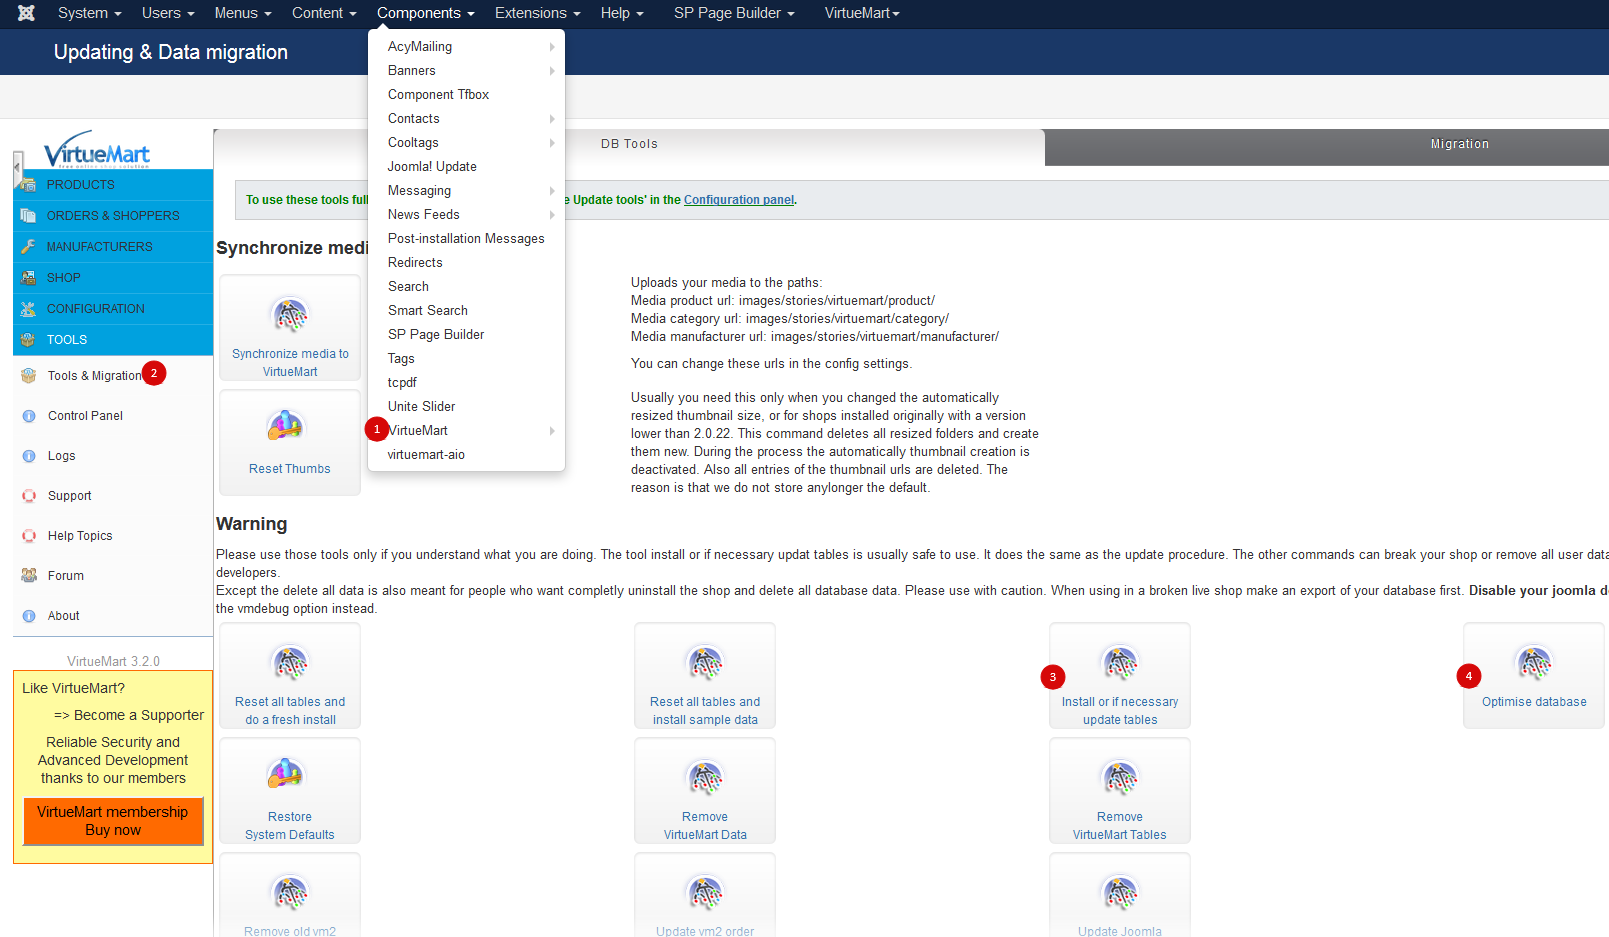
- Open Virtuemart--> Tools--> Tools & Migration and Optimize Database and Update Database
- Open Virtuemart--> Shop - fill all fields for vendor account
-
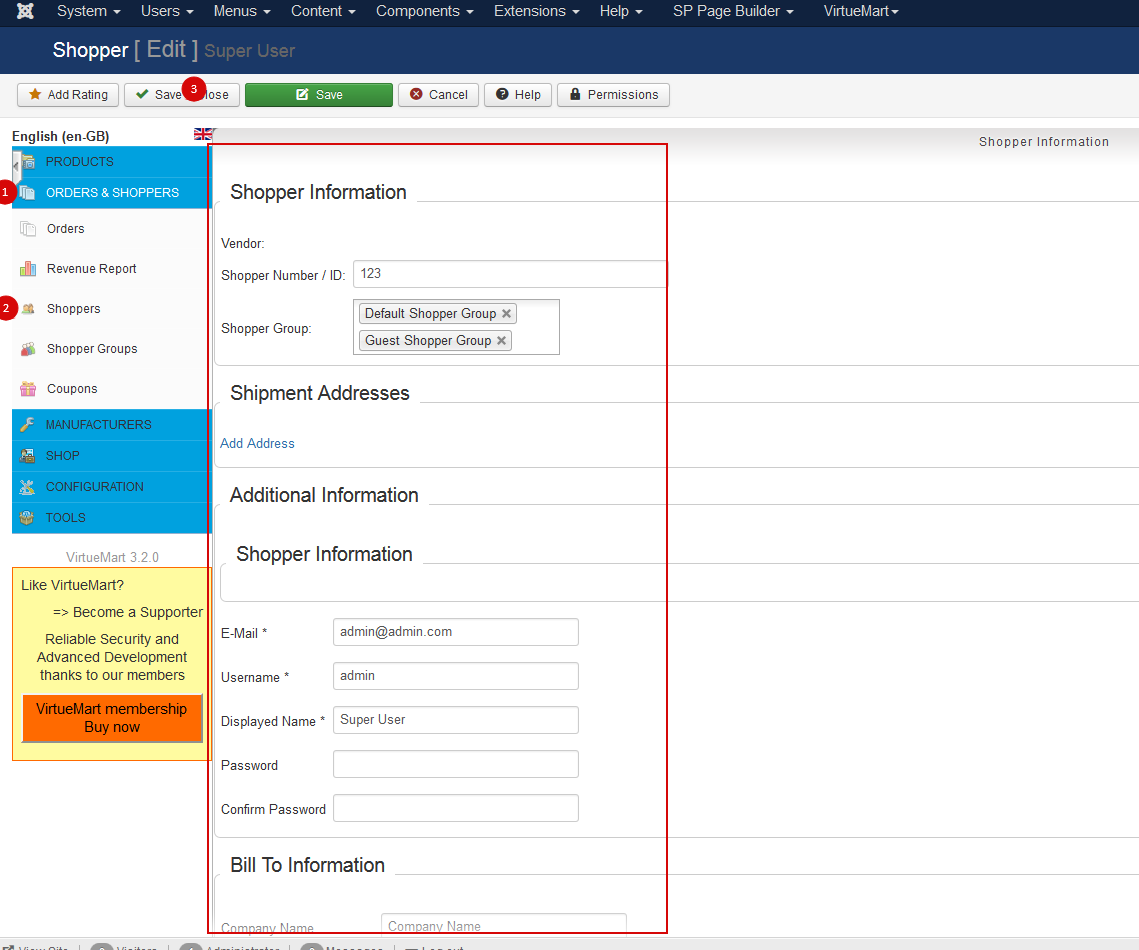
Open Virtuemart--> Orders & Shoppers --> Shopper check your account and Make your account as Vendor

There are all information about virtuemart here https://docs.virtuemart.net/
Open the site and use Flexible Joomla site with demo content
Here is a short course on how to customize the template. Important things:
- 1. Install the Firebug for the Firefox browser or use inbuilt one for Chrome by clicking the F12 button on your keyboard.
- 2. To hide the Wishlist and Compare buttons you need to hide them in css: .wishlist , #compare_cat {display:none;}
- 3. If your store has several currencies or simply use the currency module, then you can see bellow how to show and rename them:
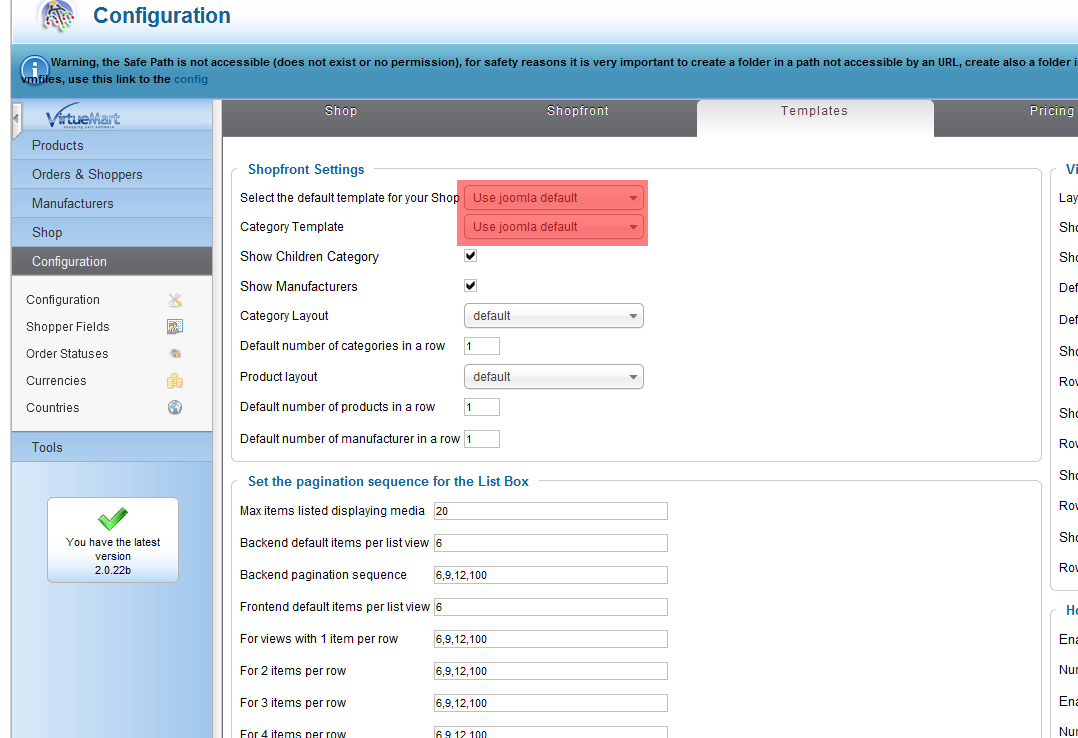
- 4. The pagination is adjusted in the config files. Attention! This adjustment is common for all (Configuration\Shopfront\Default items per listing view). The step in the drop-down list can be adjusted in the admin panel (Configuration\Templates\Set the pagination sequence for the List Box ). Also, you can adjust the pagination for the categories separately. For this you need to go to the categories and adjust the number of displayed items.
- 5. The following settings are no activated yet: Configuration\Templates\Default number of categories in a row , Default number of products in a row , Default number of manufacturer in a row. Now they show 1 item (by default) and you cannot change this via the admin panel. For this reason we removed them for some time in order not to destroyed the template. Once we sort this out and make them active, the template will be updated and you will be notified first.
- 6. There is a checkbox and the dimension for the small images in the store. When the checkbox is marked, then the images will be cut off according this dimension. If not marked, then you need to upload them by yourself. This is a mandatory condition for the normal displaying images in the store. The dimension of the small images is 280px x 280px, the big ones - 380px x 380px and bigger. Be sure that you keep the image proportion and then your store will look fine.
- Also, the admin panel has a possibility to synchronize all the images which are in the folder. Please see the screenshot above. By creating a product you need to choose them and not to upload (see the screensho below).
- 8. There are 2 modules in the Manager module (Display_none) and they should not be delete. These modules are not displayed anywhere but they check an accuracy of displaying. This is because of the VirueMart specificity.
- 9. Single product page. The displaying of all the possible prices can be edited in the template (templates\t3_bs3_blank\html\com_virtuemart\productdetails\default_showprices.php). Why did I comment the output of more than 10 prices? I output the final price and the price with the discount. Taxes and discounts you can find in the shopping cart. In the template these prices are not shown. If you need to show them, then you need to remove my comments from those code. You can hide the product rating, reviews with the comments and manufacturers in the admin panel: in order to hide the manufacturer write .stock {display:none;}. To hide the product code - .code {display:none;}. Hide social icons - .share {display:none;}. Hide the "ask a question" link - .ask-a-question {display:none;}. Hide the product dimensions and weight - .Dimensions {display:none;}.
- The templates which are used for the displaying custom fields and other stuff:
- 1. templates\t3_bs3_blank\html\com_virtuemart\productdetails\default_relatedproducts.php - this template for displaying related products. It means if you need to edit something that concerns the related products then you need to do this in this file; For the output the following code is used:
if (!empty($this->product->customfieldsRelatedProducts)) {
echo $this->loadTemplate('relatedproducts');
} - 2. templates\t3_bs3_blank\html\com_virtuemart\productdetails\default_addtocart.php - this template is for the adding products form. There are custom fields with the shopping cart attribute. For the output we use:
echo $this->loadTemplate('addtocart'); - 3. templates\t3_bs3_blank\html\com_virtuemart\productdetails\notify.php - this template outputs the info when a product is out of the stock. You can see this page via the adding a product to a shopping cart. In this case the "Add to Cart button" is replaced with the "notify me" button.
- 4. templates\t3_bs3_blank\html\com_virtuemart\productdetails\default_manufacturer.php - displaying the Manufacturers page.
- 5. templates\t3_bs3_blank\html\com_virtuemart\productdetails\default_video.php - this is a custom field for the video output on a single product page. The template is displayed as tabs. Position in the admin panel: $this->position = 'video'; and for the template: $this->loadTemplate('video')
- 6. templates\t3_bs3_blank\html\com_virtuemart\productdetails\default_relatedcategories.php - this is a related categories template. It is displayed in tabs echo $this->loadTemplate('relatedcategories');
- 7. templates\t3_bs3_blank\html\com_virtuemart\productdetails\default_showprices.php - this template for the displaying price. You can edit the price in this file. For the output: echo $this->loadTemplate('showprices');
- 8. templates\t3_bs3_blank\html\com_virtuemart\productdetails\default_reviews.php - the reviews and rating template, displayed in tabs. For the output use: loadTemplate('reviews'); ?>
Also, you can use jcomments. In order to switch off them via the admin panel, use the same wrap as for the reviews. If you want to output them you need to use product->event->afterDisplayContent; ?>. They are also shown in tabs. - 9. templates\t3_bs3_blank\html\com_virtuemart\productdetails\default_custom.php - a custom field for the custom info output on the single product page. The template is displayed in tabs. The position for the output is $this->position = 'custom'; and for the template $this->loadTemplate('custom'). If you want to output several custom fields, then you need to copy the template and rename it on custom2. On the single product page copy, rename it. Pay your attention on the tab IDs. In the admin panel create a custom field with a position which has been renamed by you. It should look like:
<?php if (!empty($this->product->customfieldsSorted['custom2'])) { ?>
<div class="accordion-group">
<div class="accordion-heading">
<a class="accordion-toggle collapsed" data-toggle="collapse" data-parent="#accordion" href="#collapseXXX">
<?php echo JText::_ ('COM_VIRTUEMART_CUSTOM_TAB_XXX'); ?>
<span class="VmArrowdown"></span>
</a>
</div>
<div id="collapseXXX" class="accordion-body collapse">
<div class="accordion-inner">
<?php
$this->position = 'custom2';
echo '<div class="custom">' .$this->loadTemplate('custom2').'</div>';
// Product custom2 ?>
</div>
</div>
</div>
<?php } ?> - 10. templates\t3_bs3_blank\html\com_virtuemart\productdetails\default_customfields.php - this is a standart custom field.
<?php
if (!empty($this->product->customfieldsSorted['normal'])) {
$this->position = 'normal';
echo $this->loadTemplate('customfields');
} // Product custom_fields END
// Product Packaging
?>
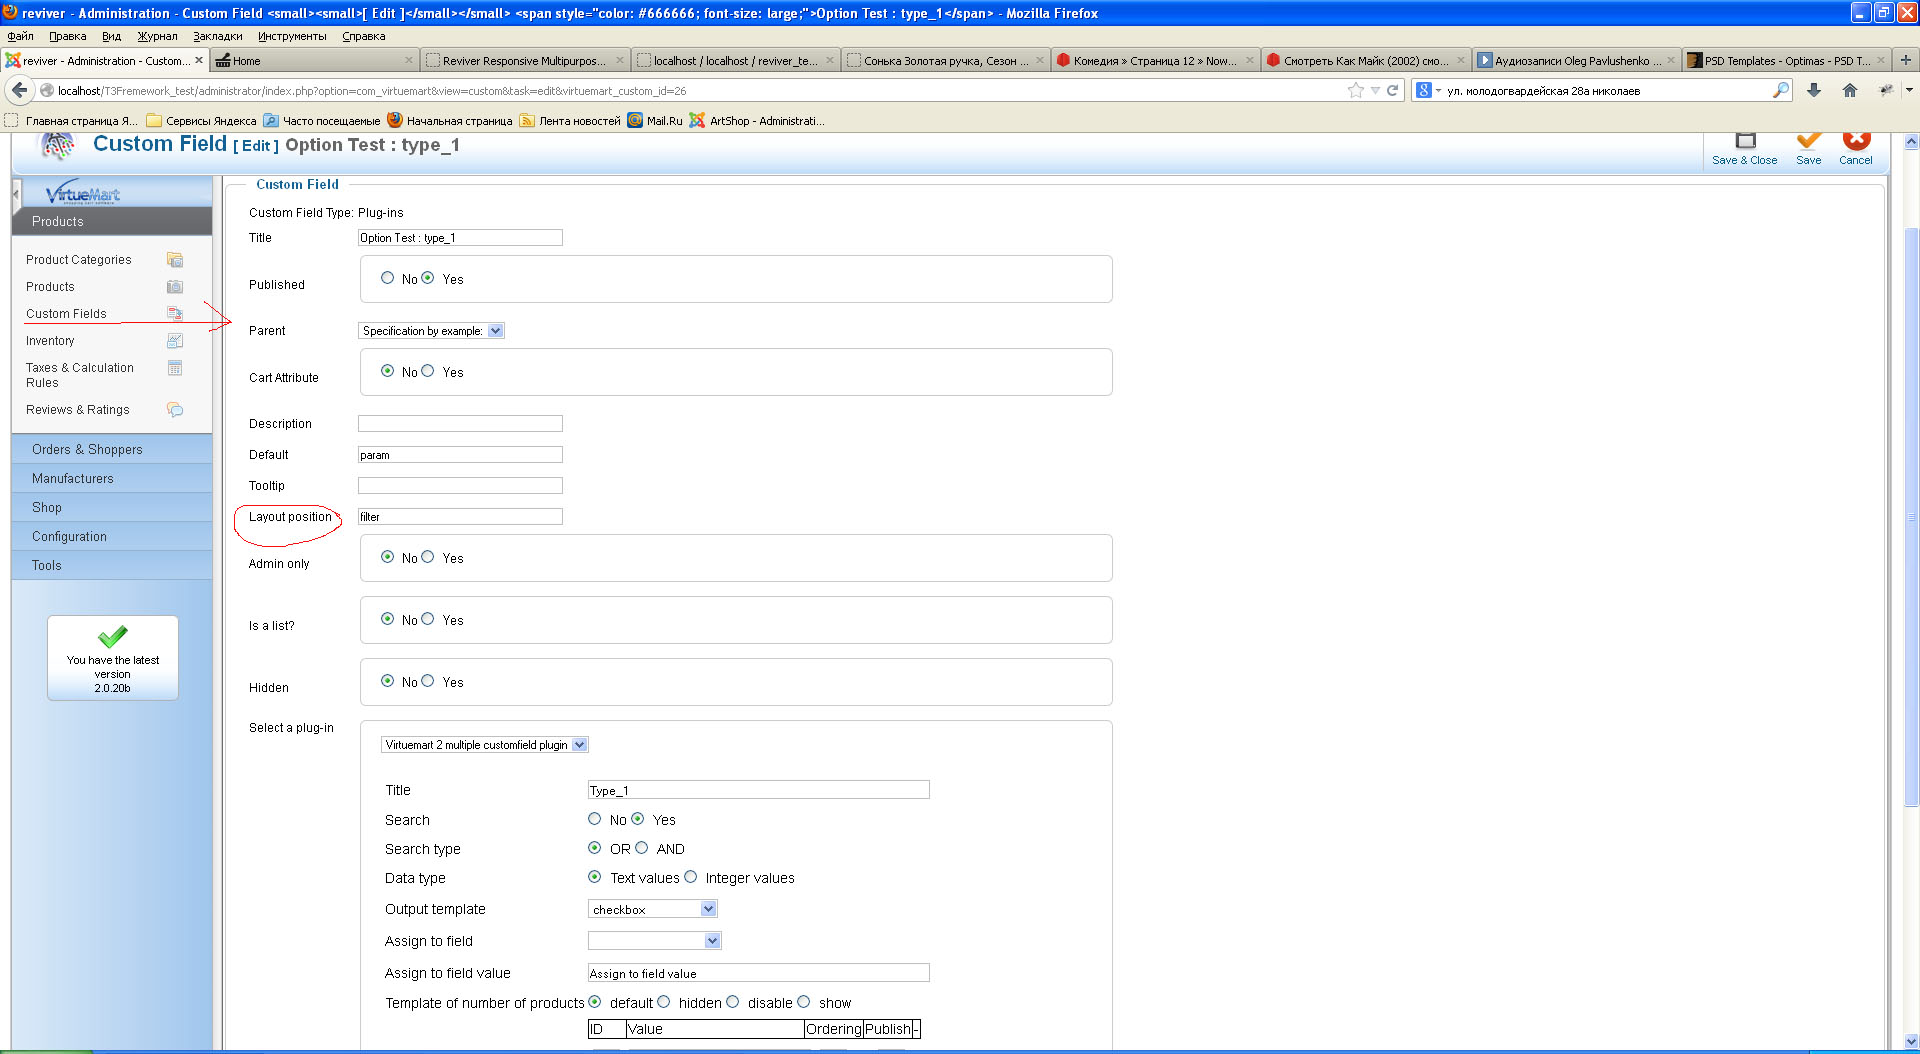
This field is displayed above the tabs. - 11. templates\t3_bs3_blank\html\com_virtuemart\productdetails\default_filter.php - this template for the output filter fields, they are displayed in tabs with description.
<?php
if (!empty($this->product->customfieldsSorted['filter'])) {
$this->position = 'filter';
echo '<div class="filter">' .$this->loadTemplate('filter').'</div>';
} // Product custom ?> - 12. templates\t3_bs3_blank\html\com_virtuemart\productdetails\default_recently.php - the recently viewed products template: echo $this->loadTemplate('recently');
- 13. templates\t3_bs3_blank\html\com_virtuemart\productdetails\default_images.php - you can edit this template only in a case if you refuse to use the (plg_vmslider) plugin which displays an image on a single product page. If you need to output custom fields in the template, then you can use the already ready templates or create your own templates with your positions and output these fields on a single product page:
- Custom Tab, Video, Related Categories, Related Products - are all the custom product fields which can be adjusted via the admin panel. Also, they are attached to the products and if you remove them in the product, then they will be hidden in the template.


<?php
if (!empty($this->product->customfieldsSorted['normal'])) { // this condition checks whether this template is used or not. If yes, then it is displayed. If not, it is empty.
$this->position = 'normal'; // the position which is responsible for the custom field output.
echo $this->loadTemplate('customfields'); // the template for the custom field editing.
} // Product custom_fields END
?>
The position is on the screenshot