Joomla 3.9.x Documentation
Joomla Social Login
Installation of Slogin
- Download package component Slogin at least version 2.3.0
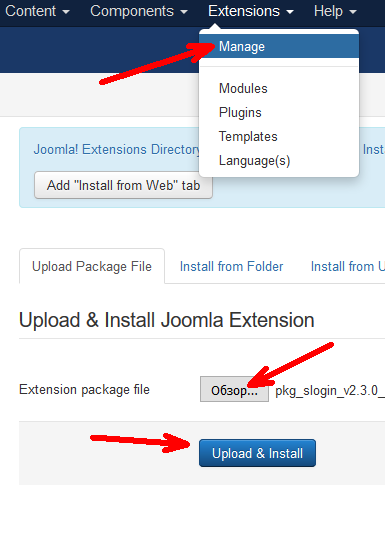
- Install the package by installing extensions Joomla. Extensions => Extensions Manager => Load package file => select the package Slogin => click "Upload and Install"
Setting Slogin for the service Slogin.info
- After installation, go to the component settings: Components => Slogin => Settings => go to the tab "Slogin Service Authentication".
- Then you need to get an ID and password, where to get them?
- Go to page: http://slogin.info/your-sites
- If you have not registered yet checking in, you can simply sign in through the social network.
- Click on the button "add site".
- In the "Callback" referenced format http://site.ru/index.php?option=com_slogin&task=check&plugin=service (site.ru replace on your website or you can copy the link from the field ready "Callbsck URL" in the settings Slogin ).
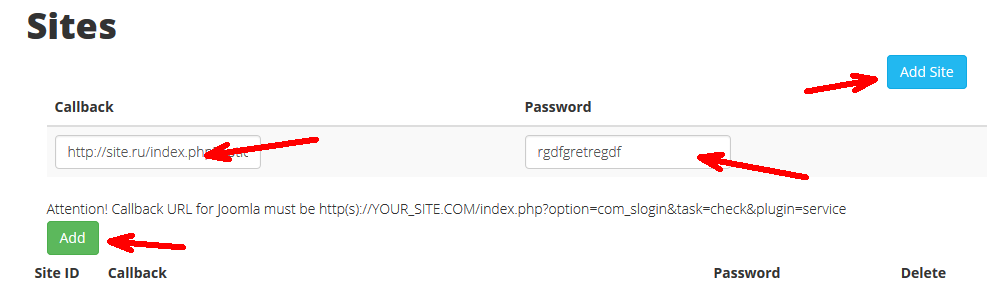
- In the "Password" field, enter the secret word.
- Click on the button "add".
- After adding a site gets its user ID and password, which is entered in the previous step.
- We put these settings field settings Slogin.
- Select the network that you want and save the settings.
- Now you need to publish the module in any position Slogin template. We pass into the Extensions => Modules => Module "Slogin".
System permissions SLogin
We do not deal with web server configuration , and do not deal with the diagnosis , web server configuration , advice on setting up and detect problems with the server software we do not provide .
Carefully read the requirements for component Slogin. To work component requires :
- Joomla 2.5 and Joomla 3.x.
- PHP version 5.2 and above, we recommend PHP 5.3.
- MySQL 5.0.41 or higher.
- Support CURL.
- Support for GD.
- Permitted connections with social networks in which you will request authorization .
Attention ! Log in at the closed site or the site is located on a local web server can not be carried out correctly.
Creating applications for authorization through social networks in joomla
Attention! Many social networks are domain www and without www, as different domains, so we recommend to decide on this matter in advance and set the preferred domain, as well as set up redirects to avoid further problems.
All settings of social networks are carried out through plug-ins. Settings can be found, Manager of extensions => Manager of plug-ins => group of plug-ins "slogin_auth".
- Settings Vkontakte
- Settings Google
- Settings Facebook
- Settings Twitter
- Settings Odnoklassniki
- Settings Mail.ru
- Settings Yandex
- Settings LinkedIn
- Settings LIve.com
- Settings Yahoo
- Settings WordPress
- Settings Instagram
Vkontakte
Beforehand it is required to set up a plug-in. Manager of extensions => Manager of plug-ins => group of plug-ins "slogin_auth" => plug-in "Social Login Vkontakte auth".
Go here and create new application. Choose Web-Site, enter name, site address and base domain. On the next page get Application ID and Secret Key and enter them in corresponding fields in component settings. Save settings and enable VKontakte login.

Beforehand it is required to set up a plug-in. Manager of extensions => Manager of plug-ins => group of plug-ins "slogin_auth" => plug-in "Social Login Google auth".
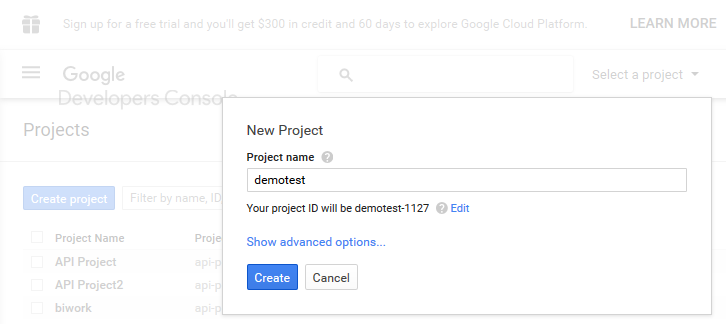
Go here and create new project. Enter it's name and click "API Access" on the next page. Hit the "Create an OAuth2 client ID" button, enter name (can be the same as project) and choose "Web application" as type. Now click on "More options" link, enter your site URL and put http://mysite/?option=com_slogin&task=check&plugin=google as Callback URI. Now get Client ID and Client Secret and enter them in corresponding fields in component settings. Save settings and enable Google login.
Create application google:
Configuring application google.
We pass on the name of the application menu => APIs & auth => credential
Create a new Client ID:
Select oAuth 2.0 client ID and its Web application.
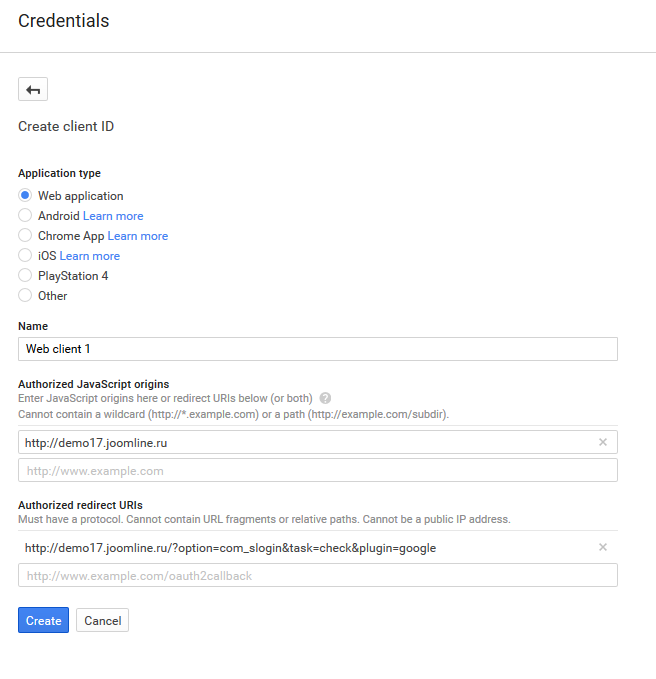
Gets something like this image:
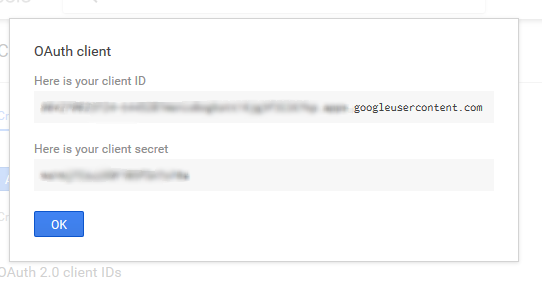
- Get client_id(Client ID) and secret_key(Client Secret).
Specify the name of the product and email:
Tab "OAuth consent screen"
Fill the "Product name"
Select in the "Email address" your email.
Beforehand it is required to set up a plug-in. Manager of extensions => Manager of plug-ins => group of plug-ins "slogin_auth" => plug-in "Social Login Facebook auth".
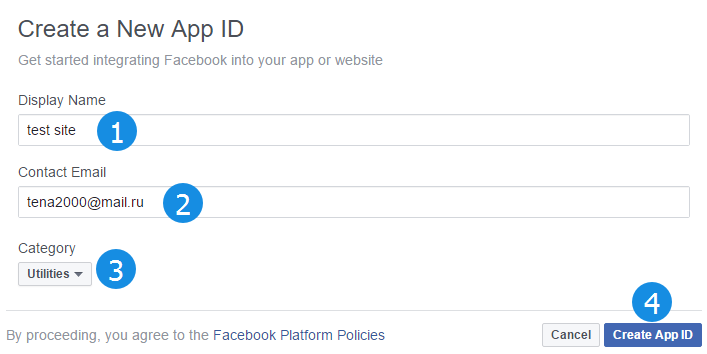
Go here and create new application.
Click on the "my Apps" => "Add a New App". Making the settings, see screenshot.
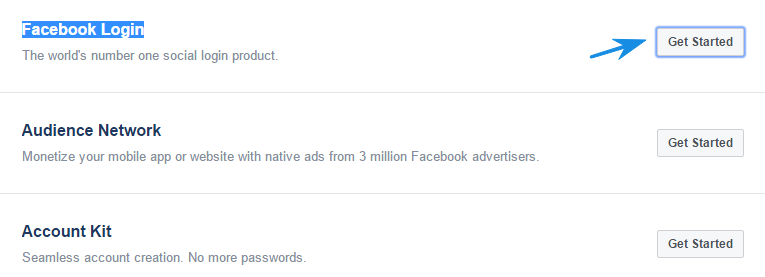
In the "Product Setup" => Facebook Login => click "Get Started".
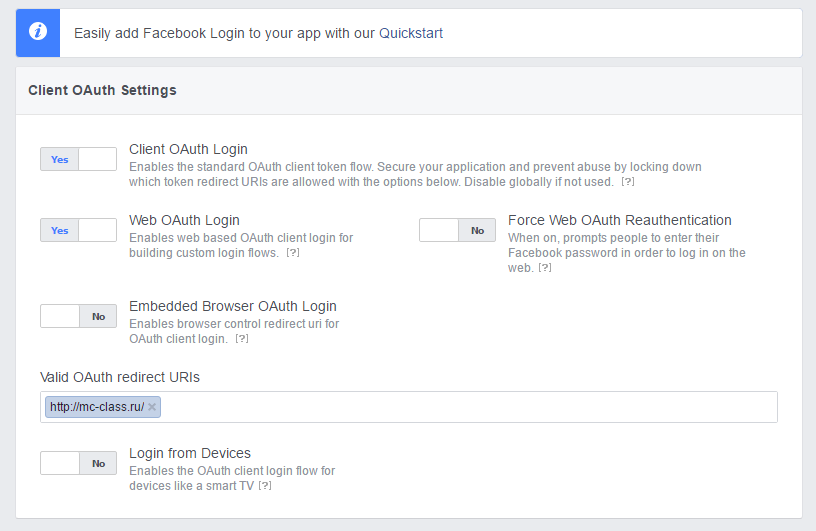
Specify site http://site.ru format. Click "Save Changes".
Go to the "App Review" section. In the "Make public?", Select "YES".
Go to the section "Dashboard" and copy settings client_id (App ID) and secret_key (App Secret) in Slogin Facebook plugin.
Attention! For administrator authorization application will display a message prompting you to pass moderation, do not necessarily will not be displayed to your visitors such posts as the rights that we ask Facebook does not require mandatory moderation.
Beforehand it is required to set up a plug-in. Manager of extensions => Manager of plug-ins => group of plug-ins "slogin_auth" => plug-in "Social Login Twitter auth".
Go here and create new applicaton.
Fill only required fields and save it. On the next page click "Create my access token" button and put Callback URL - http://mysite.com/component/slogin/callback/twitter or /?option=com_slogin%26task=check%26plugin=twitter (if you are not using SEF URLs Joomla), correct the link to see the Twitter plugin field "callback URL" as Callback URL. Now take Consumer Key(API key) and Consumer Secret(API secret) and enter them in corresponding fields in component settings. Save settings and enable Twitter login.


Odnoclassniki
Beforehand it is required to set up a plug-in. Manager of extensions => Manager of plug-ins => group of plug-ins "slogin_auth" => plug-in "Social Login Odnoclassniki auth".
Go here and register as a developer. Wait untill you request is approved, go here, fill the OAuth access form and wait again for approval email. Now go to your main Odnoklassniki Account -> Games -> My Downloaded -> Add New Application, choose Outside Odnoklassniki -> Oauth Authorization and fill the form completely (including image links!). You'll receve email shortly. Get Application ID, Public Key and Secret Key from it and enter them in corresponding fields in component settings. Save settings and enable Odnoclassniki login.

Mail.ru
Beforehand it is required to set up a plug-in. Manager of extensions => Manager of plug-ins => group of plug-ins "slogin_auth" => plug-in "Social Login mail auth".
Go here and create new application. Enter name and site address and click Continue. On the next page download receiver.html file, put it to yoursite.com/receiver.html and click Continue. Now get Application ID, Private Key and Secret Key and enter them in corresponding fields in component settings. Save settings and enable Mail.ru login.

Yandex
Beforehand it is required to set a plug-in of authentication of Yandex. Manager of extensions => Manager of plug-ins => group of plug-ins "slogin_auth" => plug-in "Social Login Yandex auth".
Go here and create new application.

We select "Яндекс.Логин". We mark: Адрес электронной почты, Дата рождения, Имя пользователя, ФИО, пол.
Callback URI
http://mysite.ru/?option=com_slogin&task=plugins.check&plugin=yandex
Beforehand it is required to set a plug-in of authentication of LinkedIn. Manager of extensions => Manager of plug-ins => group of plug-ins "slogin_auth" => plug-in "Social Login LinkedIn auth".
Go here and create new application. Click on "Create Application".
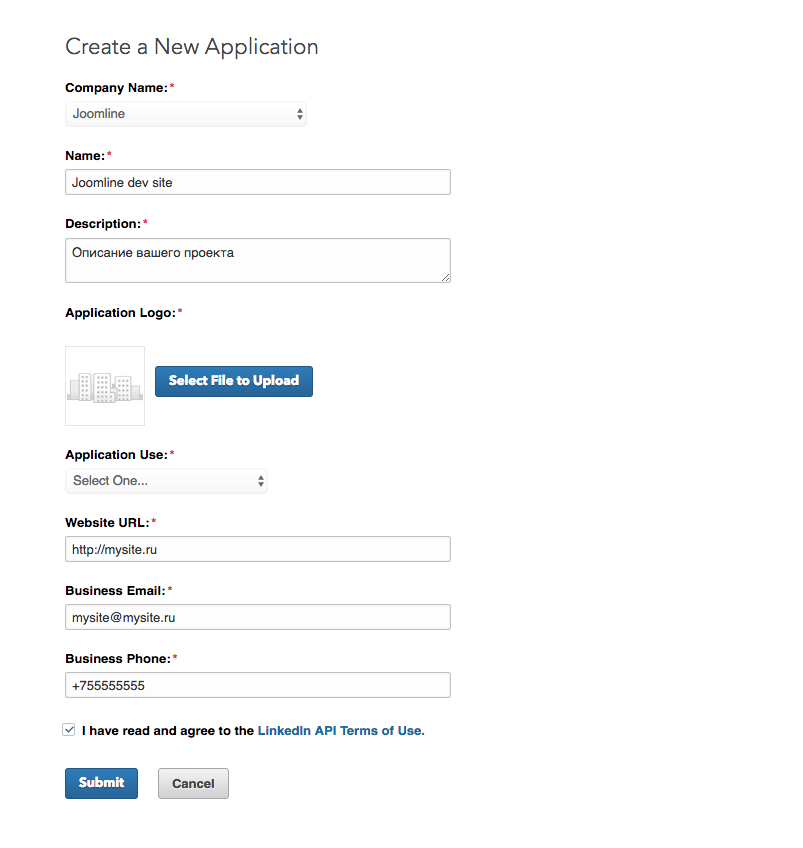
Fill all fields marked by an asterisk. Click on "Submit".
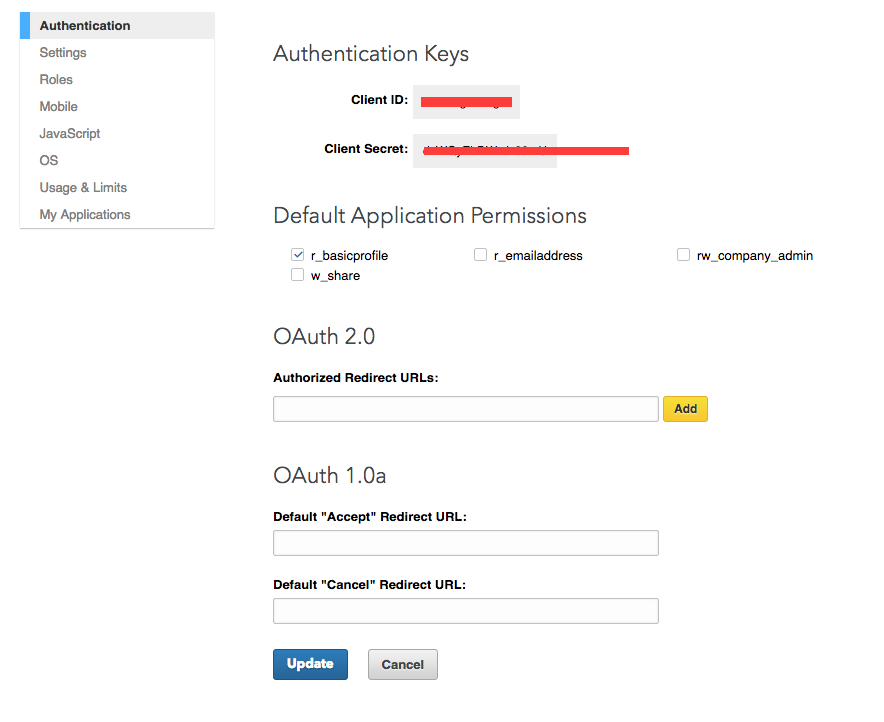
We get this page. insert into the appropriate fields of a plug-in.
Live.com
Beforehand it is required to set a plug-in of authentication of Live. Manager of extensions => Manager of plug-ins => group of plug-ins "slogin_auth" => plug-in "Social Login Live.com auth".
Go here and create new application.

Callback URI
http://mysite.ru
Save application. Now get Client ID and Client secret on the same page and enter them in corresponding fields in plugin settings. Save settings and enable Live.com plugin.
Yahoo
Beforehand it is required to set a plug-in of authentication of Live. Manager of extensions => Manager of plug-ins => group of plug-ins "slogin_auth" => plug-in "Social Login Yahoo auth".
Go here and create new application.

Save application. Now get Application ID, Consumer Key, Consumer Secret on the same page and enter them in corresponding fields in plugin settings. Save settings and enable Yahoo plugin.
WordPress - настройка авторизации через сервисы WordPress
Beforehand it is required to set a plug-in of authentication of Live. Manager of extensions => Manager of plug-ins => group of plug-ins "slogin_auth" => plugin "Social Login Wordpress auth".
Go here and create new application.
Callback URI: http://site.ru/?option=com_slogin&task=check&plugin=wordpress

Copy Client ID field and Client Secret plug in the appropriate fields.

Instagram - настройка авторизации через сервисы Instagram
Beforehand it is required to set a plug-in of authentication of Live. Manager of extensions => Manager of plug-ins => group of plug-ins "slogin_auth" => plugin "Social Login Instagram auth".
Go here and create new application.
Callback URI: http://site.ru/?option=com_slogin&task=check&plugin=instagram

Copy the data from the fields Client ID and Client Secret, paste the appropriate fields plugin.
Slogin integrations with Joomla components
Plugins requiring activation after Slogin basic package installation.
Social Login Plugin activation is strongly recommended – in order to avoid of duplicating social-authorized users.
Activate Slogin Profile Plugin if you need avatars support.
Activate JComments Social Login Plugin if you need to insert authorization block in the JComments.
If you need to display avatars in JComments, download plugin JComments Avatars Plugin (version 4 and above), install it, activate and select Slogin avatars support option. Don’t forget to activate the Slogin Profile Plugin.
Separate plugins for various integrations with Slogin.
Free plugins:
You can download following plugins from our file archive
- Plugin for integration with Community Builder – after installation through extension manager find it in plugin manager and activate.
- Plugin for integration with Easyblog – after installation through extension manager find it in plugin manager and activate.
Commercial plugins:
- Slogin – K2 integration
- JoomShopping integration.
- SLogin – JomSocial integration
- Community Builder integration
We can integrate Slogin with any other Joomla components. Please, contact us using details at the top of the page.