WOOF - WooCommerce Products Filter 2.1.8
WOOF - Easy&Flexible!
- Created: 12-05-2015 (d-m-Y)
- Latest update: 02-12-2017 (d-m-Y)
- By: realmag777
- Site: www.woocommerce-filter.com
- Contact&Support: CODECANYON.COM

Thanks you for buying of my plugin. I hope its will give for your site more power and more fun for your clients =)
Installation
- Go to your codecanyon account on page download to get the plugin bundle
- Unpack downloaded codecanyon bundle zip
- In your wordpress site go to: http://YOUR_SITE.com/wp-admin/plugin-install.php?tab=upload
- Press there button 'View'
- Find unzipped codecanyon folder, open it, find there woocommerce-products-filter.zip and select it
- Press 'Install Now' link
- Wait a little
- After installation finish press 'Activate Now' link
- For the best working with the plugin set permalinks for your site: http://YOUR_SITE.com/wp-admin/options-permalink.php
Common Settings -> Post Name (/%postname%/) or any another
Product permalink base -> Shop base with category (/shop/%product_cat%/) or any another
-
Settings in http://YOUR_SITE.com/wp-admin/admin.php?page==products§ion=display -> should be:
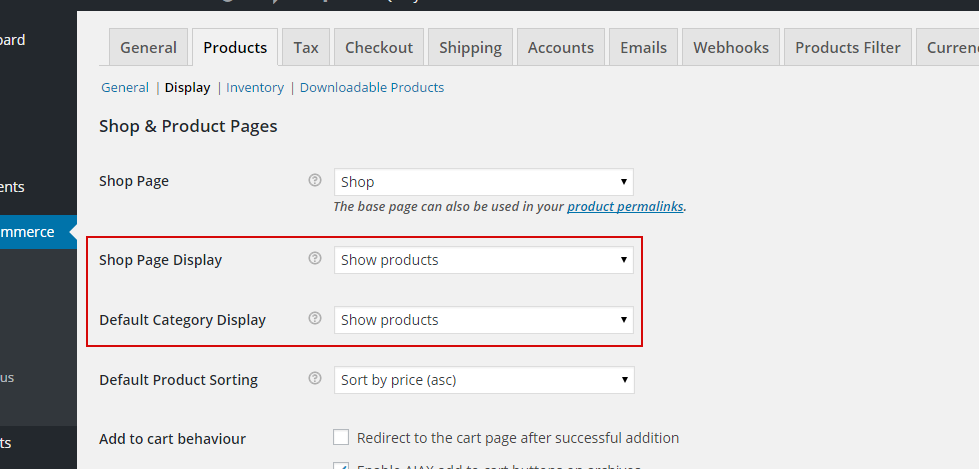
- Press 'Settings':

OR go to: http://YOUR_SITE.com/wp-admin/adminwc-settings&tab.php?page=wc-settings&tab=woof
Settings
Settings of the plugin you can find by link: http://YOUR_SITE.com/wp-admin/admin.php?page=wc-settings&tab=woof
Settings of the plugin has 6 tabs
-
Structure
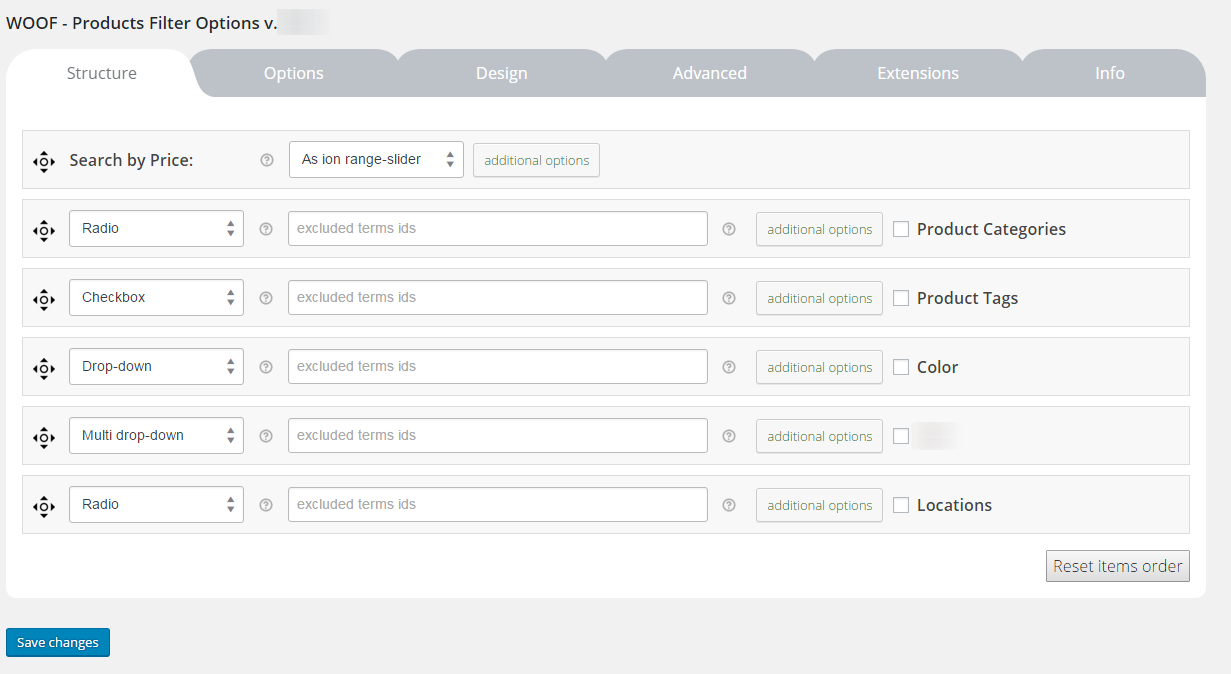
- All this items names as filter-elements: taxonomies filter-elements and by-filter-elements
- In each row of taxonomies filter-elements you can see 5 items
- First item is image, you can drag it and change the ordering of elements on the front
- Second item is drop-down by which you can change view of selected taxonomy terms on front. There is 7 types in the box: radio, checkbox, drop-down, multi drop-down, color, label, hierarchy drop-down
-
Look your attention on the color type. If select it and press 'Save' - you will see for each your color terms color-pickers and textinput for image url, by which you can set background for color-checkboxes on the front of the site.
Note: You can define description for each color in its term description textarea.
- Third item is textinput. You can exclude some terms from your filters using this element. Fot this you just need write their ID there using comma. For example: 25,77,103
- Fourth item is button. You can press it and you will found some additional options for the current taxonomy filter-element
- Show title label: You can hide taxonomy label if you need it.
- Taxonomy custom label: if you want to rename taxonomy label name on the site front
- Max height of the block: useful thing when you display taxonomy terms as checkboxes or radios and its has a lot of terms. You can set here max-height and your block visually will not be super big, 0 means no max-height
- Dispaly items in a row: Works for radio and checkboxes only. Allows show radio/checkboxes in 1 row!
- Fifth item: checkbox - check it if you want present current taxonomy or by-item on the site front
- With by-filter-elements all is more simple: drag-and-drop, name, drop-down for on/off and button with additional options (not necessary)
-
Options
- Set filter automatically: Set filter automatically on the shop page
- Autosubmit: Start searching just after changing any of the elements on the search form
- Show count: Show count of items near taxonomies terms on the front
- Dynamic recount: Show count of items near taxonomies terms on the front dynamically. Must be switched on "Show count" option
- Hide empty terms: Hide empty terms. Must be enabled "Dynamic recount" mode.
- Try to ajaxify the shop: Select "Yes" if you want to TRY make filtering in your shop by AJAX. Not compatible for 100% of all wp themes.
- Hide childs in checkboxes and radio: Hide childs in checkboxes and radio. Near checkbox/radio which has childs will be plus icon to show childs.
- Hide woof top panel buttons: Red buttons on the top (filter navigation) of the shop page when searching is done
- Lets checked terms will be on the top: Selected terms will always be displayed on the top (for parent-terms only, child will be on the top but under parent-term as it was)
- Reset button text: Reset button text in the search form. Note - if you want to hide this button just write there 'none'
-
Design
-
Radio and checkboxes skin: coloring skins for the filter checkboxes and radio on the front
Note - if you do not want to use icheck js library for your checkboxes/radio select 'none' for this option! -
Overlay skin: animation while filtering is going
There is 2 first skins is basic, another is experimental and works with svg. Script is took from here: http://jxnblk.github.io/loading
- Loading word: if 'Overlay skin' selected as default, this word will appears on the site front while filtering is going
- Overlay image background: background for animation while filtering going
- Use chosen: Use chosen javascript library on the front of your site for drop-downs.
- Use beauty scroll: Use beauty scroll when you apply max height for taxonomy block on the front
- Plainoverlay color: color for animation while filtering going
- Range-slider skin: Ion-Range slider js lib skin for range-sliders of the plugin
- Hide auto filter by default: works when "Set filter automatically" is "Yes". If you set "Yes" for this option filter on the shop page will be hidden by default, and your customers will have to press button to make it visible
- Auto filter close/open image: Image which displayed instead of filter while it is closed if option "Hide auto filter by default" selected as "Yes". Write "none" there if you want to use text only!
- Auto filter close/open text: Text which displayed instead filter while it is closed if "Hide auto filter by default" is selected as "Yes"
- Image for subcategories - open - Image when you select in tab Options "Hide childs in checkboxes and radio". By default it is green cross.
- Image for subcategories - close - Image when you select in tab Options "Hide childs in checkboxes and radio". By default it is green minus.
- Toggle block type - Type of the toogle on the front for block of html-items as: radio, checkbox .... Works only if the block title is not hidden!
- Image for block toggle [opened] - Any image for opened html-items block 20x20
- Image for block toggle [closed] - Any image for closed html-items block 20x20
- Custom front css styles file link - For developers who want to rewrite front css of the plugin. You should know CSS for such modifications!
-
Radio and checkboxes skin: coloring skins for the filter checkboxes and radio on the front
-
Advanced
Here is 2 tabs: Code and Options
-
Code:
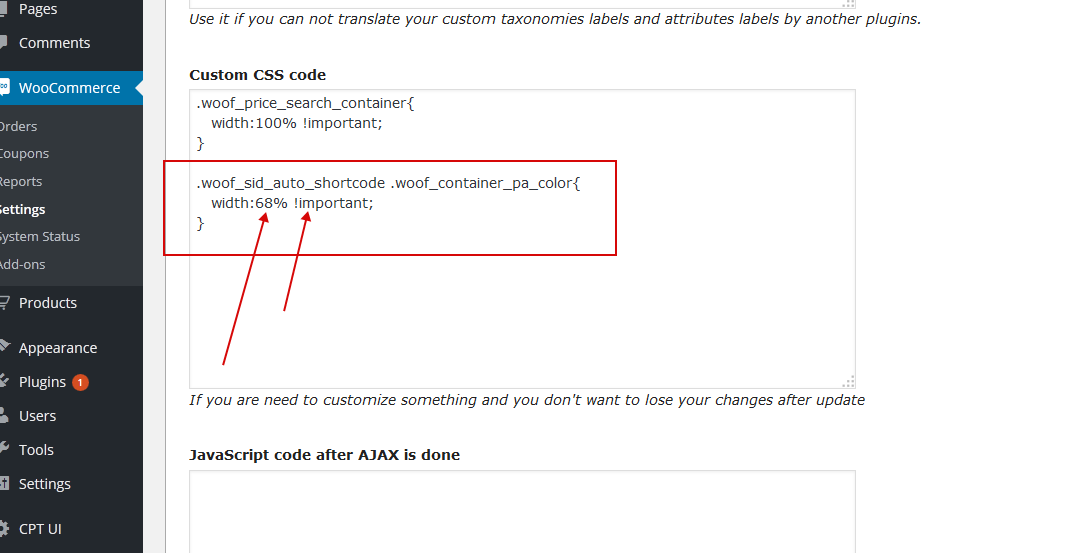
- Custom CSS code: If you want to customize the plugin style/layout and not lost your changes after update
- JavaScript code after AJAX is done: If you are developer and want to do smth after AJAX products loading - drop your script there
- Init plugin on the next site pages only: This option excludes initialization of the plugin on all pages of the site except links and link-masks in that textarea. One row - one link (or link-mask)! Example of link: http://site.com/ajaxed-search-7. Example of link-mask: product-category! Leave it empty to allow the plugin initialization on all pages of the site!
- WPML taxonomies labels translations: very useful thing when you are using WPML plugin and want to set translation for your taxonomies labels on the front for each language!
Look please how to translate labels for different languages (english is default in the example):
es:Locations^Ubicaciones
es:Size^Tamano
de:Locations^Lage
de:Size^Grobe
-
Options:
- Search slug: If you do not like search key "swoof" in the search link you can replace it by your own word. But be care to avoid conflicts with any themes and plugins, + never define it as symbol "s". Not understood? Simply do not touch it!
- Products per page: Products per page when searching is going only. Set here -1 to prevent pagination managing from here!
- In the terms slugs uses non-latin characters: If your site taxonomies terms is in: russian, chinese, arabic, hebrew, persian, korean, japanese and any another non-latin characters language - set this option to Yes, better do it instantly after installation, because later if you will activate this option: color options for example - you will have to set them by hands again.
- Storage type: If you have troubles with relevant terms recount on categories pages with dynamic recount for not logged in users - select transient.
- Hide terms count text: If you want to show relevant tags and tags count on the categories pages you should activate show count, dynamic recount and hide empty terms in the tab Options. But if you do not want show count text near each term - set Yes here and its will be hidden by CSS.
- Listen catalog visibility: listening of "catalog visibility" - the option in each products backend page in 'Publish' sidebar widget.

- Disable swoof influence: Sometimes code 'wp_query->is_post_type_archive = true' does not necessary. Try to disable this and try woof-search on your site. If all is ok - leave its disabled. For DEV: Disabled code by this option you can find in index.php by mark "disable_swoof_influence".
- Cache dynamic recount number for each item in filter: Useful thing when you already started your site and enabled use dynamic recount. Its make recount very fast! Of course if you added new posts which have to be in the search results you have to clean this cache OR you can set time period for auto cleaning using drop-down near 'clear cache' button to make dynamic recount information actual!
- Cache terms: Useful thing when you already set your site IN THE PRODUCTION MODE - its getting terms for filter faster without big MySQL queries! If you actively adds new terms every day or week you can set cron period for cleaning. Another way set: 'not clean cache automatically'!
- Show blocks helper button: Show helper button for shortcode [woof] on the front when activated option 'Set filter automatically'.
- Custom extensions folder: Custom extensions folder path which relative to 'wp-content' folder where you can add your own extensions.
-
Code:
-
Extensions
Extensions: default and custom extensions for products filtering functionality.
-
Info
Just useful information and link to the plugin demo site.
Setup on the front
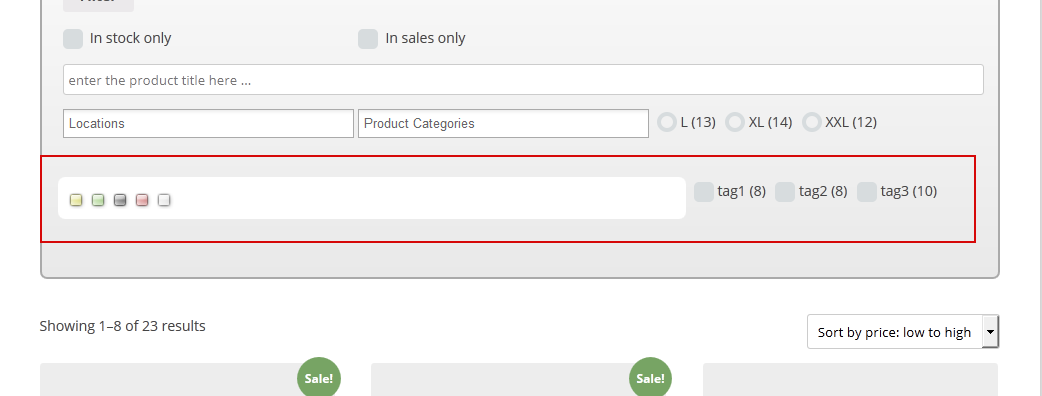
After you set the settings and saved them you have 3 ways to set the filter on the front:
-
Set filter automatically
For this you should activate in the plugins tab 'Options' option 'Set filter automatically'.
And on the shop page and categories pages you will get smth like this

-
Widget
Widget is more convinient way to represent search forms, because its can be presented on all pages of the site which allow users to start searching from any place of your site.
You can set widget quickly here: /wp-admin/widgets.php
-
Additional text before - text where you can put any content before WOOF search form
in the widget, for exaple shortcode [woof_search_options]

- Redirect to - Redirect link to any page - use it by your own logic. Leave it empty for default behavior.
- Form AJAX redrawing - Useful when uses hierarchical drop-down for example. Redraws search form without submiting
-
Additional text before - text where you can put any content before WOOF search form
in the widget, for exaple shortcode [woof_search_options]
- By shortcodes -> Read next section please ...
Videos
Instead of (also with) reading this documentation you can watch video tutorials here: http://www.woocommerce-filter.com/video-tutorials/
Shortcodes
The plugin has 2 basic shortcodes:
[woof sid="auto_shortcode" autohide=0 taxonomies=product_cat:9]
[woof_products per_page=8 columns=3 is_ajax=0 taxonomies=product_cat:9 custom_tpl='themes/twentytwelve/woo_tpl_1.php']
Shortocode [woof] generates search form and has next options:
-
sid: here you can set any word without space. You may need it if you want to customize it for your layout using css.
For example if to set sid 'auto_shortocode' - container of the search form will has css class as 'woof_sid_auto_shortcode' which you can use in your customization
-
autohide - if set this option to '1' - search form will be hidden after page loading and your customers can press button to show it.
-
taxonomies you can define condition where set taxonomy and its term. Do not forget to set the same condition in [woof_products]. Example: [woof is_ajax=1 taxonomies=product_cat:9,12+locations:30,31]
-
tax_exclude exclude taxonomies from the seacrh form: [woof tax_exclude='pa_size,pa_test']
-
Additionally user can create custom set of filter-elements using next attributes:
- tax_only - write taxonomies or products slug using comma
- by_only - write any by-filter-elements there using comma: by_text,by_price,by_sku,by_author,by_onsales,by_instock. Of course firstly user should enable extensions for that by-filter-elements
-
redirect - allows show results on any another page of the site. Example: [woof redirect='http://www.my_site.com/search_page_results_77']. Ignored in ajax mode as AJAX works with current page DOM!
-
ajax_redraw - Redraws search form without submiting. Example: [woof redirect="http://www.my_site.com/test-all/" autosubmit=1 ajax_redraw=1 is_ajax=1 tax_only="locations" by_only="none"]
-
autosubmit - allows autosubmit of the search form even if its disabled in the plugin options page. Example: [woof autosubmit=1]
Shortcode [woof_products] has next options:
- per_page: products per page
- columns: how many products per row. Usually it is: 2,3 or 4. It depends of your theme ability/functionality and not from the WOOF!
- is_ajax: very power option. You can set it to 1 and your filter generated by [woof] will start works in AJAX mode!
-
taxonomies you can define taxonomy-condition there. Do not forget set the same condition in [woof]. Example: [woof is_ajax=1 taxonomies=product_cat:9,12+locations:30,31]
-
behavior only one value: 'recent'. Example: [woof_products behavior='recent' per_page=12 columns=3]
-
custom_tpl - path to self made template if its nesesary. Example: themes/twentytwelve/woo_tpl_1.php
-
tpl_index - index of cutom extension which is template
-
get_args_only - value 1 or 0, default is 0. Possibility get assembled array of arguments for any purposes. WP_Query request in this case not done ...
Additional useful shortcodes:
- [woof_text_filter] - you can drop shortcode for searching products by title/content/excerpt on your site. This shortcode has 1 optional attribute: placeholder
- [woof_sku_filter] - you can drop shortcode for searching by SKU any where on your site. This shortcode has 1 optional attribute: placeholder
- [woof_price_filter type="slider"] - price filter as: drop-down, slider, text. This shortcode has 3 optional attributes: type (slider,select,text), placeholder, additional_taxes (Example => product_cat:9)
- [woof_author_filter role="author" placeholder="Hello World 2018"] - filter by authors as drop-down
- [woof_search_options] - search-navigation (red buttons)
- [woof_found_count] - Shows count of found products. Drop it in the usual text-widget with any text you need or use it in the hook woof_print_content_before_search_form.
- [woof_products_messenger] - see here.
- see more here
Tips&Tricks
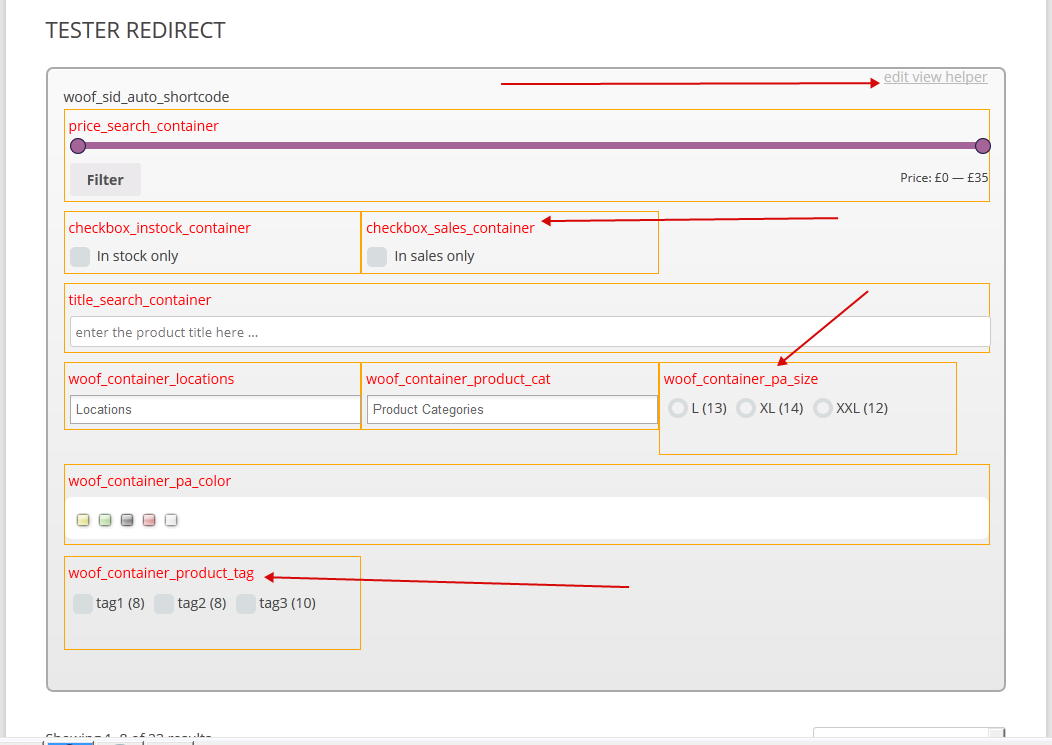
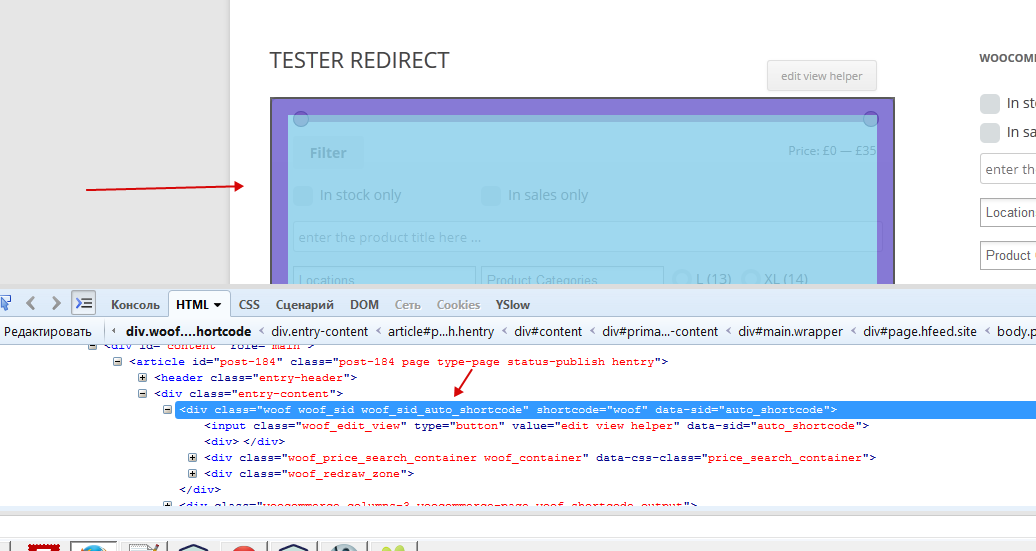
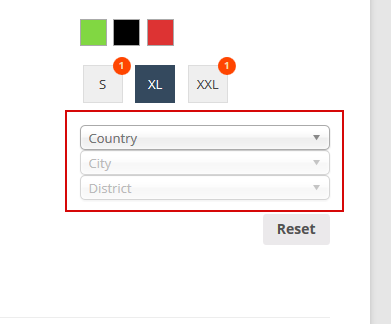
If you logged in in the site as admin, and you want to customize for example wide of columns in [woof] shortcode
which has sid you can apply helper button for it as on the screens!
So it can help you in your defferent css customizations for your site!
Custom Taxonomies
If you need for example custom taxonomy as 'Location' - no problems, you can create it using next plugin:The Plugin Demo Site And WOOF will be working well with it. Just look the plugins demo site with it!
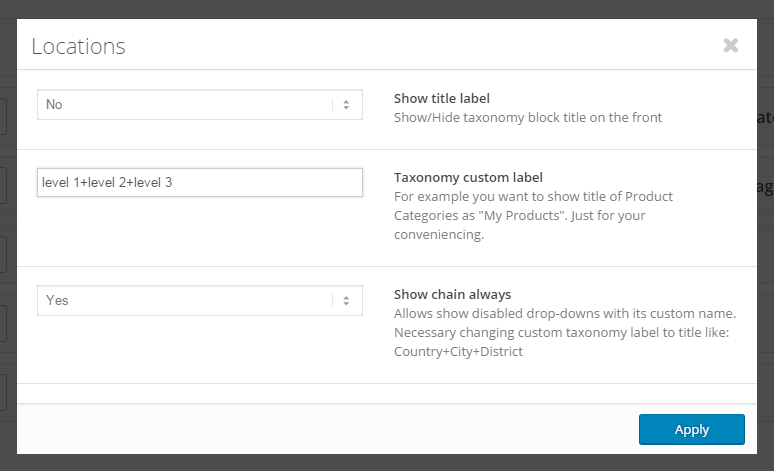
Hierarchy drop-down
From v.2.1.3 it was added ability to create special drop-downs for construction of terms as:parent->child->sub child->sub sun child-> ....
For example you want to create filtering by Locations. For this you can create custom taxonomy Location and add terms by next logic:
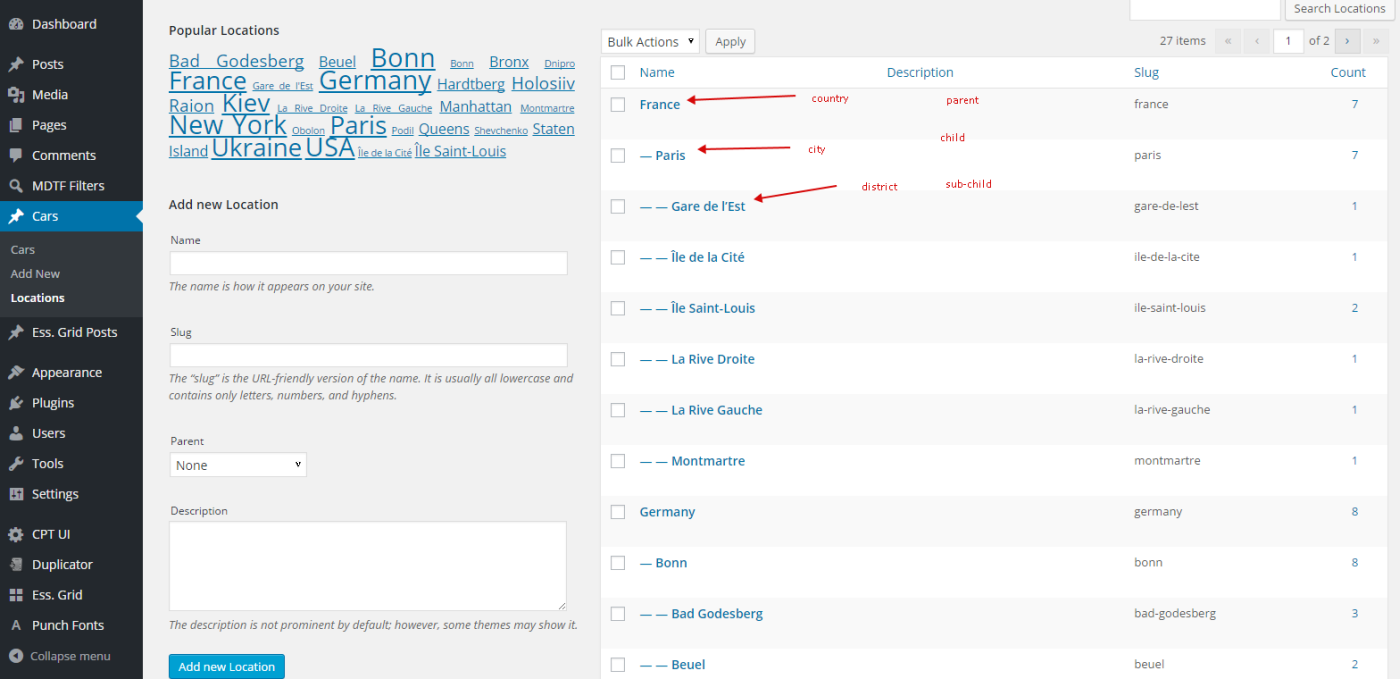
EXAMPLE: http://www.demo.woocommerce-filter.com/working-with-hierarchy-drop-down/
Then in first tab for taxonomy Location select 'Hierarchy drop-down' and in advanced options in 'Taxonomy custom label' write 'Country+City+District' and set 'Show chain always' as Yes. On the front you will get next:
The same logic for Maker+Model in cardealer for example
Hint: When WOOF-search IS going on the site in tag body appears CSS class 'woof_search_is_going'. Happens only in non-ajax mode.
Recommendations
Main reccomendation is for dynamic recount -> this feature takes a lot of resources because each recount can take more that 1 sql query
to database and this can make site slow. So there is ways to make it fast:
- Do not use it
- Use 'Cache dynamic recount number for each item in filter' in the plugins settings -> tab 'Advanced'.
But in this case after you added more posts you will have to clean this cache OR set it cron period for it:
- clean cache automatically hourly
- clean cache automatically twicedaily
- clean cache automatically daily
- clean cache automatically each 2 days
- clean cache automatically each 3 days
- clean cache automatically each 4 days
- clean cache automatically each 5 days
- clean cache automatically each 6 days
- clean cache automatically each 7 days
It is depends of how often products-adding on your site ... - Use cache plugins as WP Super Cache for example. But this way good when your site not in AJAX mode. For AJAX mode better use 'Cache dynamic recount number for each item in filter'
- Use PHP 5.4 or higher! PHP 5.4 is 1.5X FASTER than PHP 5.3
- Read FAQ
For Developers
The plugin has some features which can help you in the customization of the plugin functionality:
- The plugin settings -> tab Advanced -> Code -> textarea 'Custom CSS code'. Here you can add any CSS code you need for your customization
- The plugin settings -> tab Advanced -> Code -> textarea 'JavaScript code after AJAX is done'. You can use it reiniting of any DOM elements if you need it. Useful thing when you uses non standard output for woocommerce products, any dynamic galleries for example ...
-
The plugin uses hook 'woof_before_term_name' - you can use it to place any icons before each term of any taxonomy for example!
if (has_filter('woof_before_term_name')) echo apply_filters('woof_before_term_name', $term, $taxonomy_info);else echo $term['name'];
This filter is applied in: views\html_types\checkbox.php, views\html_types\radio.php, views\html_types\mselect.php, views\html_types\select.php
Using variables $term AND $taxonomy_info you can identify each term and taxonomy of it. - If you need to operate with view (html/css) or functionality of the plugin or any another thing for mobile devices there is JavaScript variable generated by the plugin - woof_is_mobile - which has value 1 if user using mobile device, and 0 if not.
- There is ability to work with the plugin: Display Product for WooCommerce, but to make them friends you will have to do some actions!
- It is possible add auto scroll after ajax searching is done
-
In files:
- views\html_types\checkbox.php
- views\html_types\color.php
- views\html_types\mselect.php
- views\html_types\radio.php
- views\html_types\select.php
implemented filter before foreach: woof_sort_terms_before_out.
$terms = apply_filters('woof_sort_terms_before_out', $terms, 'select');
You can apply it for custom sorting on front with different scenarios. -
In shortcode [woof_products] before wp_query implemented next code:
$wr = apply_filters('woof_products_query', $wr);
So developer can create callback for wp hook 'woof_products_query' and manipulate with its arguments!
Look API here: https://codex.wordpress.org/Class_Reference/WP_Query#Taxonomy_Parameters
- Hint: When woof-search IS going on the site in tag body appears CSS class 'woof_search_is_going'
-
Filter 'woof_use_chosen' - for any manipulation with enabling chosen js
lib for drop-downs. For exampe disable it for mobile view:
add_filter('woof_use_chosen', function($is) { if (wp_is_mobile()) { return false; } return $is; }); - Filter 'woof_main_query_tax_relations' - manipulations with taxonomies relations in the search query. Read more here http://www.woocommerce-filter.com/hook/woof_main_query_tax_relations/. Here is video with demonstration of the feature.
- Filter 'woof_text_autocomplete_items' - use it to return count of found posts in text of the search textinput of the plugin if autocomplete mode is enabled.
-
Use
jQuery(document).trigger('woof_ajax_done');for any js actions after seacrh by AJAX is done. -
read comprehensive info about plugins functionality here
Extensions
From version 2.1.3 added ability to create any extensions for WOOF. But using examples in folder 'ext/' of the plugin and option
Advanced -> Options -> Custom extensions folder it is possible create new or improved
existed extensions for current project without any risk to lose code
In version 2.1.4 API for extension is finished and ready for production.
Its possible to create extensions with its own settings in tab Extensions.
read all info about extensions here
Tested for compatibility
The plugin tested for compatibility with the next plugins:
Localization
All words wrapped in wordpress function '_e' or '__'. So it is possible localize it for any language.
For this you are need create .po file and edit it with poedit.
Get more info here.