WooCommerce Prices By User Role
- created: 11/21/2014
- latest update: 11/21/2014
- by: Festi-Team
- email: support@festi.io
WooCommerce Prices By User Role Plugin provides opportunity to establish different prices for each customer group. Also you can do only product catalog without prices and show custom notification instead price.
Getting Support
Please be polite when requesting support, and we will be sure to respond as soon as possible. We will do the best to answer your questions. We will always provide fixes for any bugs that crop up as soon as can be
If you can't find answer in this guide, send inquary to support@festi.io
Requirements
-
WordPress 3.8.x, WordPress 3.9.x, WordPress 4.0.x,
-
Use of the, WooCommerce 2.0.x, WooCommerce 2.1.x
Should be installed WooCommerce Plugin! -
A WordPress WooCommerce Compatible Theme
The WordPress theme you use must properly intagrated WooCommerce templates. That means using hooks (for advanced users/developers) or using our catch-all woocommerce_content() function inside your theme.
Installation
WordPress Plugin Uploader
You can install Prices By User Role via the WordPress plugin uploader without unzipping the file.
- Log into your WordPress admin panel
- Navigate to Plugins > Add New
- Click Upload
- Click Choose File and select the woocommerce-woocartpro.zip
- Click Install Now.
- Activate the plugin through the Plugins menu in WordPress
FTP
You can also install Prices By User Rolet via FTP
- Decompress the .zip file you downloaded from CodeCanyon.
-
Find the
woocommerce-prices-by-user-rolefolder (this directory is created when you unzip the file). -
Upload the
woocommerce-prices-by-user-rolefolder to yourwp-content/pluginsdirectory. - Navigate to your Control Panel: Plugins
- Under Prices By User Role, click Activate
What did this do?
Installing the Plugin doesn’t automatically change prices on your site. Once you install the plugin, you’ll get a new Control Panel Prices by User Role under WooCommerce Section in Administrator Panel.
Setup
General
- Navigate to Prices By User Role Section in under WooCommerce, tab “Settings”
- Hide Add to Cart Button - hides Add to Cart Button for unregistered users
- Tick Option “Show Prices only for Registered Users” if you need to hide prices.
- Text for Non-Registered Users – here you can type in text which will be displayed for unregistered users. If you need use links or custom style, type html text
- Hide Prices for User Roles - tick the user roles for which you want to hide price
- Text for Registered Users with Hidden Price - here you can type in text which will be displayed for user roles with hidden price. If you need to use links or custom style, type in html text
- Discount or Markup for all Products - choose discount or markup for all products. This value will be subtracted (discount) or added (markup) to the Regular Price for all products
- Pricing Roles - here you can see user groups that will be displayed for each product. To activate new group for individual pricing just check box with user group name.
- Display the Regular Price on Product Page - here you can enable displaying discount info for registered users with special price on product page and on cart page. User will see something similar to the following:
10. Add New Role – here you can add new user role, type in label and click Add New Role
Setup Price for User Role
After you are done with the settings, open your product (Edit Product or Add New), you will see the new price field for active User Role. Type in your price and save product:
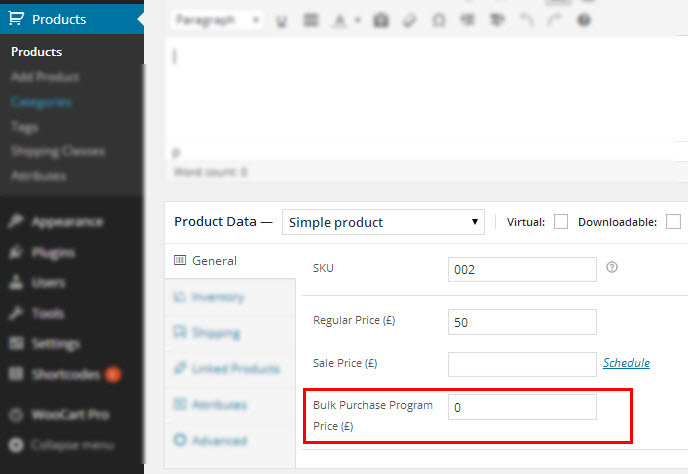
New Field for User Role Price
After Updating the Product, User with this Role will see only this price
Bulk Price Import
- Simple Products
- Virtual Products
- Downloadable Products
- External Products
The file uploads the next data:
- Images via a URL (Requires allow_url_fopen or cURL on your server)
- Featured Image
- Categories and Tags with hierarchical (Add new one if they don’t exist)
- Import Custom Fields
- Map any CSV column to any Product field
- If you include a header row, the plugin will attempt to map column values to product fields automatically.
- Vvalidationfor multiple-choice fields (fields with a limited set of valid values like yes/no, instock/outofstock, etc.)
- Dollar signs, commas, etc. are stripped out of number fields like prices, weight, length, width, height
- If SKU already exists, existing product is updated rather than inserting new product.
- If SKU already exists and importing images, will skip duplicate image imports.
- Locale settings are supported to better handle importing files with special characters and other alphabets.
List of Importable Attributes:
- post_title (Name)
- post_content (Description)
- post_excerpt (Short Description)
- post_status (Post Status — Publish, Draft, Trash, etc.)
- menu_order (Menu Order)
- comment_status (Comment/Review Status — Open, Closed)
- ping_status (Trackback/Pingback Status — Open, Closed)
- _regular_price (Regular Price)
- _sale_price (Sale Price)
- User Role Price
- _tax_status (Tax Status)
- _tax_class (Tax Class)
- _visibility (Visibility)
- _featured (Featured)
- _weight (Weight)
- _length (Length)
- _width (Width)
- _height (Height)
- _sku (SKU)
- _downloadable (Downloadable)
- _virtual (Virtual)
- _stock (Stock)
- _stock_status (Stock Status)
- _backorders (Backorders)
- _manage_stock (Manage Stock)
- product_cat (Categories, by Name or ID)
- product_tag (Tags, by Name or ID)
- product_shipping_class (Shipping Class, by Name or ID)
- Custom Fields
- Product Images (By URL or Local File Path)
- _button_text (Button Text, for External Products)
- _product_url (Product URL, for External Products)
- _file_paths (File Paths, for Downloadable Product)
- _download_expiry (Download Expiration, in Days)
- _download_limit (Download Limit, an integer)
To import file into a WordPress bfollow these steps:
- Go to WooCommerce → Price by Role in the admin panels.
- Choose "Import" tab from the list.
- Upload this import file using the form provided on that page.
- You will first be asked to map the attributes in this export file to WooCommerce fields on the web site. For each attribute, you may choose to map to an existing WooComerce field on the web site
- WordPress will then import each of the products, and categories contained in this file into your shop
Adding New Users
If you want give acces to prices for some user, please follow these steps:
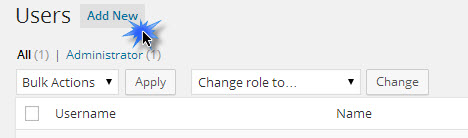
- Go to Admin Panel > Users (yoursite.com/wp-admin/users.php)
- Add New User
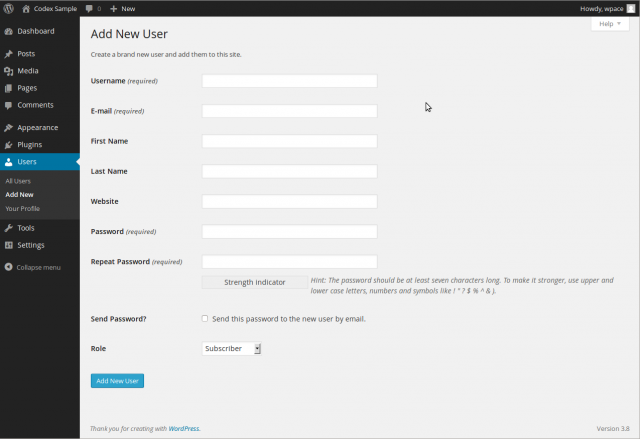
- Regardless of that setting, you can manually create new users here.
- Username (required) - Enter the username of the new user here. This will also be used as the Login name of the new user.
- E-mail (required) - Enter a valid e-mail address of the new user here. The e-mail address must be unique for each user. If a published post or page is authored by this user, then when approved comments are made to that post or page, a notification e-mail is sent to this e-mail address.
- First Name - Enter the first name of the new user here.
- Last Name - Enter the last name of the new user in this text box (the display name defaults to first and last name).
- Website -: You may enter the new user’s website URL in this text box.
- Password (twice) - Enter a password for the new user twice here, once in each text box.
- Strength Indicator This indicates if the password you entered is Very Weak, Weak, Medium, or Strong (displayed in green). The stronger the password the more secure the login. Hint: The password should be at least seven characters long. To make it stronger, use upper and lower case letters, numbers and symbols like !”?$%^&).
- Send Password? - Check the box to Send this password to the new user by email.
- Role - Select the desired Role for this User from the drop-down box. Default: Administration > Settings > General - New User Default Role
- Add User - Click this important button to save the new user’s information into WordPress’ database. If you don’t click this button, the user will not be added. A flash message at the top of the screen will advise you that the new user has been added.