Welcome
We thank you for purchasing our product. Hope our product will be of great help for you to succeed. We appreciate your decision to read the manual before request for our support.
| Project | Mega Main Menu |
| Created | 10 November 2013 at 12:00 GMT |
| Author | MegaMain |
| Author URI | megamain.com |
| Support | support.megamain.com |
Quick Start Guide
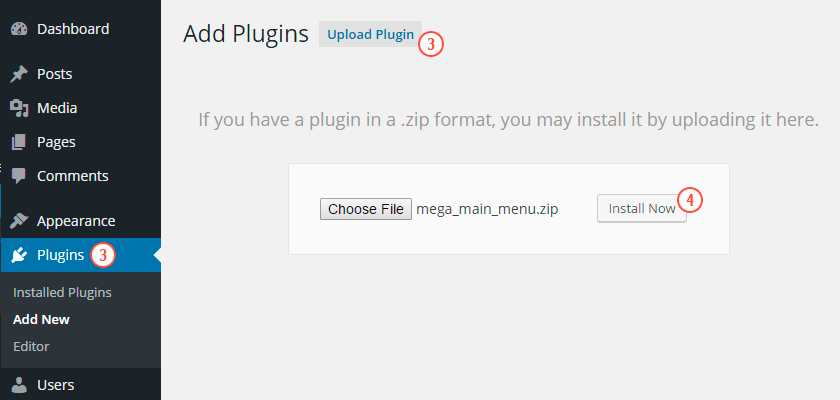
1) Install
Dashboard ► Plugins ► Add New ► Upload
Follow the next steps to setup plugin:
- Extract file "mega_main_menu.zip" from the general archive to your computer;
- Log in dashboard of your WordPress;
- Next follow the way "Plugins -> Add New -> Upload";
- In the file selection field you should choose "mega_main_menu.zip" stored in your computer, and click the button "Install Now";
- Don't forget to activate plugin.
If you followed all instructions correctly, the link "Mega Main Menu" should be added in the section "Appearance".
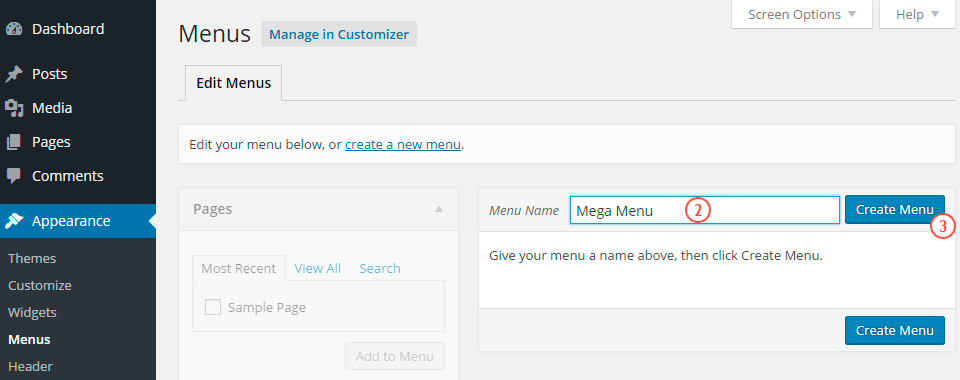
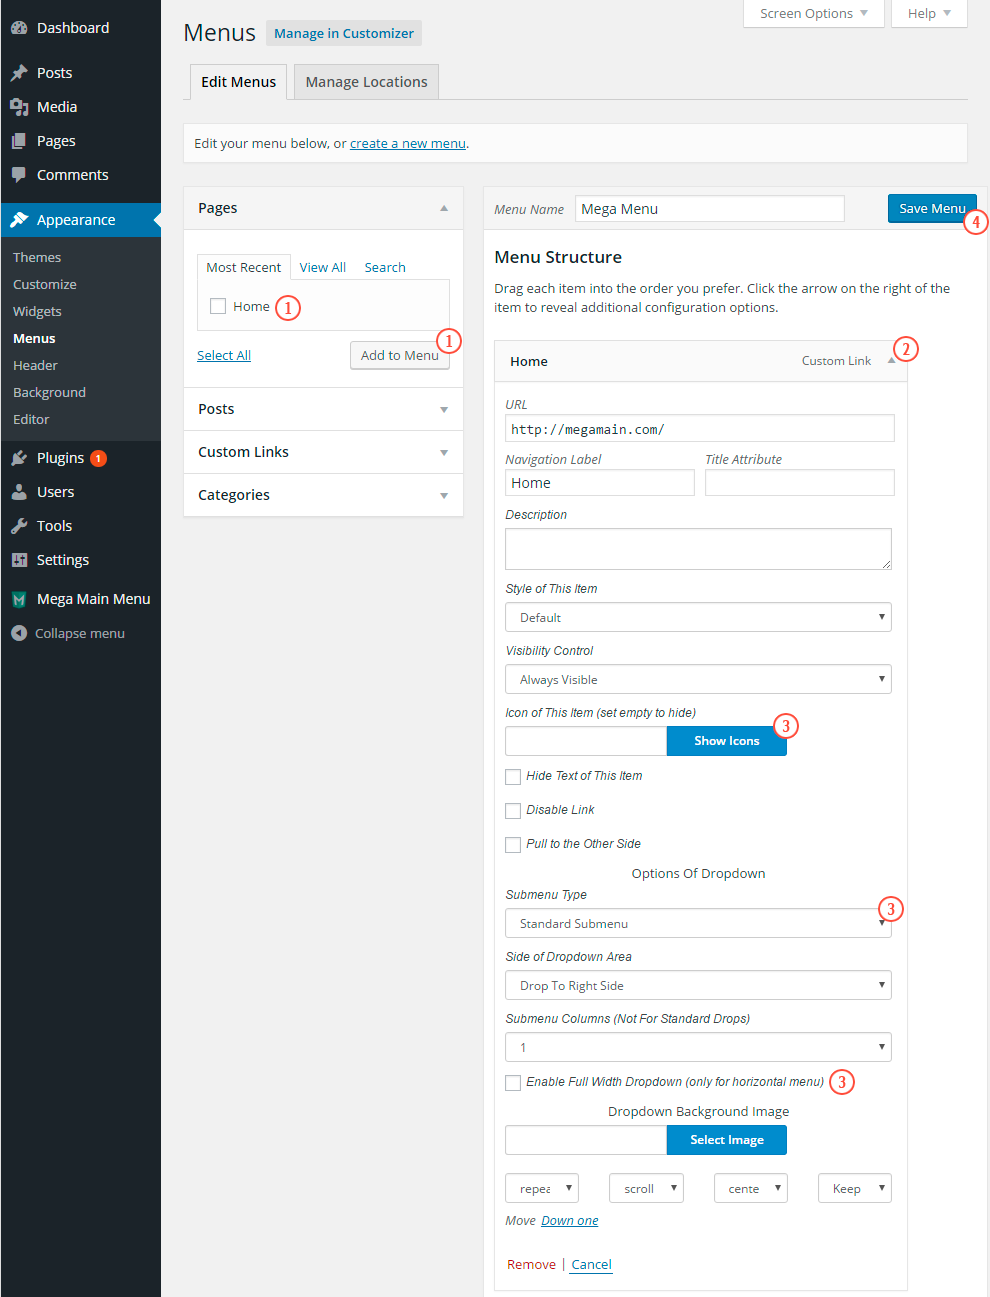
2) Set Menu Structure for Defined Location
Dashboard ► Appearance ► Menus ► Edit Menus
If in your WP there is not yet created "Menu Structure" or you want to create a new Menu Structure for using it with "Mega Main Menu Plugin" – follow the next steps:
- Click the link "create a new menu";
- Type a new title for your menu (Example: "My Mega Menu");
- Click the button "Create Menu".
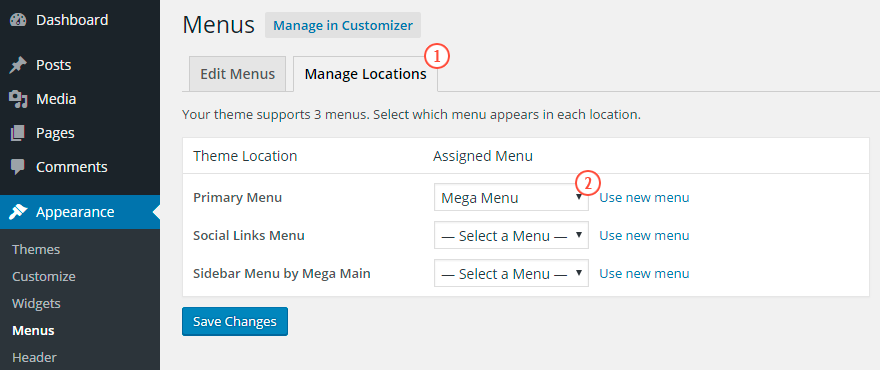
Dashboard ► Appearance ► Menus ► Manage Locations
If you already have the created "Menu Structure" - set the necessary Menu Structure for the definite location.
Example: Select "My Mega Menu" for "primary_menu" theme location.
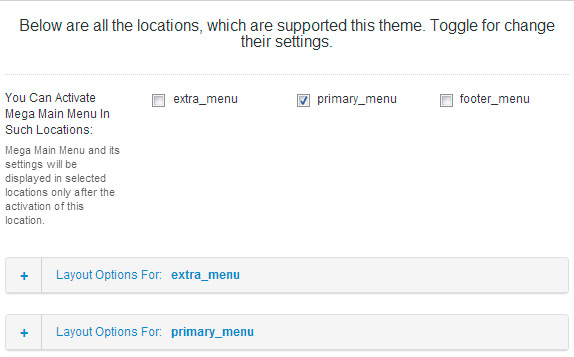
3) Activate
Dashboard ► Mega Main Menu ► General
Mega Main Menu and its settings will be displayed in selected locations only after the activation of this location. Check the location(s) where you want to display Mega Main Menu.
Example: If you want to use "Mega Main Menu Plugin" in "primary_menu" location - check this location
4) Add and Set Up Menu Items
Dashboard ► Appearance ► Menus ► Edit Menus
Follow the next steps for set up menu item:
- In the section "Pages" (or Links, or Categories) tick the page for which you want to create an item of menu and click the button "Add to menu" (your selected item of menu will be added in the section "Menu Structure").
- Click the caret (arrow down) next to the title of added item of menu, all settings of this menu item will be unfolded.
-
Customize this menu item according to your requirements.
Example:- Select icon;
- Select "Submenu type" on "Multicolumn Dropdown";
- Set "Submenu Columns" on "3";
- Check "Enable Full Width Dropdown"
- Save the changes in Menu Structure ("Save Menu" button).
Video Guides
Install Guide
General Settings
Activation of the Mega Menu for the definite location of the theme
Dashboard ► Mega Main Menu ► General
Mega Main Menu and its settings will be displayed in selected locations only after the activation of this location. Check the location(s) where you want to display Mega Main Menu.
Logo Settings
Dashboard ► Mega Main Menu ► General
Here you can select the image-file for using it as a logo in the Menu and set its size. Select image to be used as logo in Main Mega Menu. It's recommended to use image with transparent background (.PNG) and sizes from 200 to 800 px. Then set height of the logo. You can set height of the logo in percentage to the height of the initial container (applicable values from 10 to 99 percent). Width of the logo is set up automatically to save proportions of the original logo image.
You can find instructions how to add selected logo to the definite menu in "Layout Options: location ".
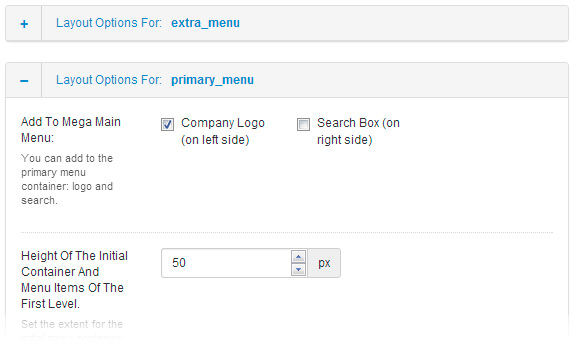
Layout Options
Dashboard ► Mega Main Menu ► General ► Layout Options: location
Firstly, you should decide for which menu location layout should be set.
In "Layout Options: Location " you can:
- Add to the primary menu container: logo and (or) search.
- Set height for the initial menu container and items of the first level.
- Choose how to locate menu elements of the first level.
- Choose where to locate icon for first level items.
- Select type of separator between the first level items of this menu.
- Set the value of corners radius.
- Activate Menu Minimization on Handheld Devices.
- Choose Menu Direction (Horizontal, Vertical).
- Enable sticky menu.
- Set sticky scroll offset.
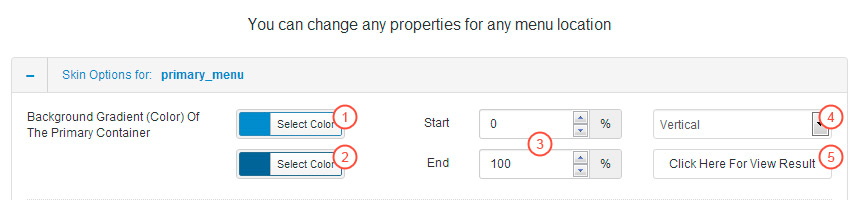
Skin Settings
Dashboard ► Mega Main Menu ► Skins ► Skin Options: location
Firstly, you should decide for which menu location skin should be set.
In "Skin Options: location " you can change:
1. Background Gradient (Color) of the Primary Container.
If you want to use gradient follow the next steps:
- Select the initial color of the gradient.
- Select the final color of the gradient.
- Set the starting and ending points of the transition color range from the first into the second color of the gradient.
- Choose the direction of the gradient (Vertical, Horizontal or Radial).
- Click the button "Click Here To View Result" to check how this gradient will be displayed.
If you want to use flat color - set the same color value for the first and second parameters.
If you want to set the background image for menu initial container - use the following option.
2. The background image of the initial container.
You can choose and tune the background image for the primary container.
Notice: the background image replaces the background gradient and only flat color stays for the background.
3. Font for the first level items.
4. The size of icons in first level items.
5. Text Color of the First Level Item.
6. Text Color of the Active First Level Item.
7. Gradient (Color) of the background for the active first level item.
The process of setting up the gradient or color for this element is the same as for "Background Gradient (Color) of the Primary Container".
8. Background Gradient (Color) of the Dropdown elements.
The process of setting up the gradient or color for this element is the same as for "Background Gradient (Color) of the Primary Container".
9. Font of the dropdown menu item.
10. Text color of the dropdown menu item.
11. Background Gradient (Color) of the dropdown menu item.
The process of setting up the gradient or color for this element is the same as for "Background Gradient (Color) of the Primary Container".
12. Border color between dropdown menu items.
13. Text color of the dropdown active menu item.
14. Background Gradient (Color) of the dropdown active menu item.
The process of setting up the gradient or color for this element is the same as for "Background Gradient (Color) of the Primary Container".
Additional Skin Settings
Dashboard ► Mega Main Menu ► Skins
Set Of Installed Fonts
Select the fonts that must be included on the site. Remember that a lot of fonts affect on the speed of load page. Always remove unnecessary fonts.
Additional Styles (Different Colors for Each Menu Items)
Here you can add and edit highlighting styles. After that you can select these styles for menu item in "Menus -> Your Menu Item -> Style of This Item" option.
Custom Icons
You can add custom raster icons. After saving these settings, icons will become available in a modal window of icons selection. Recommended size 64x64 pixels.
Specific Options
Dashboard ► Mega Main Menu ► Specific Options
Custom CSS
This field is needed in the case when your template has a particular menu location and it needs adjustment. You can place here any necessary custom CSS properties.
Responsive for Handheld Devices
If this option is enabled, then the menu will be transformed, if the user uses the handheld device.
Coercive Styles
This option is recommended to use only if styles of the installed theme interfere with the proper display of Mega Main Menu. If this option is checked - all CSS properties for this plugin will have "!important" priority.
"Indefinite Location" Mode
If this option is checked - all menus will be replaced by the mega menu. This will be useful for templates in which are not defined locations of the menu.
Settings of the definite item of the menu
Dashboard ► Appearance ► Menus
Toggle the item of menu which you want to set.
Definite Item Settings
1. Standard WordPress settings of the menu item.
We will leave out the explanation associated with standard WordPress settings of the menu item as they are very simple and understandable. We will consider opportunities of the Mega Main Menu instead.
2. icon of the current menu item.
To select the icon of the menu item follow the next steps:
- Click the button "Show Icons".
- In the modal window that appears, click the icon that you prefer.
- Click the button "OK" in the upper right corner of the modal window (if you click outside the modal window - icon selection will be canceled and the modal window will be closed).
Notice: the plugin includes a set of more than 1600 vector icons, so loading a modal window can take some of your time and patience.

3. Hide Text of This Item.
Use this option if you want to display the menu item without a text. For example, link to the home page can be displayed without a text, and only the "Home" icon can be left.
4. Disable Link of This Item.
Use this option if you want to set up the menu item without an active hyperlink. For example: it can be the title for the column in multicolumn dropdown menu.
Settings of dropdown menus
Notice: these settings can be adjusted only for the first level items of the menu, and the style of displaying all children dropdown elements will depend on these settings. All examples here - http://menu.megamain.com/wp-content/plugins/demo_dashboard_2.html.
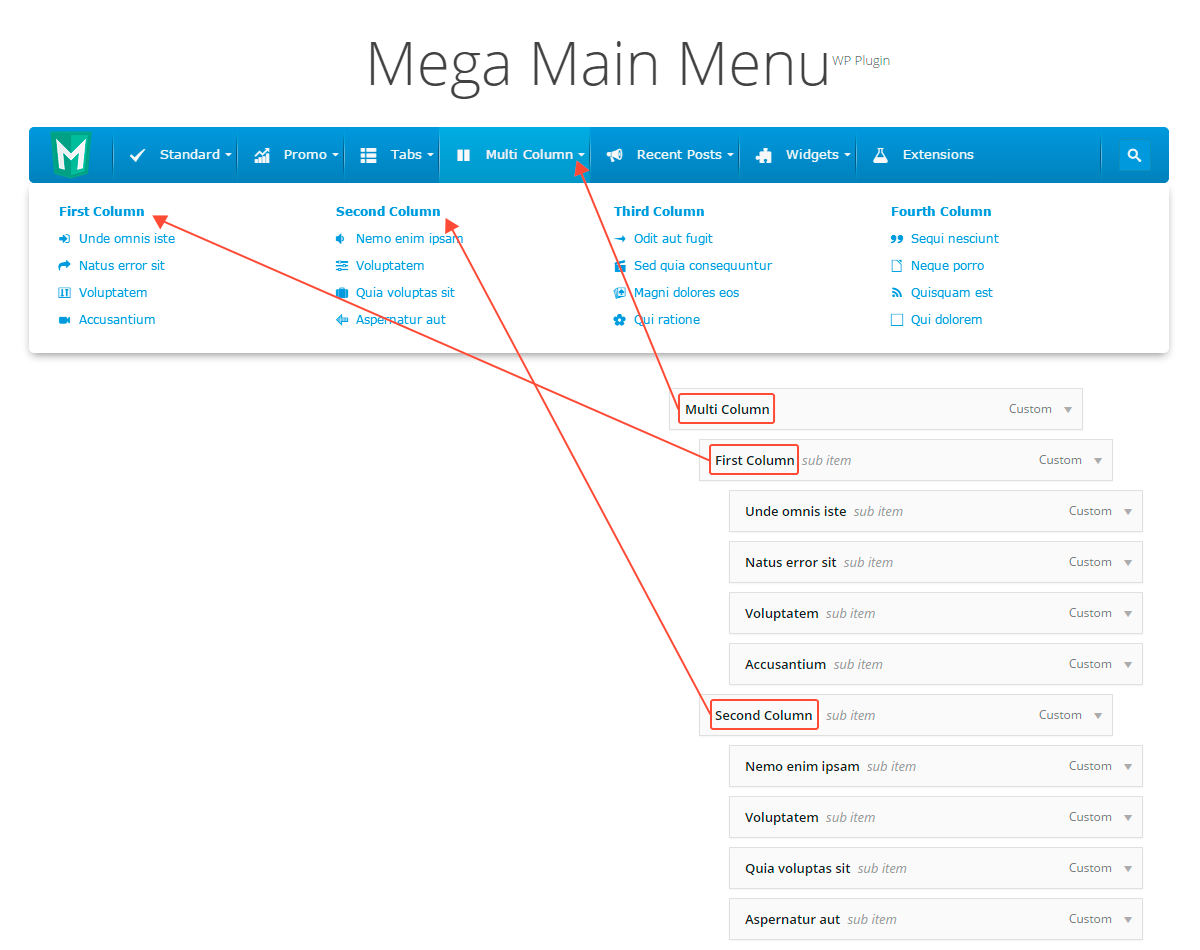
1. Submenu Type.
- Standard Dropdown. Use this type to display usual dropdown menu as one column.
- Multicolumn Dropdown. Use this type to display dropdown menu with several columns. Number of columns depends on the option "Number of Columns".
- Grid Dropdown. Use this type to display dropdown menu in the form of a grid. Number of elements placed in one line depends on the option "Number of Columns".
- Posts Grid Dropdown. Use this type to display dropdown menu in the form of a grid using recently added posts. Number of elements placed in one line depends on the option "Number of Columns". Thumbnail picture and icon for each post are selected on the page of editing this post (Look for "Featured image" and "Post Icon" Metaboxes).
- Widgets Dropdown. Use this type to display dropdown menu with Widgets. Select number of columns with the help of the option "Number of Columns". Using this type you can add and edit widgets in the usual place (on page Dashboard -> Appearance -> Widgets).

2. Side for dropdown elements.
Just choose the side to which dropdown elements will unfold. For example: if you set "Drop To Right Side" for this option then dropdown will start at the left side of the initial element and go beyond it to the right.
3. Number of columns.
This option influences the number of elements in one line for "Grid Dropdowns", the number of columns in the "Multicolumn Dropdown" and "Widgets Dropdown".
4. Enable the full width for the sub-menu.
If you check this option the dropdown menu will be stretched to the full width of the primary container.
5. Dropdown Background Image.
Use this area to select and set parameters of the background image for the dropdown item.
Update
Follow the next steps to update (reinstall) plugin, all these steps are important for the correct working of the plugin:
- Deactivate and remove the old version (all settings will be saved);
- Install the new version;
- Go to "Mega Main Menu settings" page and save settings again (*important);
- Clear cache of the browser (Ctrl + Shift + R few times on the page);
- All done.
FAQ
My menu structure loses some items (or options) when I save the settings.
Cause of this problem is small value of the "max_input_vars" option in the configuration of your server (host). You must increase value of the "max_input_vars". You must to set a value that is twice as large of the current value.
-
Most hosts have the opportunity to change this value in the "Host Admin Area".
Example:
If currently you have max_input_vars = 1000
You need to set max_input_vars = 2000 (or more)
-
You can try to change this value using ".htaccess" file in root directory of the your site. Add one of these lines at end of ".htaccess" file.
php_value max_input_vars 9000
php_value suhosin.post.max_vars 9000
php_value suhosin.request.max_vars 9000
-
You can try to change this value using "php.ini". Add this line if you don't find max_input_vars
max_input_vars = 9000
-
If that does not help you, ask your host support "How can I increase the value of the max_input_vars for my site?".
-
Also you can deactivate the options that you do not use to customize the menu structure. It helps reduce the number of options and reduce the load on the server.
Example:
- If you do not use option "Icon Of The Item" - disable it globally in the "Settings of the structure -> Icon Of The Item -> Disable".
- If you do not use option "Description Of The Item" - disable it globally in the "Settings of the structure -> Description Of The Item -> Disable".
The most unused options, you can try to disable them:
- Description Of The Item.
- Style Of The Item.
- Visibility Control.
- Dropdown Background Image.
My menu is displayed incorrectly in IE9 (or older)
-
IE9 and older not supported Alpha colors.
In order to fix it, use HEX "#2a6496" instead RGBA "rgba(42,100,150,1)".
-
IE9 and older not fully supported Gradients.
In order to fix it, use flat colors (#2a6496 > #2a6496) instead gradients (#428bca > #2a6496).
- Our plugin supports IE8, but only in safe mode, it means that all navigation functions is available but without 100% design matching. MicroSoft officialy stopped support of IE8 in April 2014 - http://www.microsoft.com/en-us/windows/enterprise/end-of-support.aspx. If the MicroSoft stopped supporting their product, all other programmers can also stop supporting it.
"Sticky" feature does not work on mobile devices.
"Sticky" feature does not work on mobile devices, because if you open the menu, you can not click on the last item, it will always be outside the screen.
If you understand that use sticky menu on mobile devices is bad practice, but you still want it - use this code in "Custom CSS" field.
#mega_main_menu.direction-horizontal > .menu_holder.sticky_container
{
	position: fixed;
	top: 0px;
	left: 0px;
	width: 100%;
	border-radius: 0px;
	z-index: 2000;
	line-height: 0px;
	text-align: center;
}
#mega_main_menu.direction-horizontal > .menu_holder.sticky_container > .menu_inner
{
	display: inline-block;
}
#mega_main_menu.direction-horizontal.include-logo > .menu_holder.sticky_container > .menu_inner > .nav_logo,
#mega_main_menu.direction-horizontal > .menu_holder.sticky_container > .menu_inner > .mega_main_menu_ul
{
	vertical-align: top;
}
Search Box - Static instead Animated.
Add this code in the "Specific Options -> Custom CSS" field, to get static search box instead animated:
.mmm #mega_main_menu li.nav_search_box
{
	width: auto !important;
}
.mmm #mega_main_menu li.nav_search_box #mega_main_menu_searchform
{
	position: relative !important;
	right: 0px !important;
	display: block !important;
}
.mmm #mega_main_menu li.nav_search_box #mega_main_menu_searchform .field
{
	width: 160px !important;
	max-width 160px !important;
	padding-left: 8px !important;
	cursor: text;
}
Remove Dropdown Arrows
Add this code in the "Specific Options -> Custom CSS" field.
/* for 1-st levels */
#mega_main_menu > .menu_holder > .menu_inner > ul > li > .item_link:after
{
	content: none !important;
}
/* for 2-nd and other levels */
#mega_main_menu li.tabs_dropdown > .mega_dropdown > li > .item_link:before,
#mega_main_menu li.default_dropdown > .mega_dropdown > .menu-item > .item_link:before
{
	content: none !important;
}
Custom CSS to correct menu layout in "Avada".
First of all you must to activate "Specific Options -> Use Coercive Styles" option.
#mega_main_menu > .menu_holder > .menu_inner > ul > li.nav_search_box #mega_main_menu_searchform .field
{
	background-color: transparent !important;
}

#nav
{
	float: none !important;
}

#mega_main_menu > .menu_holder > .menu_inner > ul
{
	width: auto !important;
}

#snav > *,
#nav > #nav > *,
#small-nav .mobile-selector,
.mega_main_menu .fusion-main-menu-search
{
	display: none !important;
}

#snav > #mega_main_menu,
#nav > #nav > #mega_main_menu,
#small-nav #mobile-nav
{
	display: block !important;
}

#wrapper #mega_main_menu > .menu_holder > .menu_inner > ul > li > .item_link,
#wrapper #mega_main_menu > .menu_holder > .menu_inner > ul > li.multicolumn_dropdown .mega_dropdown > li > .item_link
{
	border: 0px none !important;
}

[class*="mega_main_menu"] #wrapper #nav ul li ul li a:hover
{
	background-color: transparent !important;
}
Custom CSS to correct menu layout in "X" Theme.
/* Hide logo of the theme */
.x-navbar .x-brand,
.x-btn-navbar,
.x-btn-navbar.collapsed
{
	display: none !important;
}

/* Fix for mobile menu */
.x-nav-collapse,
.x-nav-collapse.collapse
{
	height: auto !important;
}
.x-navbar-inner
{
	min-height: 0px !important;
}
Custom CSS to correct menu layout in "Enfold".
/* Stretch menu to theme layout container */
#header_main nav
{
	position: static !important;
	display: block !important;
}

/* Hide unnecessary elements */
#header_main .logo,
#mega_main_menu .menu-item-search-dropdown,
#advanced_menu_toggle,
#advanced_menu_hide
{
	display: none !important;
}

/* Auto height of the header */
#header_main .container
{
	height: auto !important;
	line-height: 1 !important;
}
Custom CSS to correct menu layout in "Jupiter".
.mmm .mk-header-nav-container
{
	display: block !important;
}
.mmm .mk-toolbar-resposnive-icon
{
	display: none !important;
}
Custom CSS to correct menu layout in "Divi".
.mmm #top-menu-nav
{
display: block !important;
}
.mmm #et_mobile_nav_menu
{
display: none !important;
}
Custom CSS to correct menu layout in "TwentySixteen".
/* stretch menu to full wide */
.mmm .site-header-menu
{
display: block !important;
width: 100% !important;
}
/* hide unnecessary menu button */
.mmm .menu-toggle
{
display: none !important;
}
/* hide site logo */
.mmm .site-branding
{
display: none !important;
}
For developers
mmm_set_configuration - to set custom configuration of the plugin using your theme functions.
add_filter( 'mmm_set_configuration', 'my_function_to_set_mmm_configuration' );

function my_function_to_set_mmm_configuration ( $default_configuration ) {

	// Get configuration of the plugin that is stored in the DataBase.
	$saved_configuration = get_option( 'mega_main_menu_options', array() );

	if ( ( $saved_configuration === false ) || empty( $saved_configuration ) ) { // If you do not have a saved configuration in the database - do your code.

		$theme_custom_configuration = $default_configuration;

		$menu_location_name = 'primary-menu'; // name of menu location of your theme.

		// FEW EXAMPLES

		// Format of the checkbox option
		$theme_custom_configuration[ 'mega_menu_locations' ] = array( $menu_location_name );
		$theme_custom_configuration[ 'responsive_styles' ] = array( 'true' );
		$theme_custom_configuration[ $menu_location_name . '_sticky_offset' ] = array( 1 );
		$theme_custom_configuration[ $menu_location_name . '_first_level_item_height_sticky' ] = array( 80 );
		$theme_custom_configuration[ $menu_location_name . '_mobile_label' ] = array( 'MENU' );
		$theme_custom_configuration[ $menu_location_name . '_first_level_separator' ] = array( 'none' );

		// Format of the input_text, textarea, radio option
		$theme_custom_configuration[ 'custom_css' ] = '.theme_custom_class #mega_main_menu { margin: 10px; }';
		$theme_custom_configuration[ 'logo_src' ] = 'http://menu.megamain.com/wp-content/plugins/mega_main_menu/src/img/megamain-logo-120x120.png';

		// Format of the group of the inputs (menu_bg_gradient)
		$theme_custom_configuration[ $menu_location_name . '_menu_bg_gradient' ] = array( 'color1' => '#FFF', 'color2' => '#FFF', 'start' => '0', 'end' => '100', 'orientation' => 'top' );
		$theme_custom_configuration[ $menu_location_name . '_menu_first_level_link_font' ] = array( 'font_family' => 'Inherit', 'font_size' => '13', 'font_weight' => '400' );
		$theme_custom_configuration[ $menu_location_name . '_menu_first_level_link_color' ] = '#666666';
		$theme_custom_configuration[ $menu_location_name . '_menu_first_level_icon_font' ] = array( 'font_size' => '13');
		$theme_custom_configuration[ $menu_location_name . '_menu_first_level_link_bg' ] = array( 'color1' => '#FFF', 'color2' => '#FFF', 'start' => '0', 'end' => '100', 'orientation' => 'top' );
		$theme_custom_configuration[ $menu_location_name . '_menu_first_level_link_color_hover' ] = '#bfd80f';
		$theme_custom_configuration[ $menu_location_name . '_menu_first_level_link_bg_hover' ] = array( 'color1' => '#bfd80f', 'color2' => '#FFF', 'start' => '2', 'end' => '0', 'orientation' => 'top' );
		$theme_custom_configuration[ $menu_location_name . '_menu_search_bg' ] = array( '#bfd80f' );
		$theme_custom_configuration[ $menu_location_name . '_menu_search_color' ] = '#f8f8f8';
		$theme_custom_configuration[ $menu_location_name . '_menu_dropdown_wrapper_gradient' ] = array( 'color1' => '#ffffff', 'color2' => '#ffffff', 'start' => '0', 'end' => '100', 'orientation' => 'top' );
		$theme_custom_configuration[ $menu_location_name . '_menu_dropdown_link_font' ] = array( 'font_family' => 'Inherit', 'font_size' => '13', 'font_weight' => '300' );
		$theme_custom_configuration[ $menu_location_name . '_menu_dropdown_link_color' ] = '#666666';
		$theme_custom_configuration[ $menu_location_name . '_menu_dropdown_icon_font' ] = array( 'font_size' => '13');
		$theme_custom_configuration[ $menu_location_name . '_menu_dropdown_link_bg' ] = array( 'color1' => 'rgba(255,255,255,0)', 'color2' => 'rgba(255,255,255,0)', 'start' => '0', 'end' => '100', 'orientation' => 'top' );
		$theme_custom_configuration[ $menu_location_name . '_menu_dropdown_plain_text_color' ] = '#666666';

/*
		// You can print $default_configuration to see full list of options (only in dashboard)
		print_r( $default_configuration );
*/

		add_option( 'mega_main_menu_options', $theme_custom_configuration );
	} else { // If you have configuration stored in the DataBase - do nothing.
		return false;
	}

}
Result in the "DataBase"
wp_options -> option_name = mega_main_menu_options
mmm_skin_extend - to add few custom CSS rules which user can not to change.
add_filter( 'mmm_skin_extend', 'my_function_to_extend_css' );

function my_function_to_extend_css ( ) {
	$my_css_rules = '.theme_custom_class #mega_main_menu { margin: 10px; }';
	return $my_css_rules;
}
Result (at end of file: /plugins/mega_main_menu/src/css/cache.skin.css)
	...
	...
	...
	.theme_custom_class #mega_main_menu { margin: 10px; }
mmm_container_class - to add extra CSS classes in the "Mega Main Menu" initial container.
add_filter( 'mmm_container_class', 'my_function_to_add_classes_in_container' );

function my_function_to_add_classes_in_container ( $default_classes ) {
	/*

	// You can print $default_classes to see full list of CSS classes of the initial container
	print_r( $default_classes );

	*/

	// Example
	$my_css_classes = '';
	$my_some_variable = 1;
	if ( $my_some_variable == 1 ) {
		$my_css_classes .= 'my_extra_class';
	}
	return $my_css_classes;
}
Result
<div id="mega_main_menu" class="primary primary_style-flat ... my_extra_class">
	...
		...
	...
</div>
Support
If you need support, if you have a question or suggestion - leave a message on our support page Support.MegaMain.com.