Thanks for having purchased HomeShop - Responsive Multipurpose VirtueMart Template, now it's time to get your fingers a little dirty and start configurate your theme. If you have any questions that are beyond the scope of this help file, please feel free to contact us via our Support Ticket. Thanks so much!
Quickstart Installation
If you're not familiar with Joomla we recommended you use the quickstart package.
Quickstart package
A quickstart is basically a brand new installation of Joomla with custom options. When you install this package you'll get a site that looks exactly like the demo and
has all extensions already installed and configured. Installing Quickstart package is like install normal joomla!.
Virtuemart v3
VirtueMart comes with some sample data. One of the best ways to get a quick start on using VirtueMart is to set up a development site with the sample data, and start modifying it. In the process of making changes you will learn how to maneuver through the admin, and set up shop. In addition to installation, we'll cover:
An overview of the default setup
Using the Administration section
Modifying the store front
Modifying the standard currency
Modifying product prices and display
Enabling PayPal as the payment method
Enabling basic shipping methods
VirtueMart is full of details and options. This will give you a good foundation of skills you need. Since VM 3.0 is so new, there are still many features that need to be developed, and will be available in the coming months. If you learn these basics you'll be able to take advantage of the full power of VM 3.0 as it's released.
MY PERSONAL NOTICE! I don't advice to install the new VM versions. Usually we are testing it on our test server and after provide official update on Themeforest site
This is just example how to install the new VM version. Images are symbolic
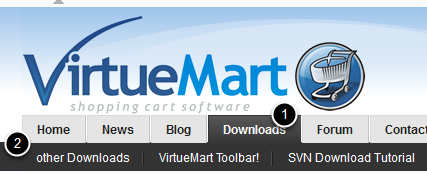
Be sure to download the newest version which is at the bottom of the list. They are alphabetical so the order is determined by the last letter in the version name. If there is a newer version when you read this, it will be there. If 2.0 is officially released you will be able to download it from the main URL http://virtuemart.net.
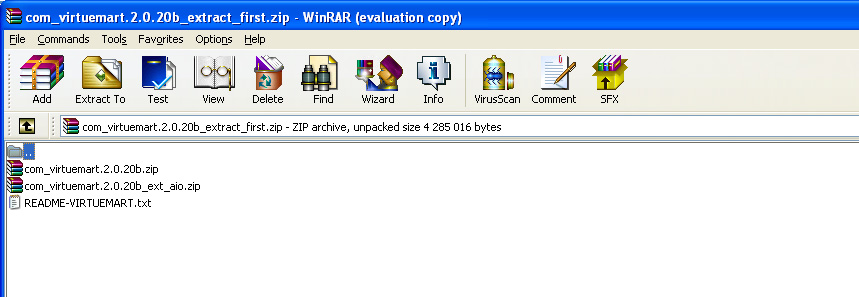
Notice in the name of the VirtueMart download that it says _extract_first - after you download it you will need to uncompress the file on your local computer or your server. You will see two more zipped directories.
After you uncompress the original file, upload and install com_virtuemart.1.9.8k.zip.
Repeat the procedure for com_virtuemart_ext_aio,1.9.8k.zip
The first one is the Virtuemart shopping cart itself, the second is a bundle of extensions and modules to enhance it. The aio in the name stands for All In One Installer (AIO).
Step 2. ACTION: Install
Go to Extensions > Extension Manager > Browse for the file > Click Upload & Install
When you get to the confirmation page, it will ask if you want to install Sample Data. Install the Sample Data.
Repeat the process and upload the AIO
2a. RESULT: The installed modules
You will see these modules automatically installed and enabled in your Modules Manager.
2b. RESULT: The installed plugins
These plug-ins will be automatically installed and enabled. You don't have to go to the Module Manager unless you want to change the position of a module, configure it or disable it. You don't need to visit the plug-in manager unless you need to disable it. There are no configurable parameters for any of the plug-ins.
Step 3. ACTION: Create a Menu Item
Go to Menus > Main Menu > Add New Menu Item.
Your front page will show you a warning that you must create a menu item before the cart will be accessible. So do this first.
3a. CONFIGURE: Name and Select
Give it a Title (Like Store or Shop. I'm going to use Virtue Mart Storefront)
Click Select
3b. CONFIGURE: Complete Selection
Under Virtue Mart click VirtueMart Default Layout.
You could pick Categories Layout or Category Layout if it suits you or you are creating a specific link. The default layout will create a "Store Front".
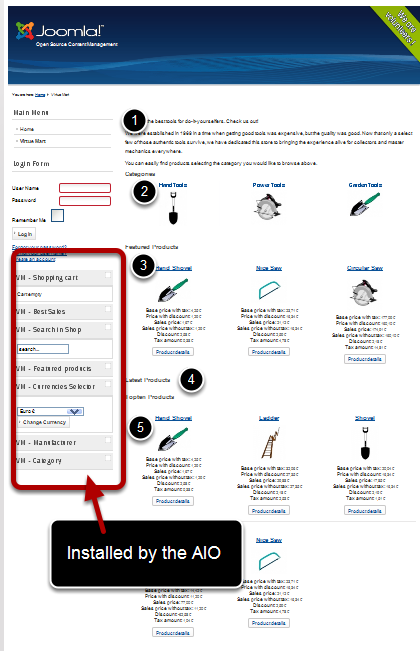
3c. RESULT: The store front with sample data installed.
To View the store go to your home page and click the menu link you just created.
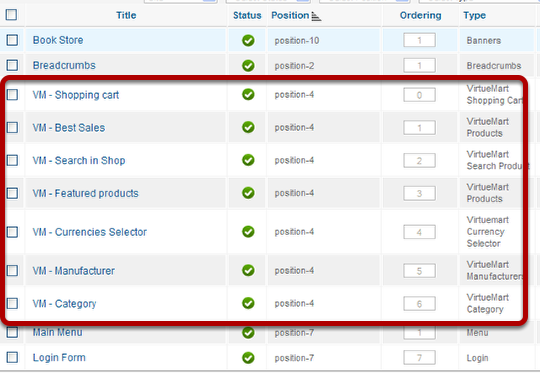
You will notice that all the modules that were installed now show on the site. You can modify and configure these in the Module Manager.
VM - Shopping cart is closed
VM - Best Sales is closed
VM - Search in Shop is closed
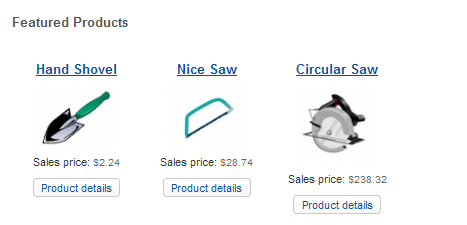
VM - Featured products is closed
VM - Currencies Selector is closed
VM - Manufacturer is closed
VM - Category
The page divisions show products and create sections on the store front.
Store Description
Categories
Featured Products
Latest Products (empty until you add your own)
Top Ten Products
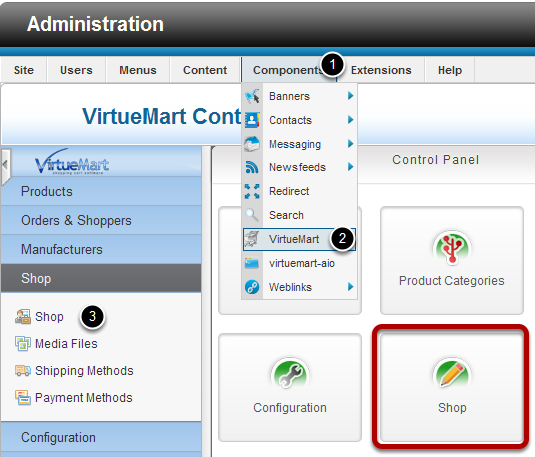
Step 4. ACTION: Start modifyng the company information
Go to Components > Virtuemart Click on Shop - You can use the shop icon or click Shop from the menu. Both will work.
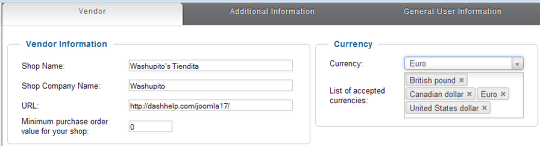
Step 5. CONFIGURE: Modify Vendor Information
Change the shop name and company name to yours. Set the default currency and modify the list of accepted currencies.
The default will be set to Euros. To change the default currency, select a different one from the drop down menu.
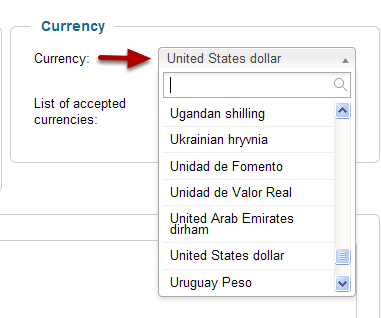
Step 6. CONFIGURE: Modify the base currency and other accepted currencies
Use the dropdown to change the base currency.
I've changed the default currency to United States dollar, now all the prices will show with a dollar sign in the cart.
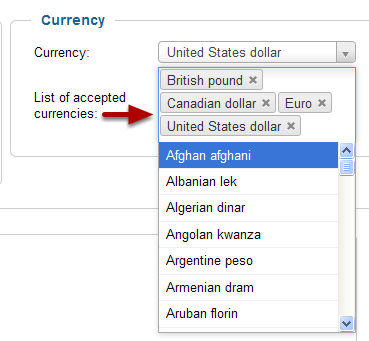
One of the modules you uploaded was a currency chooser. The user, while viewing the store, can use it to switch to any other currency you've approved. If you want to add or delete any other currencies use the List of accepted currencies field.
6a. CONFIGURE: Choose other currencies
Place the cursor in the field and a selection menu will appear. You can click the x next to the ones that were added by default to delete them, or add one by clicking on the list selection.
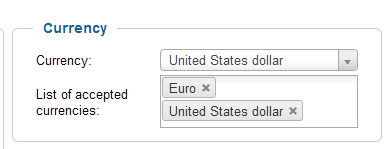
6b. RESULT: Your currency section should like this
For the currency selector to work, you will need to add the base currency to the list of accepted currencies. If you don't the currency selector on the front end won't show the option for the customer.
If you only are going to use one type, you can leave the List of accepted currencies field blank, and just set the main currency.
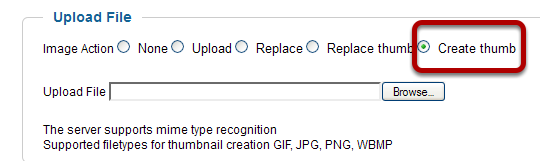
Step 7. ACTION: Change the logo image
Scroll down to the Image Information Panel
Change the name and details. ( You could un check Published if you aren't going to use a graphic)
Check the proper radio button. Nothing will change if you don't choose. This is confusing because of the placement of the labels. Pick the right one.
Browse your computer for the file to upload
Return to the top of the page and click Save to complete the action
7a. REPEAT: For thumbnail
I found I had to repeat this step to generate and replace the thumbnail.
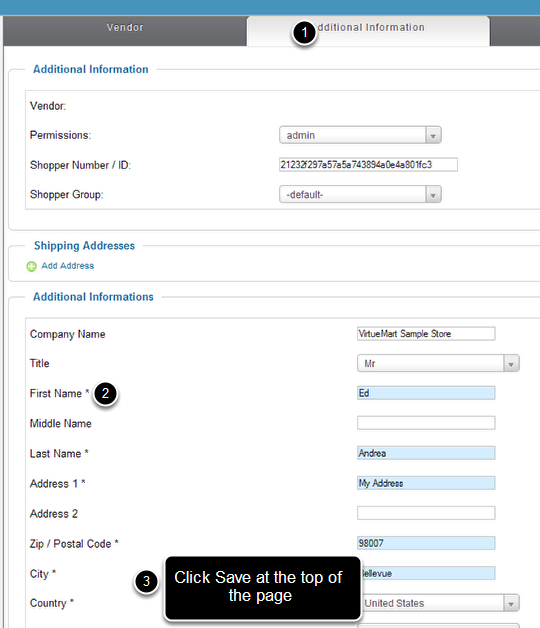
Step 8. CONFIGURE: Change the Vendor Additional Information
Switch to the Additional Information tab
Fill in the required fields
Click Save at the top of the page
The fields indicated with an asterisk and a blue background must be filled in or you will not be able to save your changes. If you were starting the store from scratch instead of using sample data, all these fields would be empty and you would need to make this the first task on your list before you could change anything on the other tabs.
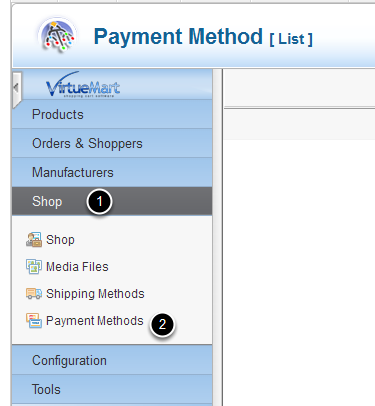
Step 9. ACTION: Enable Payment Methods
On the VirtuMart Menu go to Shop > Payment Methods.
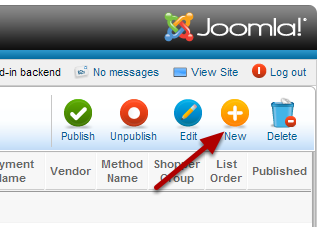
When you get there you will see a mostly blank page.
9b. CONFIGURE: Add new
Click New.
9c. CONFIGURE: Choose method
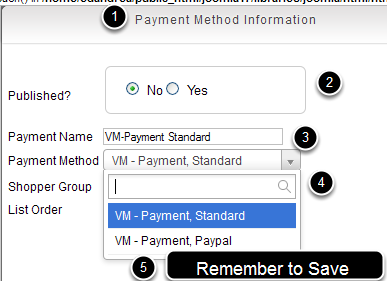
Go to the Payment Method Information tab
Click Yes to Publish
Fill in a Payment Name ( it won't save unless you do this)
Choose the payment method VM - Payment, Standard
Click Save at the top of the page
REPEAT: If you are going to use PayPal in addition to VM - Payment, Standard, repeat this step and choose Paypal this time.
At this time there are only two payment methods available for VM2.0 We expect to see many more in the near future. You can get some plug-ins now from the JED for specific gateways, and several are on the road map for the VirtueMart development project, but no set release times. Eventually there will be many choices for you here.
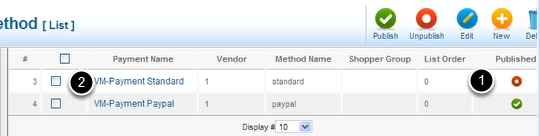
Step 10. ACTION: Publish the payment methods
Now that they are enabled you will see them on the Payment Method List.
Make sure you have published the ones you want.
Click VM Payment Paypal. Click the Payment name, or select the box and use the edit icon at the top.
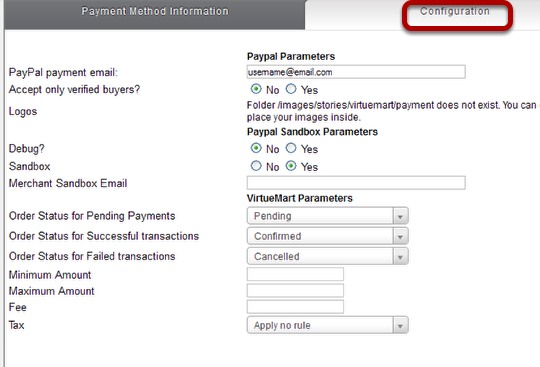
10a. CONFIGURATION: Switch tabs
Choose the Configuration tab.
Edit the Parameters.
Be sure to save.
If you are going to use Payment Method logos, you will need to create folder using the Media Manager, or FTP, in this location /img/stories/virtuemart/payment
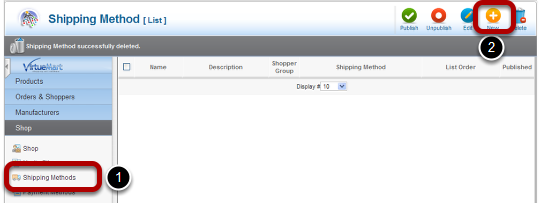
Step 11. ACTION: Enable the shipping methods
On the VirtueMart menu go to Shop > Shipping Methods
Click on New
You will see another blank page similar to the one for payment methods. The procedure for adding shipping is similar to adding payment methods.
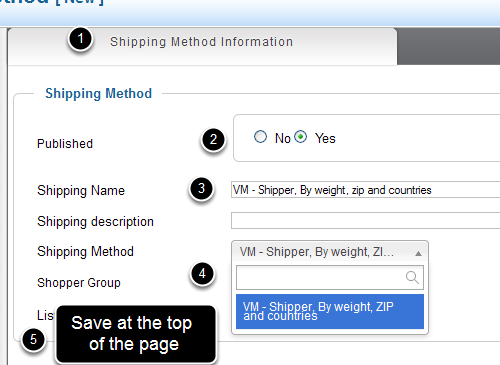
11a. CONFIGURE: Choose method
Go to the Shipping Method Information tab
Click Yes to Publish
Add a Shipping Name
Choose the method from the dropdown list
Save your changes
There is only one shipping method at this time More are in the works.
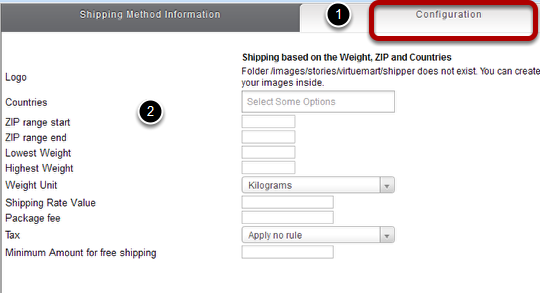
11b. CONFIGURE: Configure the shipper
Go to the Configuration tab
Add the parameters
If you are going to use a logo, you will first need to create the folder for the img at: /img/stories/virtuemart/shipper
The next item you could configure at this stage would be taxes.That's a big topic and deserves its own tutorial. There are sample tax structures set up now which we can use for the rest of the tutorial. We've adjusted and enabled all the basics, now let's get on to what most people want to do first. Change the way things look.
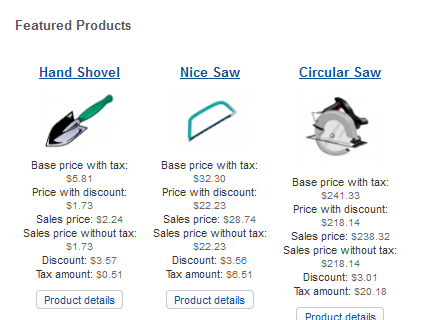
Step 12. ACTION: Modify the products
When you look at the short listing on the shopfront, you notice right away that there is an incredibly confusing array of prices. We need to fix that. So let's go to Pricing tab in the Configuration section.
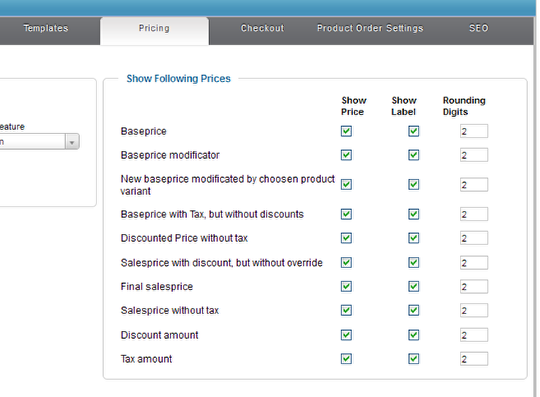
12a. CONFIGURE: Enable and disable unwanted prices
Click Pricing and you will see check boxes for showing or not showing the prices. Un check the ones you don't want to show. The Show Column controls the actual numbers. The Show Label column controls the label like "Salesprice without tax".
12c. RESULT: The modified products on the shopfront
Here are the same products with the both columns checked next to "Final salesprice" and everything else unchecked.
How to add new Custom HTML modules to your template
Some templates may contain the custom HTML modules that should be installed manually.
Please, enter Joomla! administration panel, and go to the Site → Global Configuration. Find the option "Default Editor" and select "No Editor". Default Joomla! WYSIWYG editors may modify the custom HTML module's code and cause you some issues.
Then go to the Extensions → Module Manager page. Press the "New" button in the top right corner
select "Custom HTML";
in the "Title" field type the title of your new module;
in the "Position" field choose the correct position for the new module from the Modules Configuration table;
in the "Module Class Suffix" field please, type the appropriate class suffix specified in the Modules Configuration table;
in the "Custom Output" text area please, put the HTML code provided in the appropriate file from the template "sources" folder. The correct filename could be found in the Modules Configuration table.
Menus
To create a new menu or edit an existing one go to the admin panel and choose Menus - Menu Manager form the top menu.
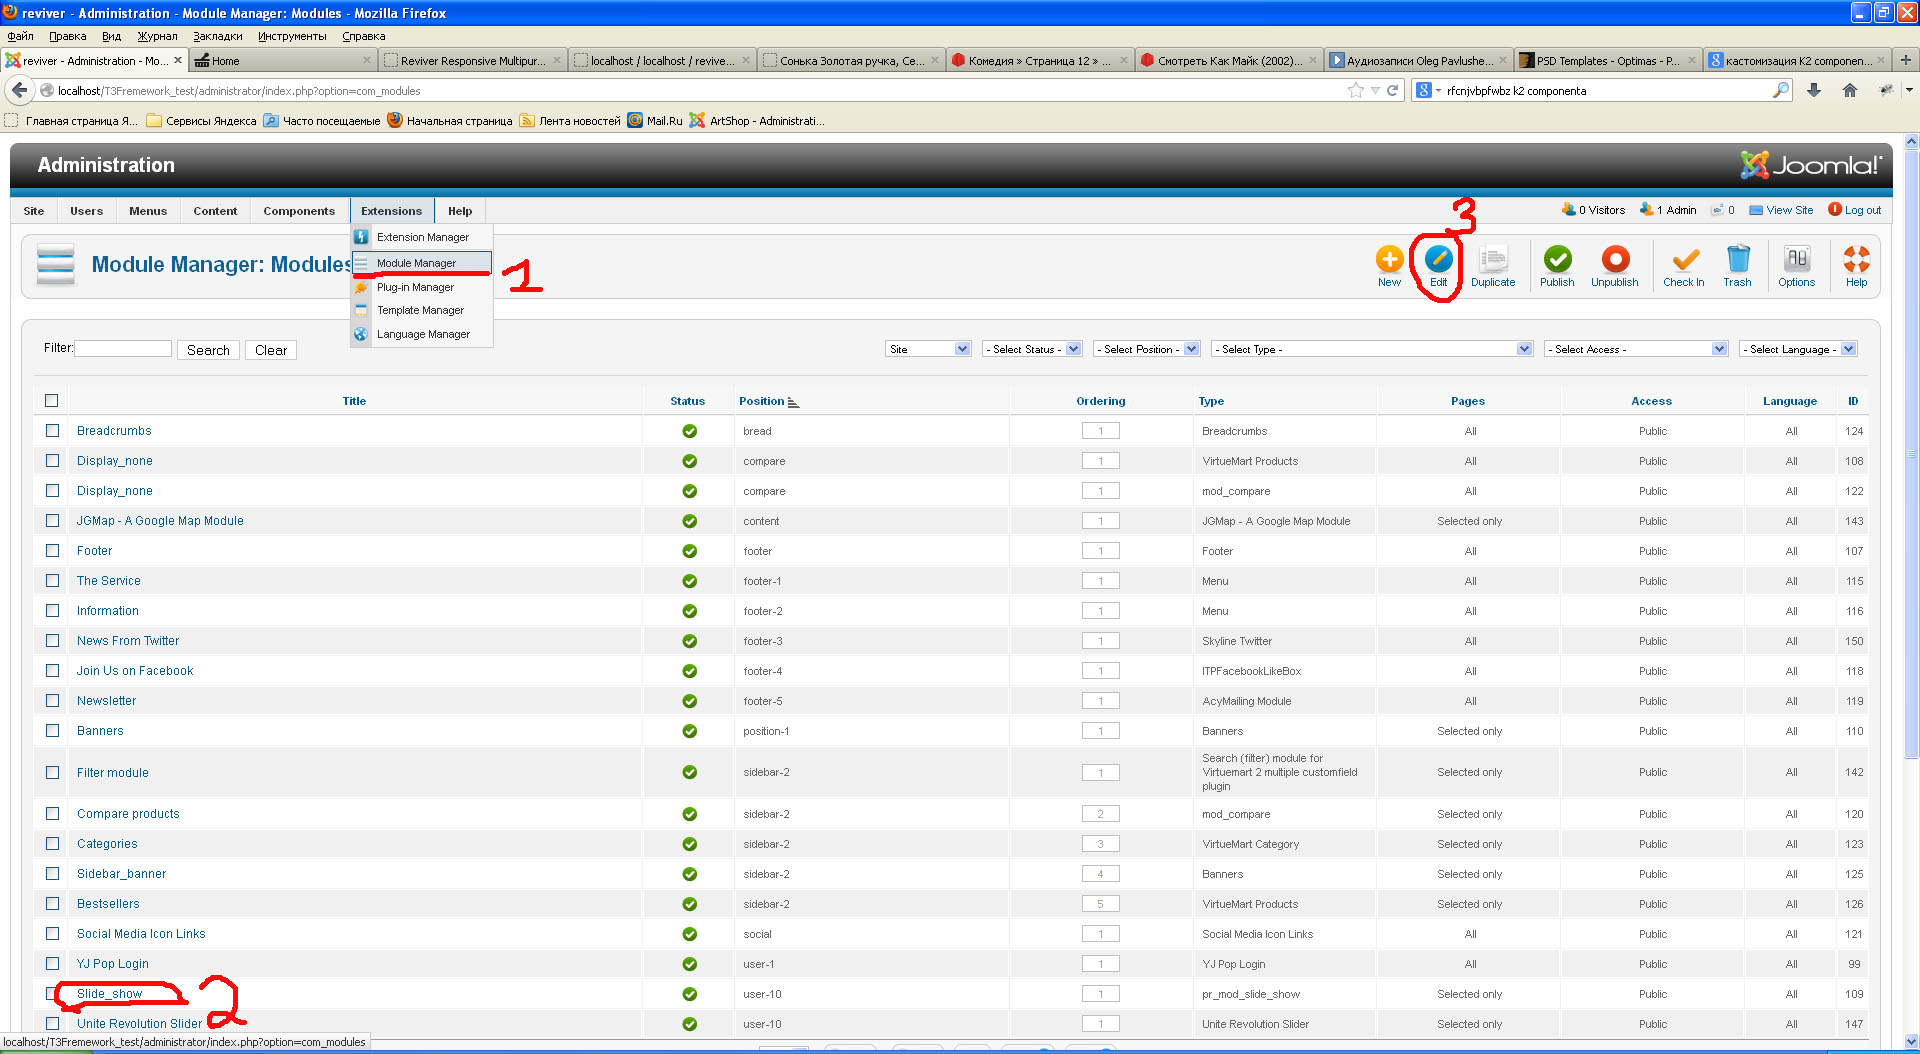
When you have made and set up your menus, go to Extensions - Module Manager and click create new (on the top right menu).
Now you just have to give your menu a title, select the menu you created from the list and give it a position.
The other settings are optional and will often depend on the kind of menu. Menus are likely to go to the top-menu, right/left or footer-col-modules
positions and they will be styled accordingly.
Here is how the mega menu looks like. You can adjust and manage it with ease. Beside the already created menu, you can also insert the modules.
Category & Product Page Layout Variations
Tips and Tricks
IMPORTANT!!! Please do not update the template, components, modules and plugins by yourself. There is no bugs in this product. Nevertheless, I recommend you to wait when we update it. Moreover, we will describe in details what exactly is changed, what is better and how to change it. If you really want to update without our assistance, then make the components backup obligatory com_akeeba-3.7.4-core or with other tools.
In this store the multilanguage is installed (incl. German, French and Italian). However, the template uses a default English language. Nevertheless, you have an opportunity to choose your own language and redefine the modules, articles and themes on your language. As you know, the demo version supports several languages. If you install another language which is not included in the list then it will not be displayed. You will need to resave the demo products, categories and delivery methods on that language on which you have installed. In addition, you need to understand that it mostly concerns the Shopping Cart module. If you install it and then adjust the new language, add this language to the Shopping Cart module, rename all the constants, then it is needed to be reinstalled in order to make them work and display properly on your website. This concerns other components and modules.
Template Customization. In the template you will find less, css, retina fonts. The less files are intended only for the less code. If you are not familiar with the less code then I recommend you to code in the css files. All the needed styles for the customization are placed in the custom.css and custom-responsive.css files. Also, you can input some settings via the Template Manager admin panel: Styles\t3_bs3_blank - Default\thememagic (see the screenshots below).
But you need to save your own settings before you create a new theme. Our template uses a default theme. In future we are planning to add new theme skins. After you save the theme, you need to indicate in the appearence style this theme. If you read the Framework documentation then everything will be understandable for you. This framework is very flexible and allows to make much.
Here is a short course on how to customize the template. Important things:
1. Install the Firebug for the Firefox browser or use inbuilt one for Chrome by clicking the F12 button on your keyboard.
2. To hide the Wishlist and Compare buttons you need to hide them in css: .wishlist , #compare_cat {display:none;}
3. If your store has several currencies or simply use the currency module, then you can see bellow how to show and rename them:
4. The pagination is adjusted in the config files. Attention! This adjustment is common for all (Configuration\Shopfront\Default items per listing view). The step in the drop-down list can be adjusted in the admin panel (Configuration\Templates\Set the pagination sequence for the List Box ). Also, you can adjust the pagination for the categories separately. For this you need to go to the categories and adjust the number of displayed items.
5. The following settings are no activated yet: Configuration\Templates\Default number of categories in a row , Default number of products in a row , Default number of manufacturer in a row. Now they show 1 item (by default) and you cannot change this via the admin panel. For this reason we removed them for some time in order not to destroyed the template. Once we sort this out and make them active, the template will be updated and you will be notified first.
6. There is a checkbox and the dimension for the small images in the store. When the checkbox is marked, then the images will be cut off according this dimension. If not marked, then you need to upload them by yourself. This is a mandatory condition for the normal displaying images in the store. The dimension of the small images is 280px x 280px, the big ones - 380px x 380px and bigger. Be sure that you keep the image proportion and then your store will look fine.
Also, the admin panel has a possibility to synchronize all the images which are in the folder. Please see the screenshot above. By creating a product you need to choose them and not to upload (see the screensho below).
8. There are 2 modules in the Manager module (Display_none) and they should not be delete. These modules are not displayed anywhere but they check an accuracy of displaying. This is because of the VirueMart specificity.
9. Single product page. The displaying of all the possible prices can be edited in the template (templates\t3_bs3_blank\html\com_virtuemart\productdetails\default_showprices.php). Why did I comment the output of more than 10 prices? I output the final price and the price with the discount. Taxes and discounts you can find in the shopping cart. In the template these prices are not shown. If you need to show them, then you need to remove my comments from those code. You can hide the product rating, reviews with the comments and manufacturers in the admin panel: in order to hide the manufacturer write .stock {display:none;}. To hide the product code - .code {display:none;}. Hide social icons - .share {display:none;}. Hide the "ask a question" link - .ask-a-question {display:none;}. Hide the product dimensions and weight - .Dimensions {display:none;}.
The templates which are used for the displaying custom fields and other stuff:
1. templates\t3_bs3_blank\html\com_virtuemart\productdetails\default_relatedproducts.php - this template for displaying related products. It means if you need to edit something that concerns the related products then you need to do this in this file; For the output the following code is used:
if (!empty($this->product->customfieldsRelatedProducts)) {
echo $this->loadTemplate('relatedproducts');
}
2. templates\t3_bs3_blank\html\com_virtuemart\productdetails\default_addtocart.php - this template is for the adding products form. There are custom fields with the shopping cart attribute. For the output we use:
echo $this->loadTemplate('addtocart');
3. templates\t3_bs3_blank\html\com_virtuemart\productdetails\notify.php - this template outputs the info when a product is out of the stock. You can see this page via the adding a product to a shopping cart. In this case the "Add to Cart button" is replaced with the "notify me" button.
4. templates\t3_bs3_blank\html\com_virtuemart\productdetails\default_manufacturer.php - displaying the Manufacturers page.
5. templates\t3_bs3_blank\html\com_virtuemart\productdetails\default_video.php - this is a custom field for the video output on a single product page. The template is displayed as tabs. Position in the admin panel: $this->position = 'video'; and for the template: $this->loadTemplate('video')
6. templates\t3_bs3_blank\html\com_virtuemart\productdetails\default_relatedcategories.php - this is a related categories template. It is displayed in tabs echo $this->loadTemplate('relatedcategories');
7. templates\t3_bs3_blank\html\com_virtuemart\productdetails\default_showprices.php - this template for the displaying price. You can edit the price in this file. For the output: echo $this->loadTemplate('showprices');
8. templates\t3_bs3_blank\html\com_virtuemart\productdetails\default_reviews.php - the reviews and rating template, displayed in tabs. For the output use: loadTemplate('reviews'); ?>
Also, you can use jcomments. In order to switch off them via the admin panel, use the same wrap as for the reviews. If you want to output them you need to use product->event->afterDisplayContent; ?>. They are also shown in tabs.
9. templates\t3_bs3_blank\html\com_virtuemart\productdetails\default_custom.php - a custom field for the custom info output on the single product page. The template is displayed in tabs. The position for the output is $this->position = 'custom'; and for the template $this->loadTemplate('custom'). If you want to output several custom fields, then you need to copy the template and rename it on custom2. On the single product page copy, rename it. Pay your attention on the tab IDs. In the admin panel create a custom field with a position which has been renamed by you. It should look like:
<?php if (!empty($this->product->customfieldsSorted['custom2'])) { ?>
<div class="accordion-group">
<div class="accordion-heading">
<a class="accordion-toggle collapsed" data-toggle="collapse" data-parent="#accordion" href="#collapseXXX">
<?php echo JText::_ ('COM_VIRTUEMART_CUSTOM_TAB_XXX'); ?>
<span class="VmArrowdown"></span>
</a>
</div>
<div id="collapseXXX" class="accordion-body collapse">
<div class="accordion-inner">
<?php
10. templates\t3_bs3_blank\html\com_virtuemart\productdetails\default_customfields.php - this is a standart custom field.
<?php
if (!empty($this->product->customfieldsSorted['normal'])) {
$this->position = 'normal';
echo $this->loadTemplate('customfields');
} // Product custom_fields END
// Product Packaging
?>
This field is displayed above the tabs.
11. templates\t3_bs3_blank\html\com_virtuemart\productdetails\default_filter.php - this template for the output filter fields, they are displayed in tabs with description.
<?php
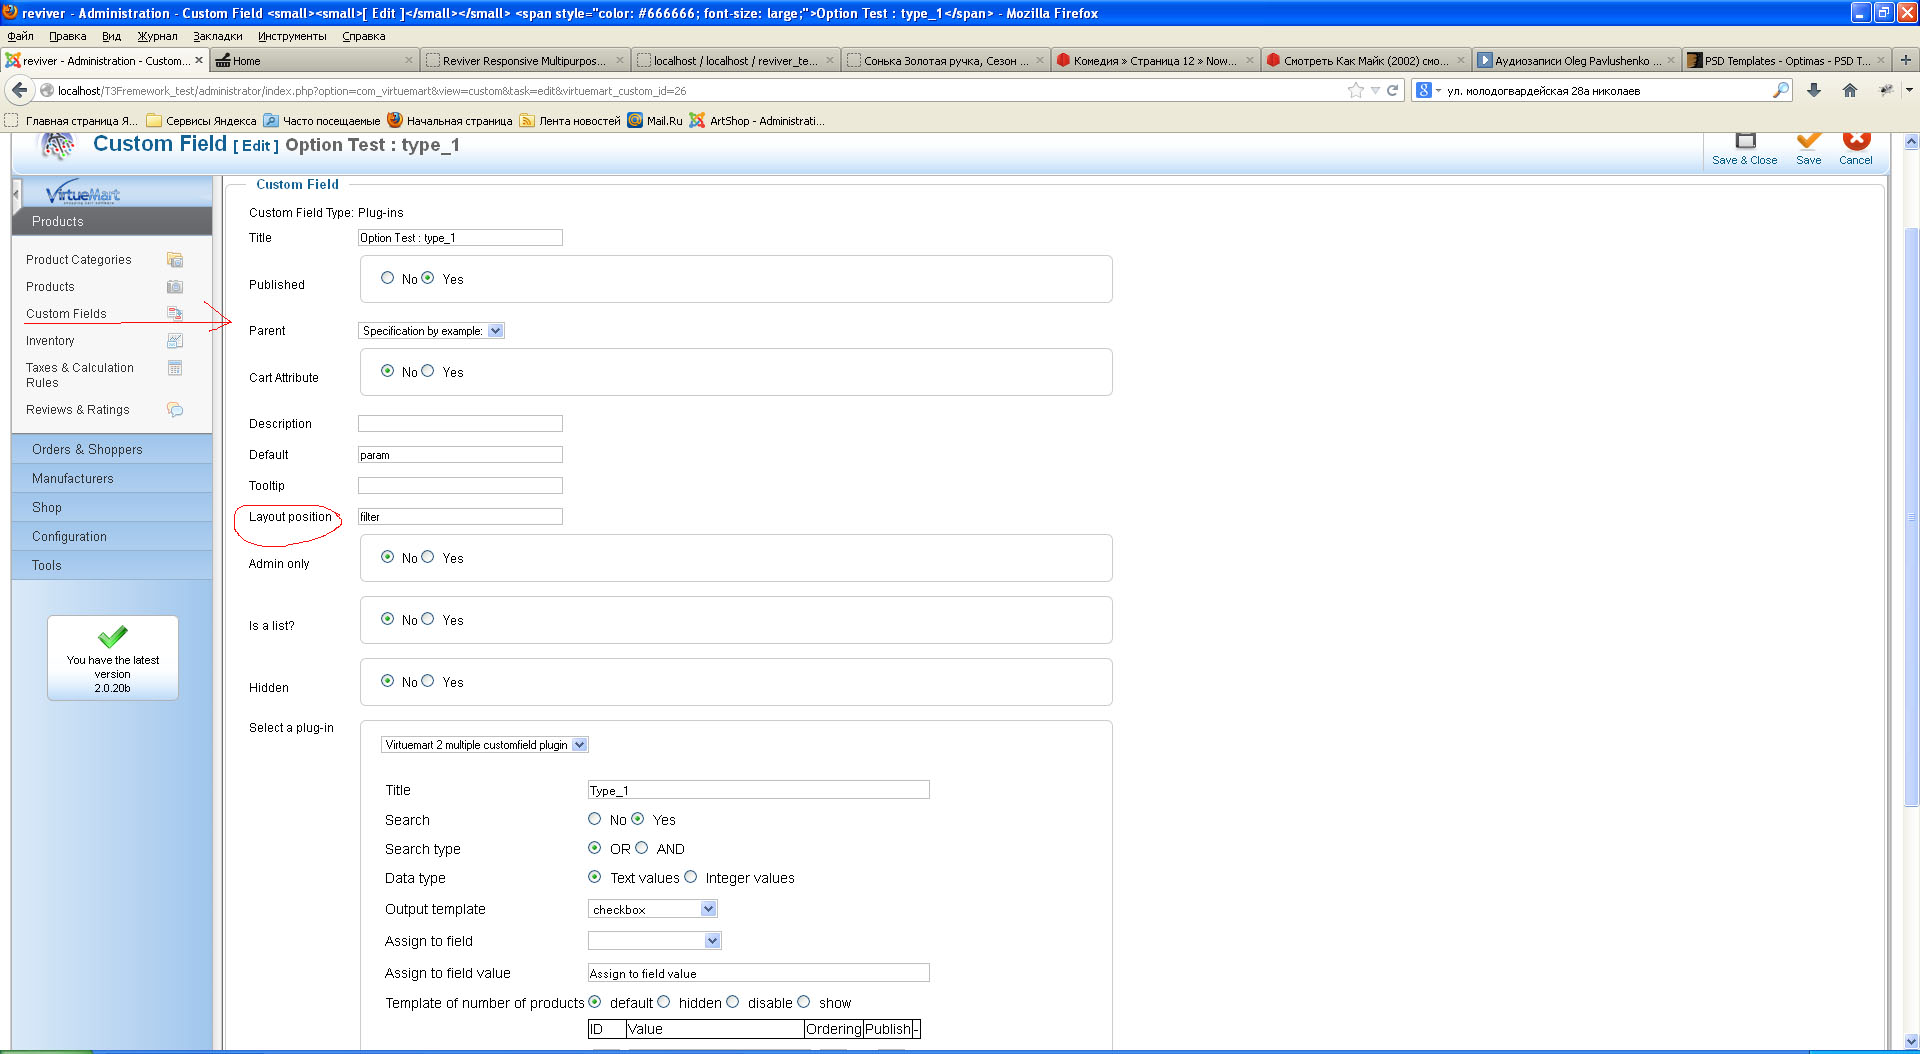
if (!empty($this->product->customfieldsSorted['filter'])) {
$this->position = 'filter';
echo '<div class="filter">' .$this->loadTemplate('filter').'</div>';
} // Product custom ?>
12. templates\t3_bs3_blank\html\com_virtuemart\productdetails\default_recently.php - the recently viewed products template: echo $this->loadTemplate('recently');
13. templates\t3_bs3_blank\html\com_virtuemart\productdetails\default_images.php - you can edit this template only in a case if you refuse to use the (plg_vmslider) plugin which displays an image on a single product page.
If you need to output custom fields in the template, then you can use the already ready templates or create your own templates with your positions and output these fields on a single product page:
<?php
if (!empty($this->product->customfieldsSorted['normal'])) { // this condition checks whether this template is used or not. If yes, then it is displayed. If not, it is empty.
$this->position = 'normal'; // the position which is responsible for the custom field output.
echo $this->loadTemplate('customfields'); // the template for the custom field editing.
} // Product custom_fields END
?>
The position is on the screenshot
Custom Tab, Video, Related Categories, Related Products - are all the custom product fields which can be adjusted via the admin panel. Also, they are attached to the products and if you remove them in the product, then they will be hidden in the template.
The main image and thumbnails can be adjusted via the Plug-in Manager: System - Virtuemart Slider.
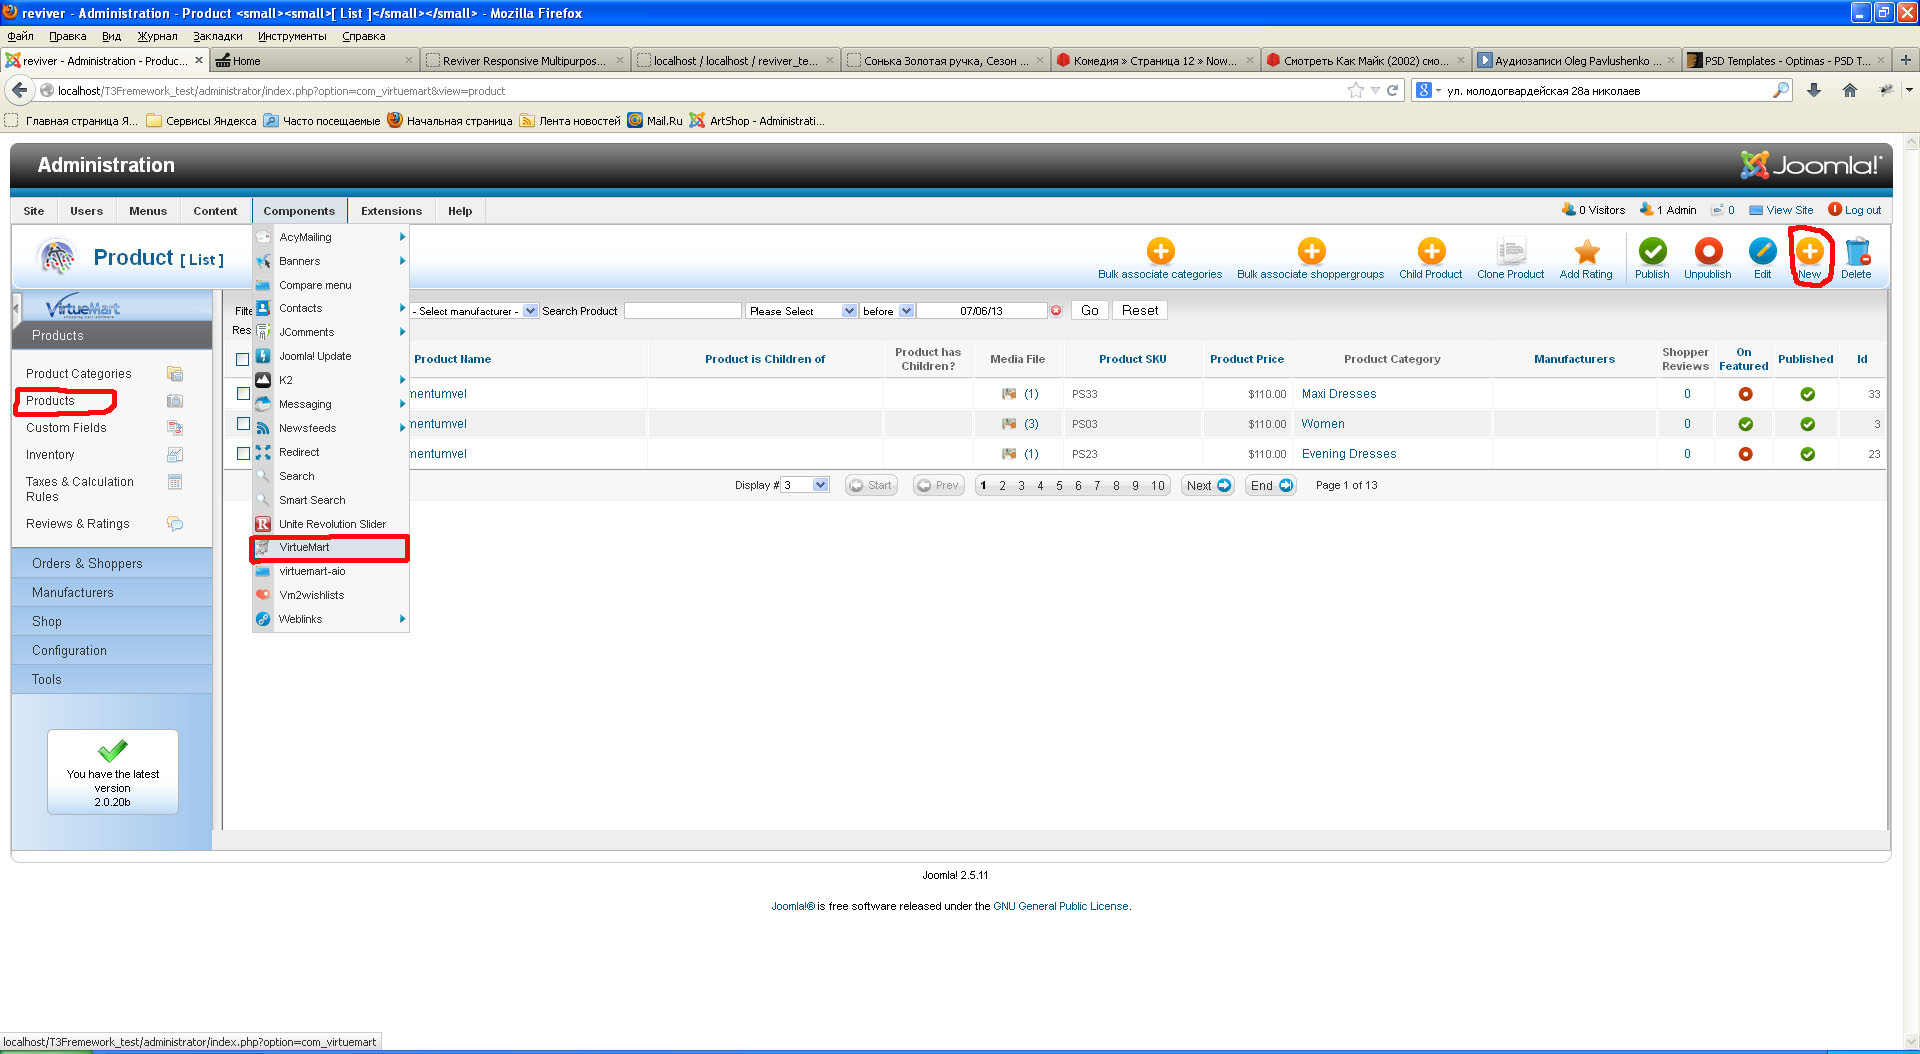
In order to create a product and a category you need to go to the VirtueMart components and choose the necessary tab. After that click NEW. See the screenshot.
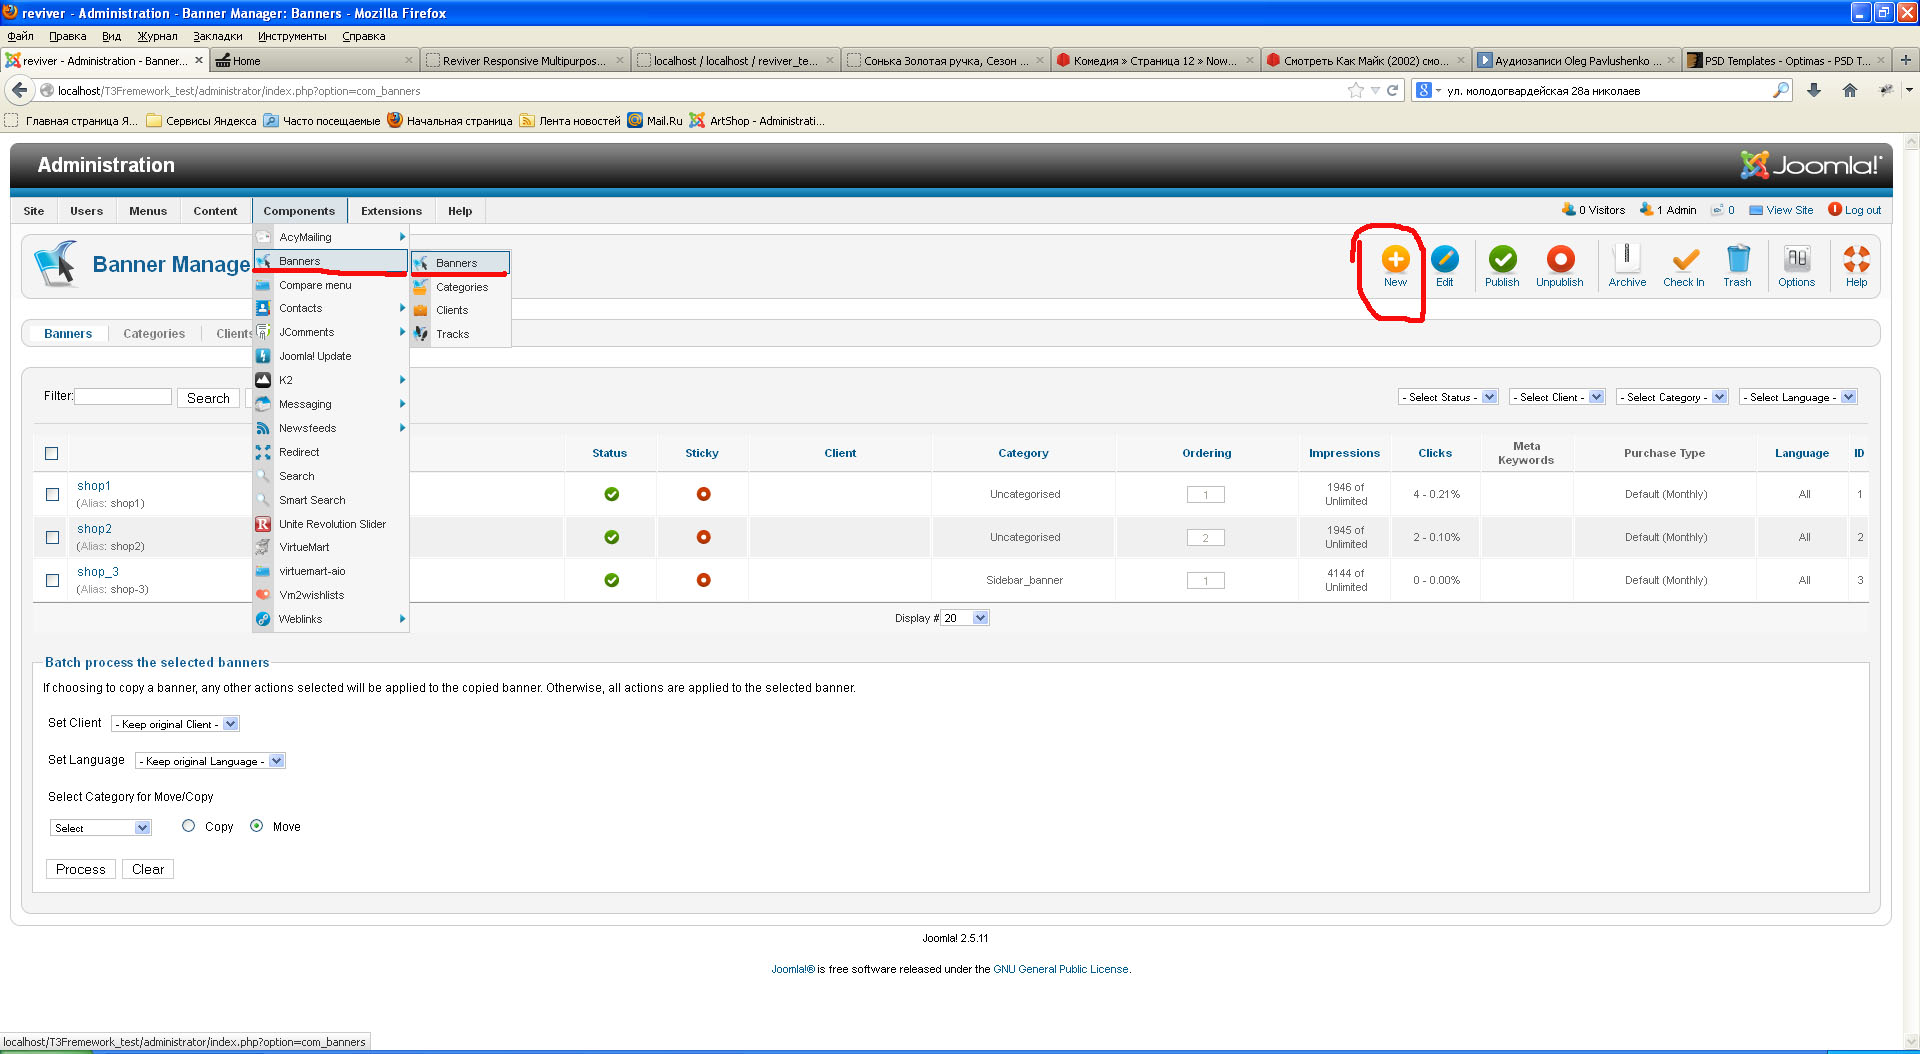
How to create or edit the banner please see the following screenshot:
On the next screenshots you'll see how to create or edit the slider:
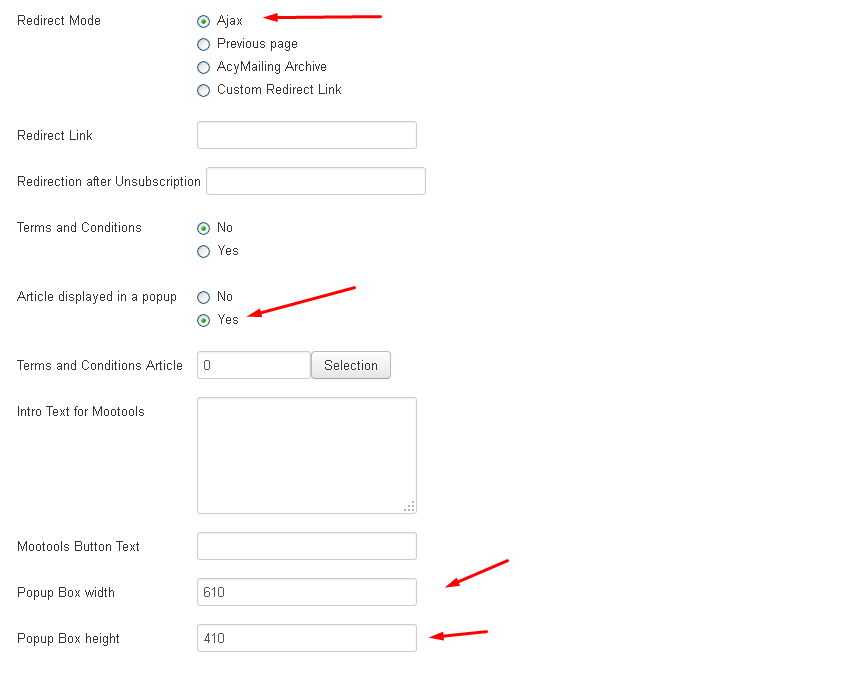
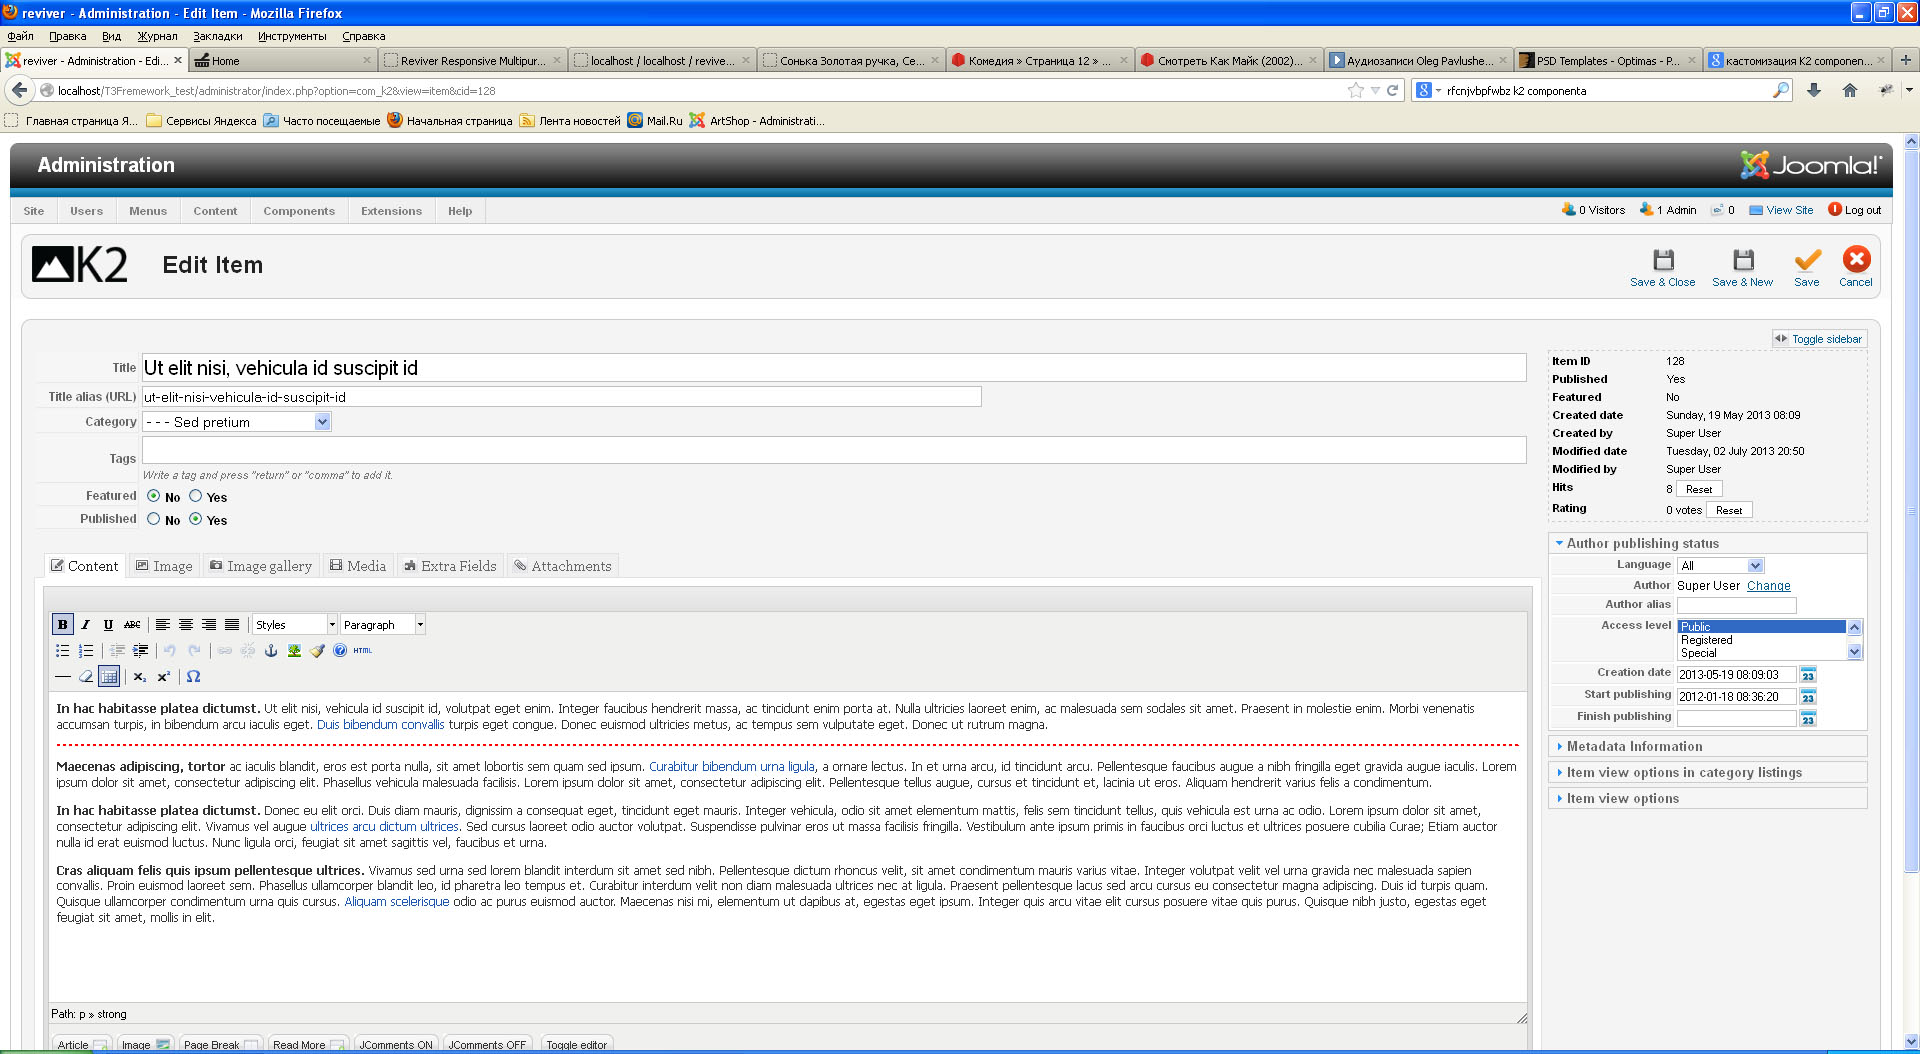
If you want to create or change the article in К2 (the Blog page) then it is better to read about this by clicking here.
It is possible to display not the full text on the Blog page, only one or two paragraphs. For this in the text editor you need to separate the necessary text (paragraph) with the code
The footer is displayed with the help of the module (templates\t3_bs3_blank\html\mod_footer\). There you can also edit, delete and add stuff. For the customization all the files of the theme are placed here: templates\t3_bs3_blank\tpls\blocks\ There you can see a lot of blocks from which the framework (skeleton) was created. The files, in which all the blocks are assembled, for example the page with the left sidebar, is here templates\t3_bs3_blank\tplsdefault-home3.php
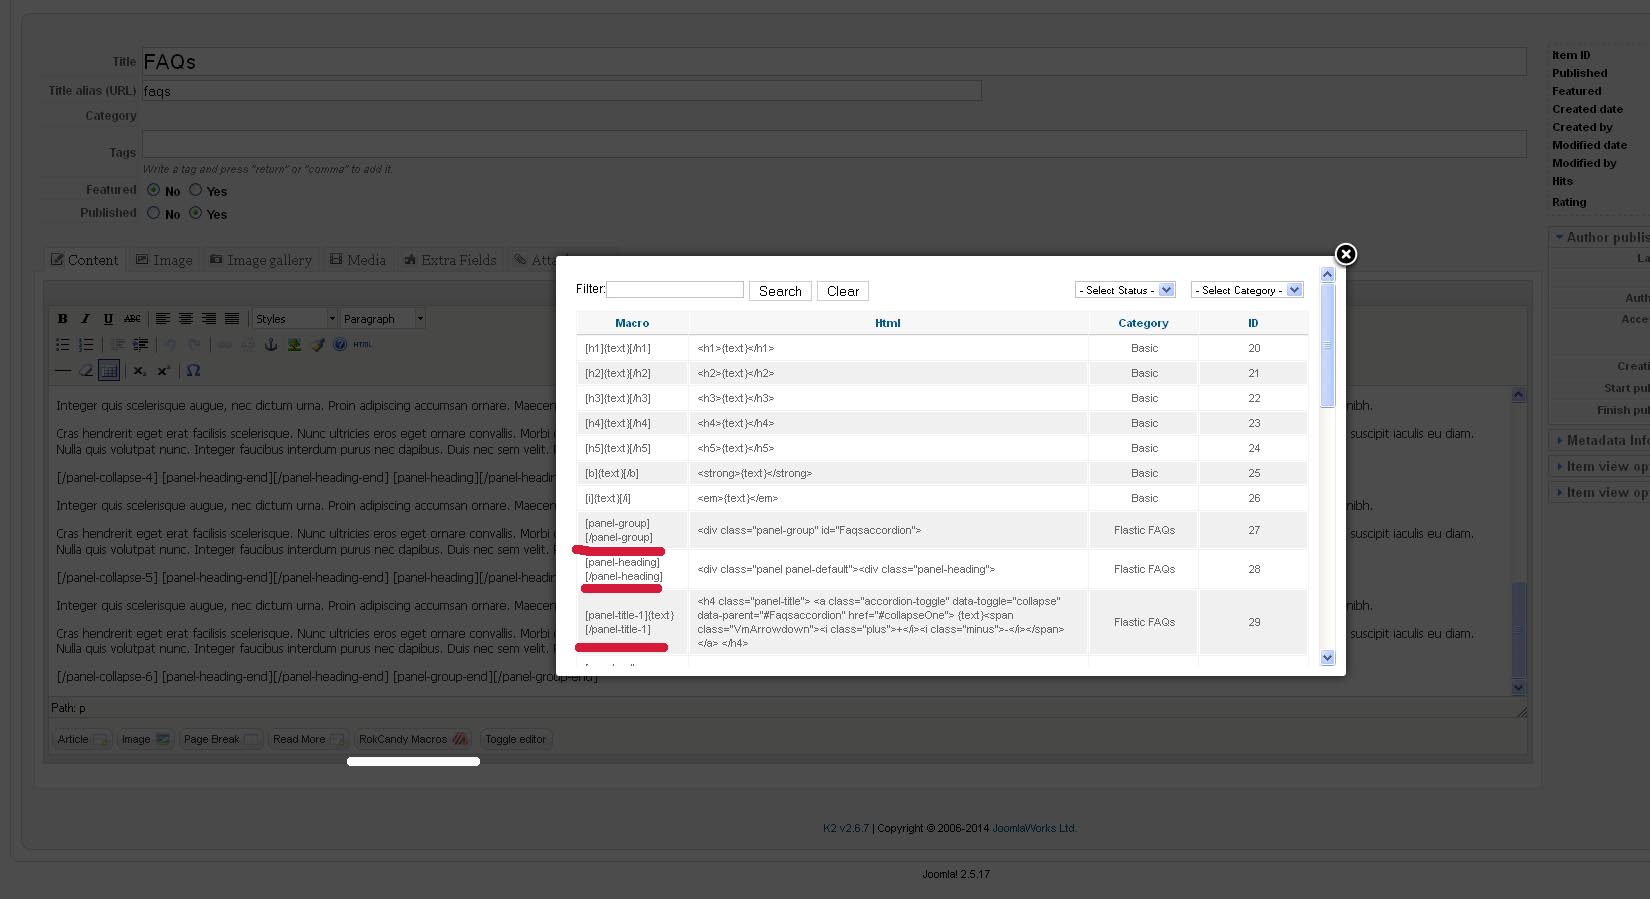
How to use shortcodes for the accordion creation in the RokCandy component
Use Editor - CodeMirror in order to insert these shortcodes. If you use a standard editor, then unnecessary gaps appear. The Shortcodes are created with HTML. You just need to place them in the proper order and add the content. By clicking the "RockCandy Macros" button, for example, in K2. See the screenshot below:
The shortcode structure is the following: for accordion there are 12 sections are created.
[panel-group][/panel-group] - it opens a container for accordion. HTML: <div class="panel-group" id="Faqsaccordion">
[panel-heading][/panel-heading] - it opens a section for the first accordion title which includes the title and content. HTML: <div class="panel panel-default"><div class="panel-heading">
[panel-title-1]{text}[/panel-title-1] - this is an accordion title. Instead of {text} type your text. HTML: <h4 class="panel-title"> <a class="accordion-toggle" data-toggle="collapse" data-parent="#Faqsaccordion" href="#collapseOne"> {text}<span class="VmArrowdown"><i class="plus">+</i><i class="minus">-</i></span> </a> </h4>
[panel-collapse-1]{text}[/panel-collapse-1] - this is the content of the accordion. Instead of {text} insert your content. HTML: <div id="collapseOne" class="panel-collapse collapse in"> <div class="panel-body"> {text} </div> </div>
Note! If 12 sections are not ehought, then you can add extra sections but keep in mind that IDs should coincide with each other: href="#collapseOne" = id="collapseOne"
[panel-heading-end][/panel-heading-end] - close the section of the first title. HTML: </div></div>
[panel-group-end][/panel-group-end] - close the container of accordion. HTML: </div>
In the nearest future we're planning to integrate more suitable shortcode system.
In the next updates all the fixes and solutions will be inserted in docs.
If you have any questions concerning the customizations or you find a bug or you just think that something should be better, then please contact us via the Support Ticket. It will be easier and quicker to help you. Thank you!
Custom solutions and FAQ
I collected many-many custom solutions and custom code for our VM items
There are many language packages available for Joomla but the template has some custom strings of text. Don't worry though, translation is really simple.
All language strings are stored in the language/xx-XX folder, where x is the language key (e.g. en-GB for english and es-ES for spanish). You need to copy
en-GB.tpl_t3_bs3_blank.ini to your language folder and change the language code in the name. Then open it with any text editor and translate the few phrases/words
in the "frontend strings" section.
PSD Files
You can find the well-organized PSD files in the PSD folder. Make sure you save the images in the correct format. They are either pngs or jpgs.
This chapter is for people who had bought the theme before we made the updates. It will help them to update their current theme.
Update 1.1
Version 1.1 - for buyers who have version 1.0 (bought it between October 16th - November 3th, 2015) and want to update their website to version 1.1
IMPORTANT! Make a backup before the update!
Version 1.1
-------------------------
1.Update Joomla_3.4.5
2.Update com_virtuemart.3.0.11.2_extract_first
3.Fixed SEF link for quickview, compare and wishlist
4.Added Genius Search mod_genius_vm_ajax_search_vm3
5.Fixed link Add to cart on popup
6.Update plg_system_t3.v2.5.1
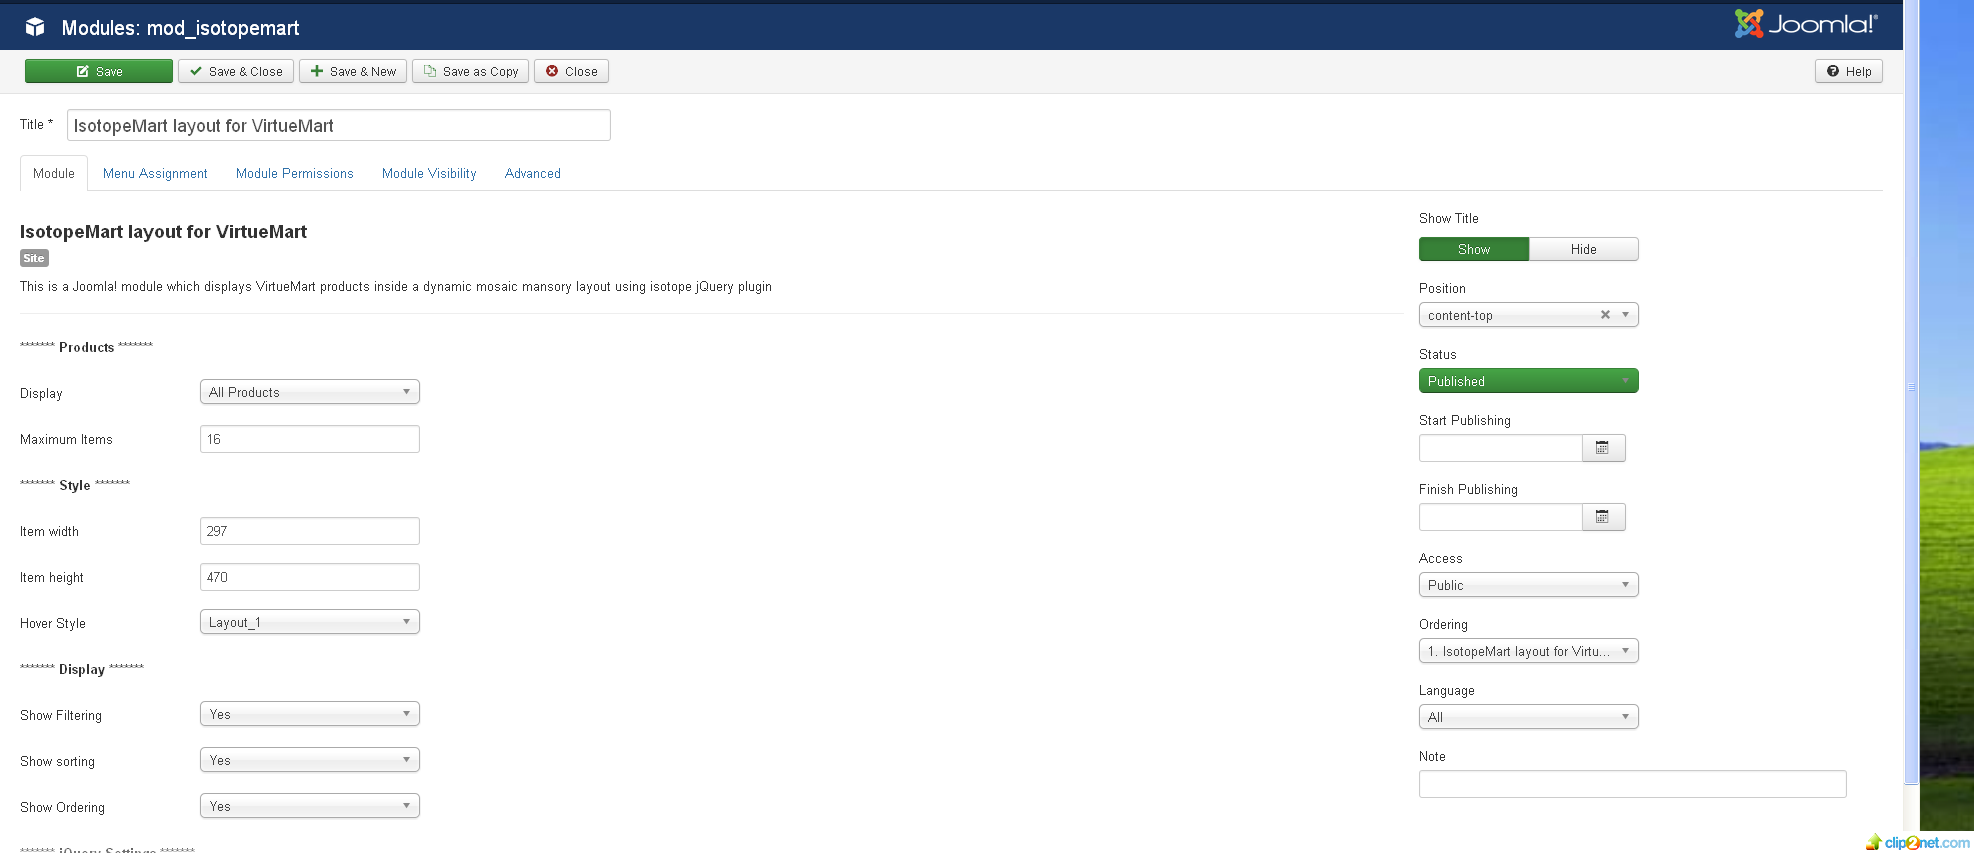
7.Added mod_isotopemart_v1.0.0
8.Fixed quickview
Version 1.6 - for buyers who have version 1.5 (bought it between March 29th, 2016 - January 28th, 2017) and want to update their website to version 1.6
IMPORTANT! Make a backup before the update!
Version 1.6
-------------------------
1.Update VM 3.0.19.1
2.Update Joomla 3.6.5
3.Update Acymailing
4.Added new google map plugin_googlemaps-J25_J3x.v3.3.zip
5.Fixed recaptcha
6.Changed login form on Checkout
7.Fixed vendor
After open plugin System - JS CSS Control and remove excerption /components/com_virtuemart/assets/js/vmprices.js In the end you have to see only string jquery.fancybox-1.3.4.pack.js
\updates\update1.7\mod_virtuemart_category_tf.zip Small image of output
10.Install all extensions from \updates\update1.7
Update 1.8
Version 1.8 - for buyers who have version 1.7 (bought it between June 30th, 2017 - September 23th, 2017) and want to update their website to version 1.8
NOTICE! After fullpackage installation switch on plugins System - JCH Optimize and System - Page Cache
Update 1.8.1
Version 1.8.1 - for buyers who have version 1.8 (bought it between September 23th, 2017 - October 4th, 2017) and want to update their website to version 1.8.1
IMPORTANT! Make a backup before the update!
Version 1.8.1
-------------------------
1. Fixed ThemeMagic
2. Update T3 framework
What should you do to update
1. Reupload files from
\updates\update1.8.1\re-upload\
Version 1.9 - for buyers who have version 1.9 (bought it between October 4th, 2017 - December 30th, 2017) and want to update their website to version 1.9
IMPORTANT! Make a backup before the update!
Version 1.9
-------------------------
1. Fixed search for php7
2. Update VM 3.2.12
3. update Joomla 3.8.3
4. Update OPC plugin 2.2.47
5. Update acymailing 5.8.1
6. Fixed error in mod_acymailing.php (acymailing_loadMootools())
7. Fixed plugin and cart module for multi-languages
8. Fixed tabs module and random products
What should you do to update
1. Reupload files from
\updates\update1.9\re-upload\
2. Install everything from
\updates\update1.9\
3. Update joomla using admin panel
Update 2.0
Version 2.0 - for buyers who have version 1.9 (bought it between December 30th, 2017 - June 13th, 2018) and want to update their website to version 2.0
IMPORTANT! Make a backup before the update!
Version 2.0
-------------------------
1. Update VM 3.2.14
2. Update 3.8.8
3. Update One Page Checkout 2.2.53
4. Update AcyMayling 5.10.1
5. Update unite_slider5.0.14
What should you do to update
1. Reupload files from
\updates\update2.0\re-upload\
2. Install everything from
\updates\update2.0\
3. Update joomla using admin panel
Update 2.1
Version 2.1 - for buyers who have version 2.0 (bought it between June 13th, 2018 - November 5th, 2018) and want to update their website to version 2.1
IMPORTANT! Make a backup before the update!
Version 2.1
-------------------------
1. Update VM 3.2.14
2. Update 3.8.8
3. Update One Page Checkout 2.2.53
4. Update AcyMayling 5.10.1
5. Update unite_slider5.0.14
6. Fixed ajax script for multivariants


 But you need to save your own settings before you create a new theme. Our template uses a default theme. In future we are planning to add new theme skins. After you save the theme, you need to indicate in the appearence style this theme. If you read the Framework documentation then everything will be understandable for you. This framework is very flexible and allows to make much.


 On the next screenshots you'll see how to create or edit the slider:
 If you want to create or change the article in К2 (the Blog page) then it is better to read about this by clicking
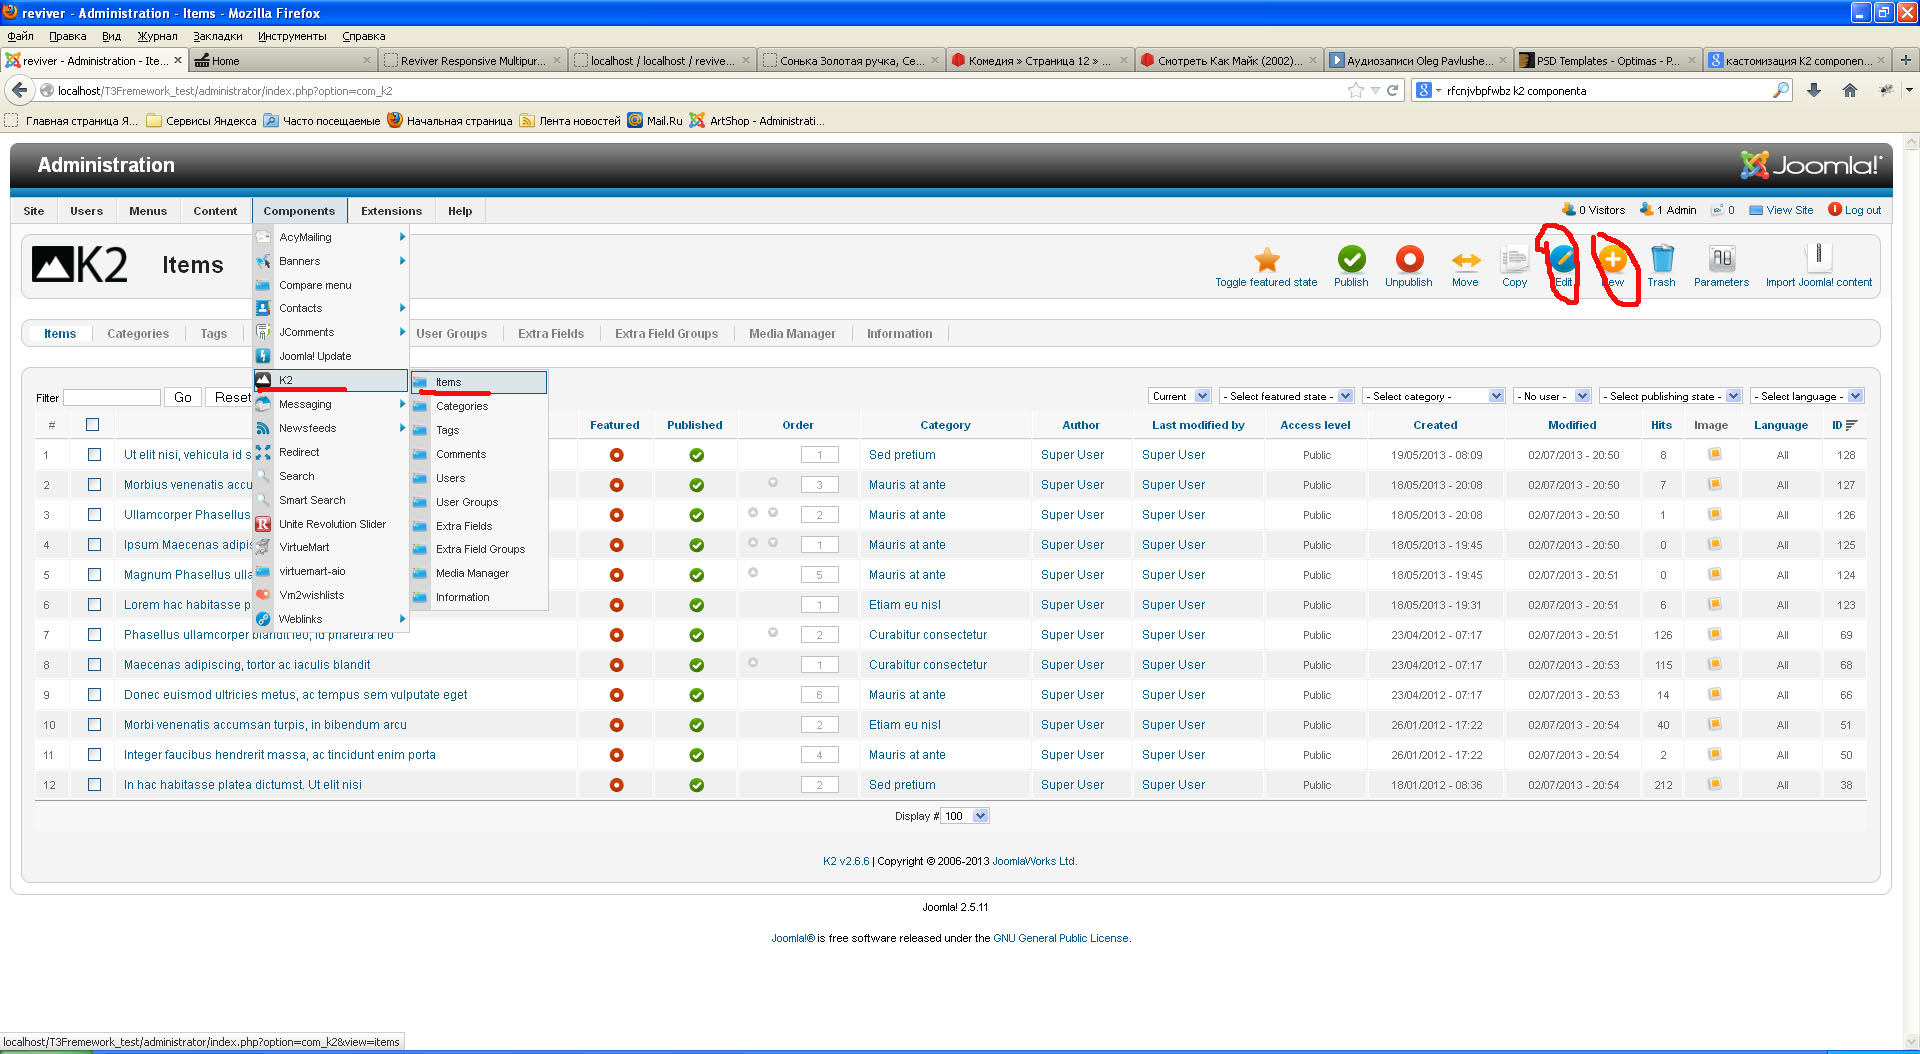
 It is possible to display not the full text on the Blog page, only one or two paragraphs. For this in the text editor you need to separate the necessary text (paragraph) with the code